


So first let me show you how I put together this simple wooden mobile hanger.
See below for the rest!
One 2″ wooden block
3/8″ dowel cut to 9″ length…of course you can go longer or shorter if you prefer!
2 of those circle things that screw into wood. (I know, so descriptive…they had them at Target for $1 or so)
It’s very easy to make, and even easier with awesome tools that my Dad has in his wood shop. I used his drill press to drill 1/2″ into four sides (drew an X with pencil from corner to corner to make sure I was right in the middle!), using the 3/8″ drill.

Then I used a drill bit small enough for the circle things you screw into wood, and drilled into the other two sides (the length of the screw part)
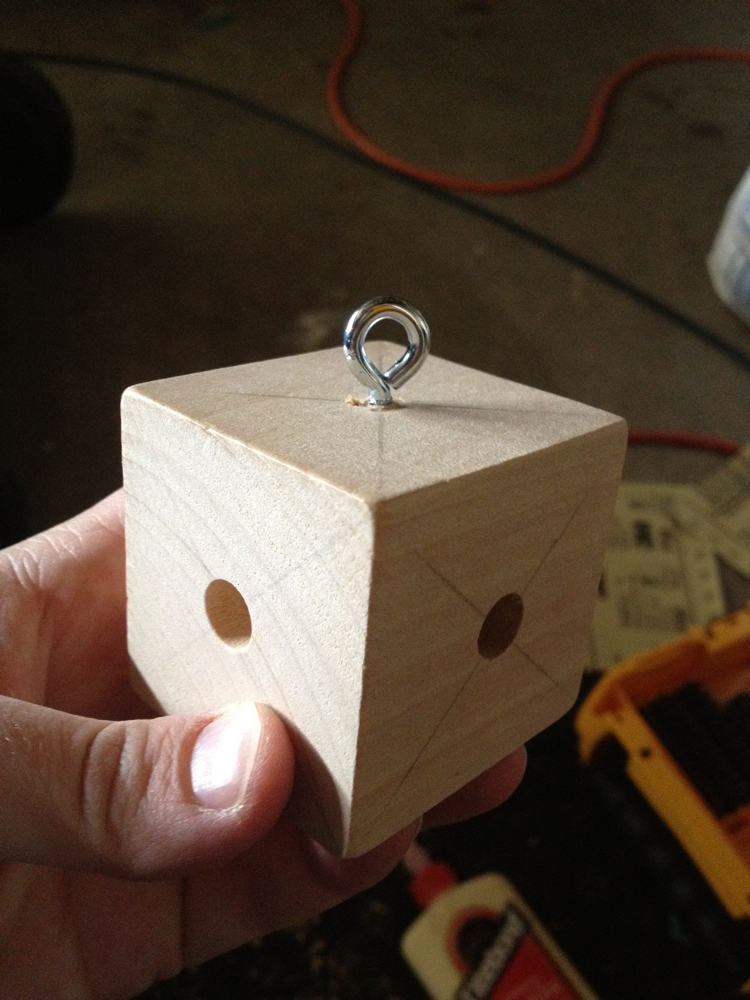
Then screw in the hooks to the hole you drilled.

I also drilled through the ends of the dowels, about 1/2″ from the end with the small drill bit.

Use a bit of wood glue to secure the dowels in the holes, and make sure the holes you drilled in the dowels are facing up and down! They should fit snugly.

Then I spray painted the whole thing (well, I taped off the metal things)…do you like my contraption? I MacGyvered a garden stake, safety pin, and some tape into this…and it totally worked! I was able to spray from all angles and let it dry safely.

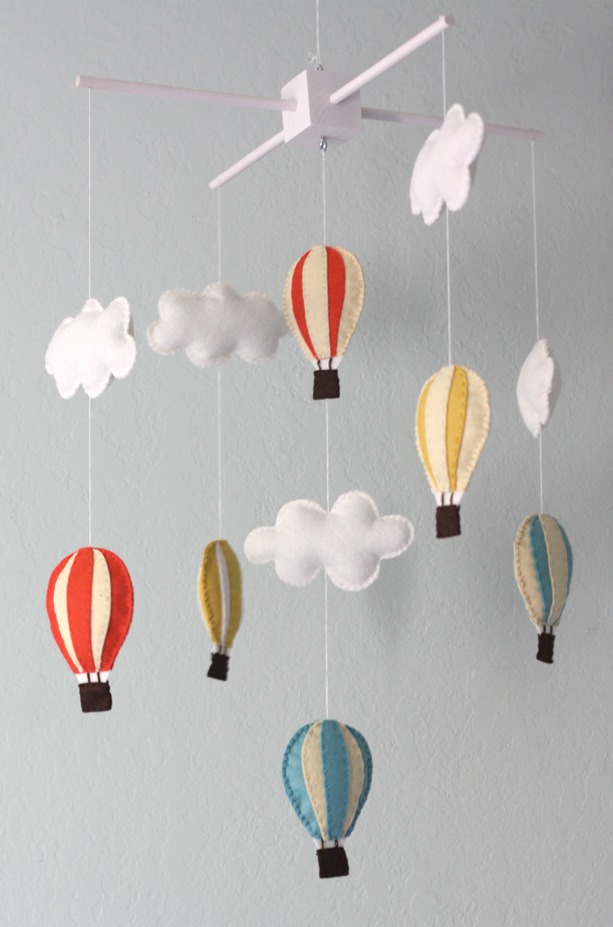
Ok! Now onto the felt part. I made 5 clouds and 6 hot air balloons, so plan your colors accordingly.

You’ll need:
felt
the free pattern
matching embroidery thread, and needles (I used off white, brown, and coral for this one)
hot glue or fabric glue
poly fil
paper clips
First cut out 2 of all the pattern pieces (except the white “sky” part between basket and balloon. Only one of those.)
Then cut 4 pieces of brown embroidery thread a bit longer than the sky part. Dab a few spots of hot glue like so making sure they are close to the edge, and glue the pieces down as shown. Fabric glue would work just as well and you won’t burn your hands as much. Me, I live on the edge so I used hot glue.

Then thread up a needle with 3 strands of the thread, and knot one end. (the other end hangs free) Sew a simple running stitch on the sides of the top panel, sewing it to the middle panel like so. Pinning helps keep it centered.
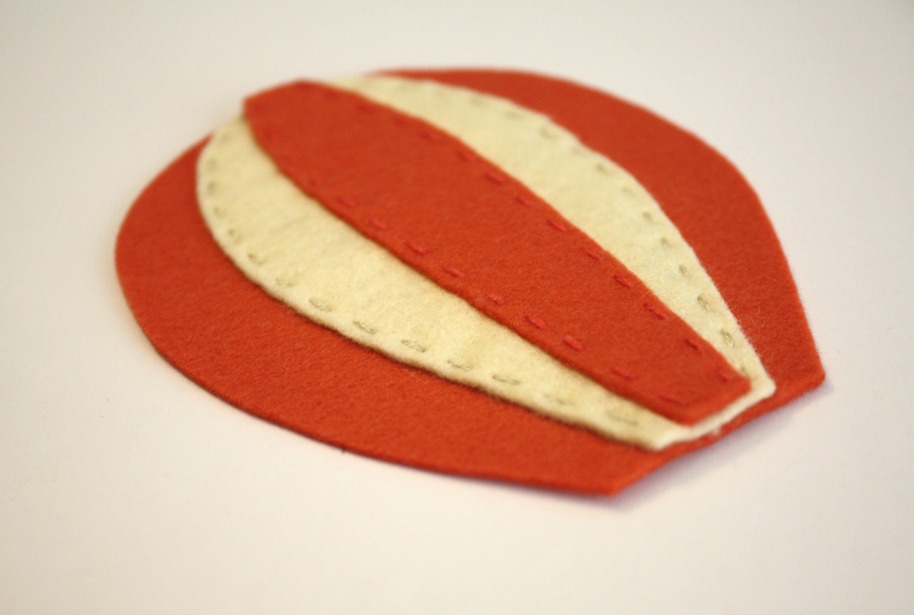
Then threading up the other color, do the same with the middle panel, sewing it to the bottom panel.
This is how I finish the ends, just make sure it’s not visible from the front…then snip it off. It doesn’t need to be super strong since it’s just hanging up.
Repeat for the other balloon side.

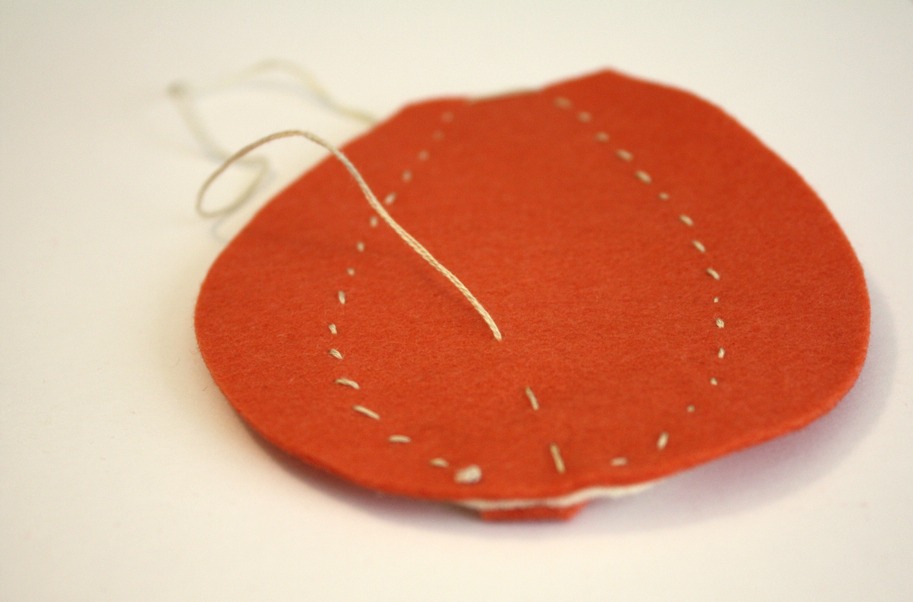
Next sandwich the sky part in between the two baskets, and sew around the outside, again with a simple running stitch (though smaller than the balloon stitching.
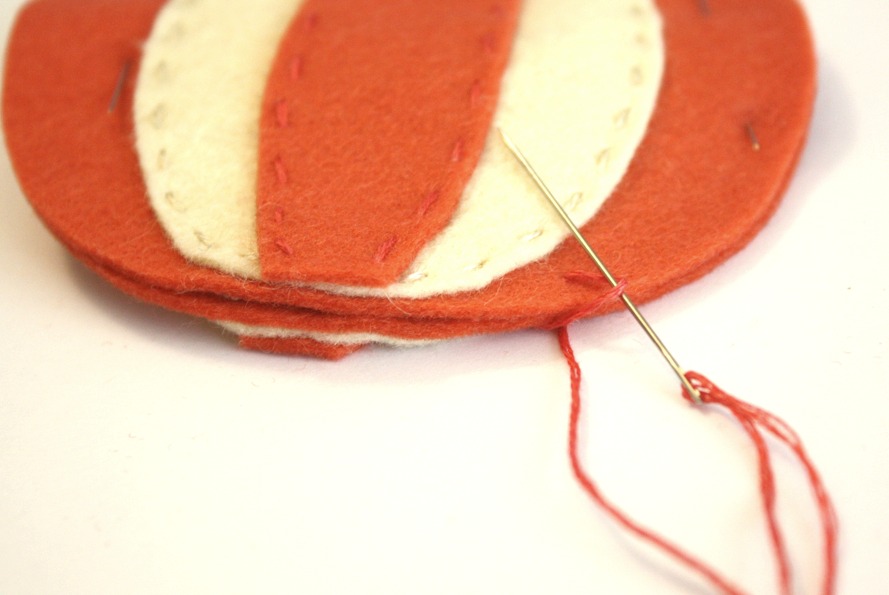
Then pin the two balloon pieces together like so, with the basket sandwiched in the bottom of the balloon.

I sewed it together with a blanket stitch…I’ll try to explain as best I can but there are many youtube videos as well if you need a different visual.
So as the picture above indicates, start your stitches near the top of the balloon, off to the side a bit. Stitch down into the bottom of the balloon piece like so.

Then make a stitch down through the top, a little bit to the right like so.
Then come up with the needle through the loop you created like so, then pull it tight.

Continue and it should look something like this…and then stitch around the whole thing, capturing the sky piece in the stitching as well!
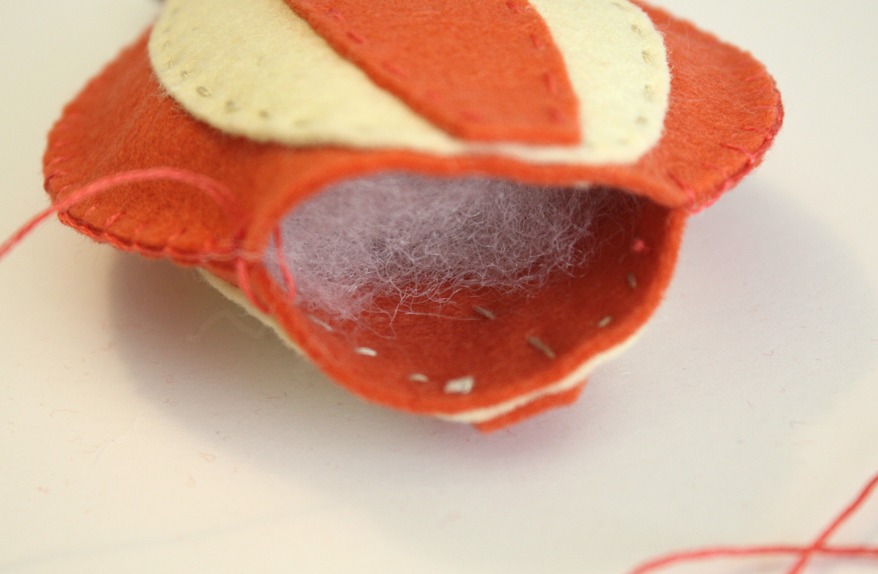
When you get to the top again, stop your stitches and fill with a bit of poly fil. Not too much, just enough to give it some shape.
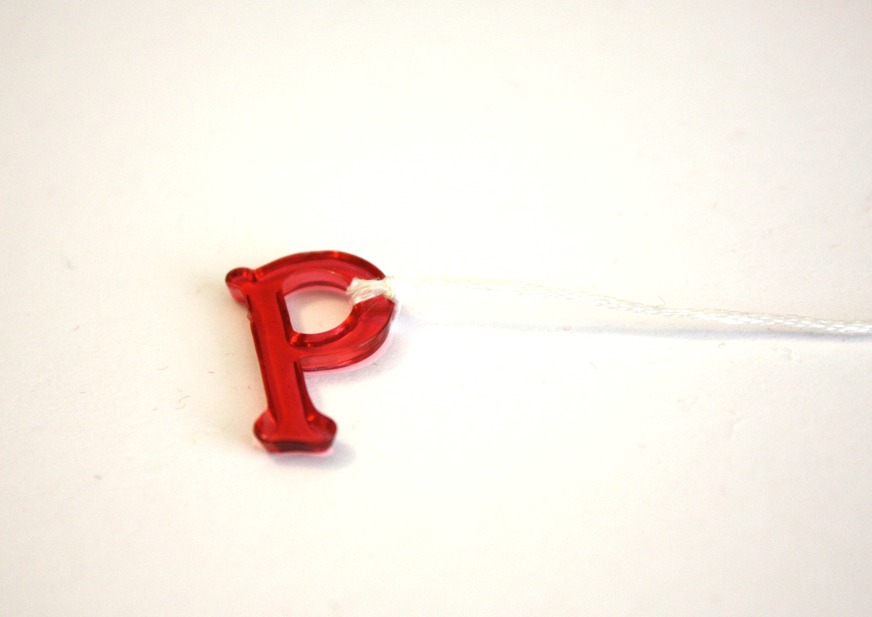
Now is where the paper clips come in, or in my case, I couldn’t find my stash, so I used some plastic scrapbooking letters. Cut a long piece (like 3 ft probably just to make sure it’s long enough) of white embroidery thread (all 6 strands) and tie one end to your scrapbooking letter paper clip.

Then stick it in the open top of your balloon like so and continue stitching it up (make sure the string comes out of the balloon straight or it will drive you nuts)

Next stitch together the clouds-with the blanket stitch. These are easy peasy…no layering involved! Also leave the top open like you did with the balloon, and fill with poly fil.
Then I threaded up the string coming from the balloon on a needle, and sewed through the bottom of the cloud and through the poly fil, out the top hole.

Grab another scrapbooking letter paper clip, and tie it where you want the cloud to hang. Sew up the cloud and you have your hanging piece! Repeat with the rest of the clouds/balloons. I did two balloons in the middle with a cloud in between.

Then when you’re all done stitching them up and have the placement how you like it, insert the thread into each hole, and tie a big ol knot to keep it from slipping out. Tie the center one around the circle metal thing of course.
You’re done! Well, of course, hang it up with some more embroidery thread or string. Ok..now you’re done!
Thank you sooooo sooo much been checking back every day for the tute on this gorgeous make. Really appreciate the time you have taken to make put it together for us!
Dazie
x
This is so cute! Love it, wish I had a reason to make it.
Very cute!
Wow this is soooo cute!
As Katie, I wish I had a reason to make it.
Maybe I should ask one of my girlfriends to get pregnant so I can make one for them :o)
Thanks
Thank you so much for this post. I want to let you know that I posted a link to your blog in CBH Digital Scrapbooking Freebies (please, notice the new url for my blog), under the Page 2 post on Jul. 18, 2012. Thanks again.
Thank you so much for this post. I want to let you know that I posted a link to your blog in CBH Digital Scrapbooking Freebies (please, notice the new url for my blog), under the Page 3 post on Jul. 18, 2012. Thanks again.
This is just too cute! I’m in love with it:)
perfect timing for this pregnant, crafty mamma! sweet as pie mobile and what a generous tutorial you shared. thank you.
This is adorable! Thanks for the tute, Jess!
I love this so much. How stinking cute. You’re awesome.
liZ
I love this so much. How stinking cute. You’re awesome.
liZ
I love this so much. How stinking cute. You’re awesome.
liZ
I love this so much. How stinking cute. You’re awesome.
liZ
Jess, it is absolutely darling! Thanks for sharing it in tutorial form. 🙂
Thank you so much for the tutorial on the wooden part especially. I’m going to make my own mobile, but the “frame” was intimidating me:)
¡Hermoso!
Gracias…
So cute! I love it!
I really liked your hot air balloons then found this too perfect match http://www.decal8.com.au/wall-stickers/hot-air-balloons.html
I’m hoping to knock out a mobile too
Thanks
So completely adorable Jess! I love the colors and your MacGyvered hanger is genius. I’m sure this mobile will be the object of much cooing in the near future. 🙂
THat is SO CUTE! Next I want you to do a tutorial on “the proper way to hang a mobile”. 🙂
So beautiful. Thanks for all your time and effort into the tutorial. Love seeing your creations!
So cool! You can actually come up with a theme to use for a baby mobile project – something you can complement with the nursery design 🙂
Totally cute! Love it! Thank you for sharing…
This is adorable, thank you for posting!
I love love love this, I’m doing a sheep themed room for my son and have been drooling over a pottery barn mobile, not that I would ever spend that much on a mobile. But now I can follow this tutorial and use the cloud and sheep stencils I have!!!
This is absolutely the cutest mobile ever Jess. Thank you so much for sharing it with SewSet! I have featured it as one of today’s top patterns!
Thank you again!
– Jess, SewSet.com
What a lovely mobile! I was looking for a present for our new niece/nephew and I think I found it! Thanks for the tutorial and pattern!
Thanks for the awesome tutorial! Just wondering where you happened to find the small 2″ block. I am inspired to make one of my own!
Hi Jess! First, I love your blog! I’m using your nursery as inspiration for our little girl’s nursery – I love the colors so much. The mobile was fantastic and I decided to make one of my own. Your tutorial was great and easy to follow – thanks so much!
Here’s a link to my finished mobile… Thanks again!
http://makebakeandlove.blogspot.com/2013/05/hot-air-balloon-mobile.html
I truly loved this mobile and I worked on it al spring.
Yesterday I gave it to my sister, she is pregnant and has a balloon theme for her child.
She absolutey loved it!!
Thanks so much en greetings from the Netherlands!!
Esther Buitelaar
P.S. She also used the balloon stickers what is a great combo
Thank you so much, I made an owl mobile using your general guidelines and I absolutely love it! I never would have been able to do it without this tutorial as I am not particularly crafty or artistic. And the best part is, I can make anything now! Other animals, cars, planes etc!
About how much felt in total did you use?
Not sure, I used mostly scraps 🙂
Those “circle things that screw into wood” are called eye screws, btw. Now you know!
you have no idea how much you have helped me with this thankyou so much!
Thank you so much for sharing this pattern. Expecting first grandchild soon and will be greatl for the nursery
Oh I have to have a go at making this for my little boy’s room – Thanks so much for sharing as it is gorgeous x
Thank so much for this. Looks easy maybe I can do myself!
Hey, I am currently making two of these, one for myself and one for my sister in-laws baby!
Great instructions 🙂
Love this tutorial & pattern! Having trouble with how to thread the sting through the centre piece (the one with 2 balloons) – how did you thread the string through the top balloon without it showing in the “sky” section (that does not have double layer of felt)?
I guess I am not sure which step you are stuck at-can you reference a step or picture?
Hi Jess
I mean the middle hanging piece which has balloon at bottom, then cloud, then another balloon at the top…Did you thread the string through the basket (top balloon) from the cloud then have it visible when going through the sky piece? I just notice that the sky is only one layer (not 2 like the balloon, cloud etc). Or did you tie off the string at the basket then start another string at the top balloon section… Sorry if I’m not making sense & thanks in advance for your help!
The string only goes through the balloon, not the sky portion, that’s separate…you can see I tied it to a plastic letter (or paperclip) to keep it from slipping through the balloon seam. Does that help?
Excellent – thank you!
Love the mobile design and fabulous tutorial (extremely clear). Your instructions gave me the courage to try making this for my daughter’s first child. Thank you.
fabulous!
I love this pattern. I am making this mobile for an Aged Care Centre. They love bright coloured items
hehe.. i saw a picture of the clouds and thought i could recreate them and make them as earrings for my friend 🙂 i can’t wait to lol-
Excellent – thank you!
it looks ADORABLE!!