


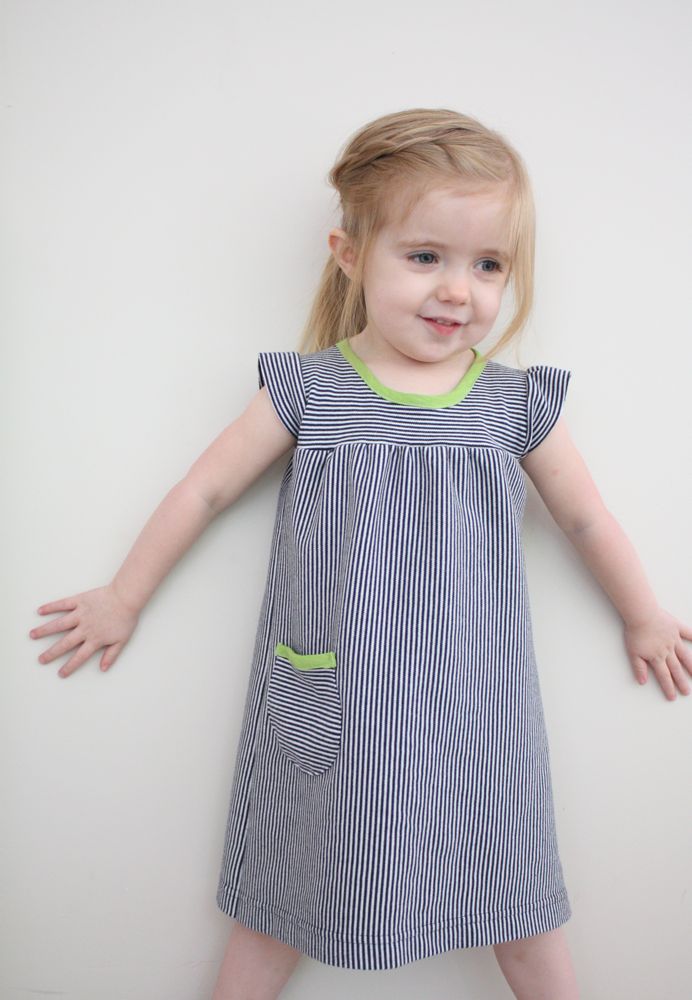
I’ve been getting better braver at sewing with knits, and I spotted this cute dress and knew I had to make one just like it! I also just happened to have a tee shirt in my refashion pile that was the same striped print, and some green knit, sooo….I went for the whole she-bang with this refashion/knock off!
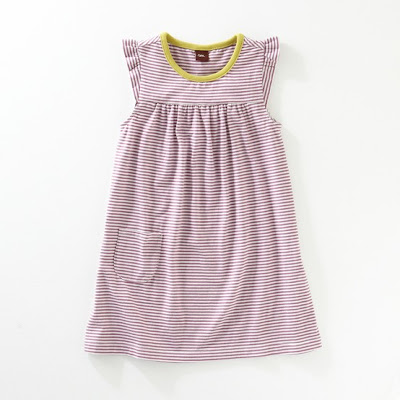
[inspiration dress]
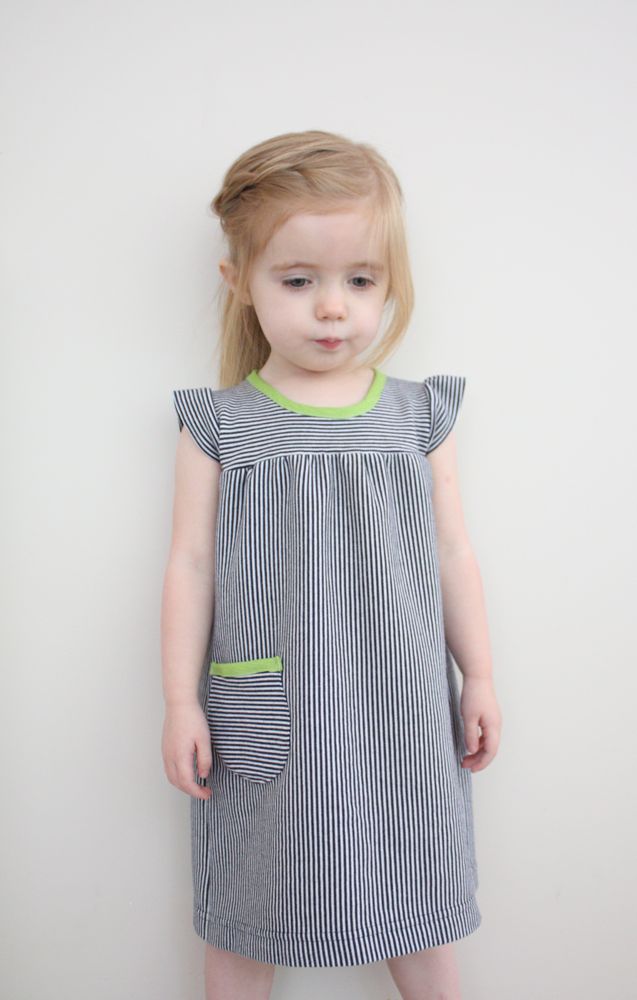
[pretty darn close]

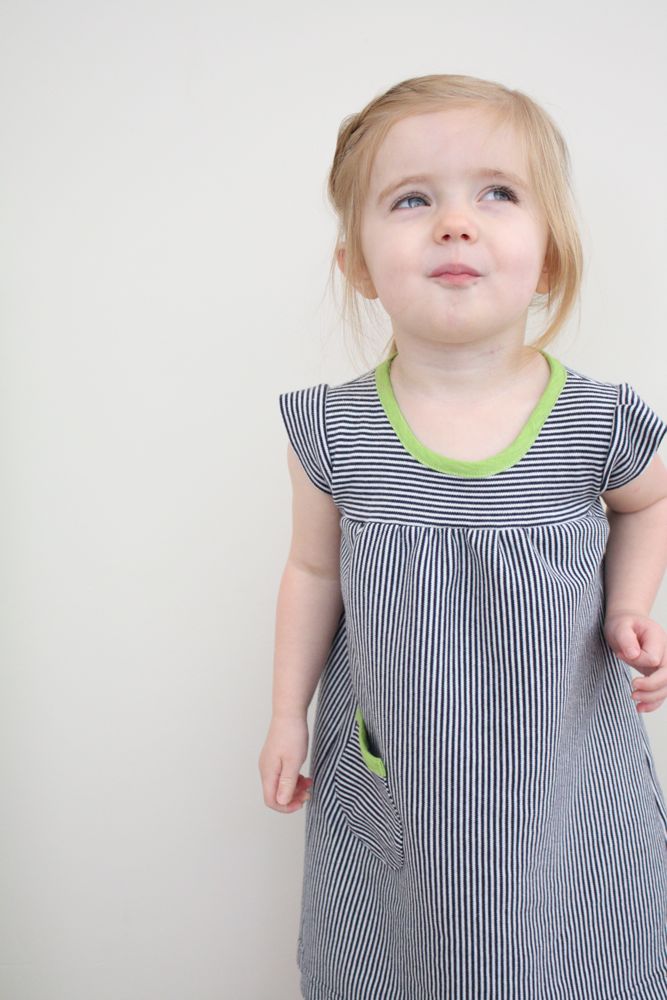
Just about the only thing that I did differently was to add some green to the pocket-it helped it stand out more. I wish I had been able to gather my flutter sleeves more but oh well. I was working with limited fabric.
Click below for the how to!
You’ll need:
large tee shirt if you’re going to refashion route, knit yardage if not. (how much depends on your child’s size of course.)
ballpoint needle
matching thread (polyester works well with knits)
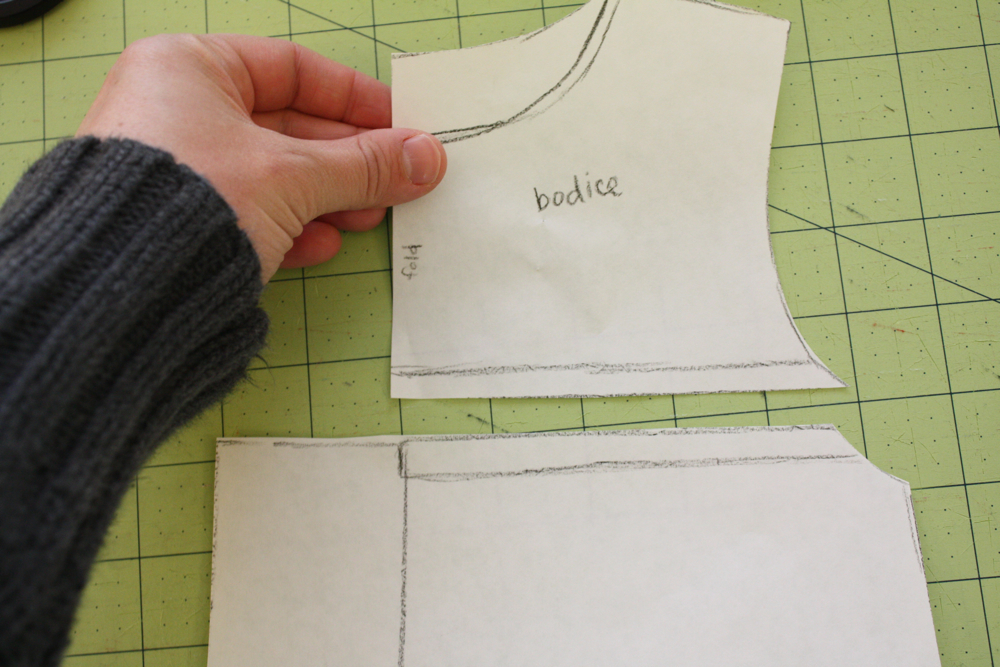
I have a bodice and sleeve pattern available in size 2T. Sorry it’s only the one size, but I am only one woman, and not quite ready to delve into pattern sizing yet. It might work to scale up or down on a printer, not sure how to do that though. Good luck if you try!
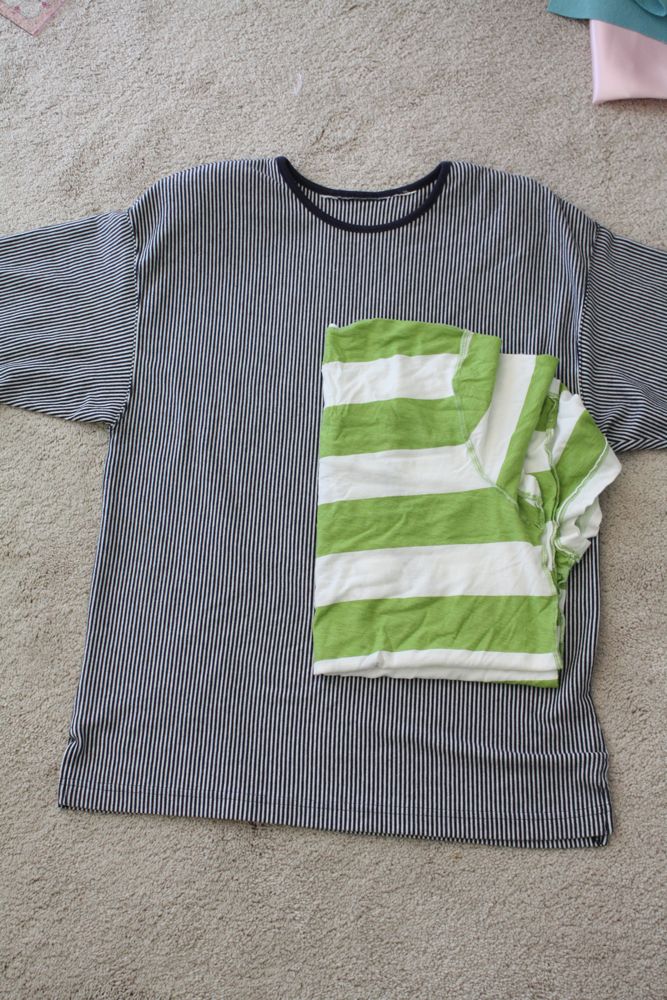
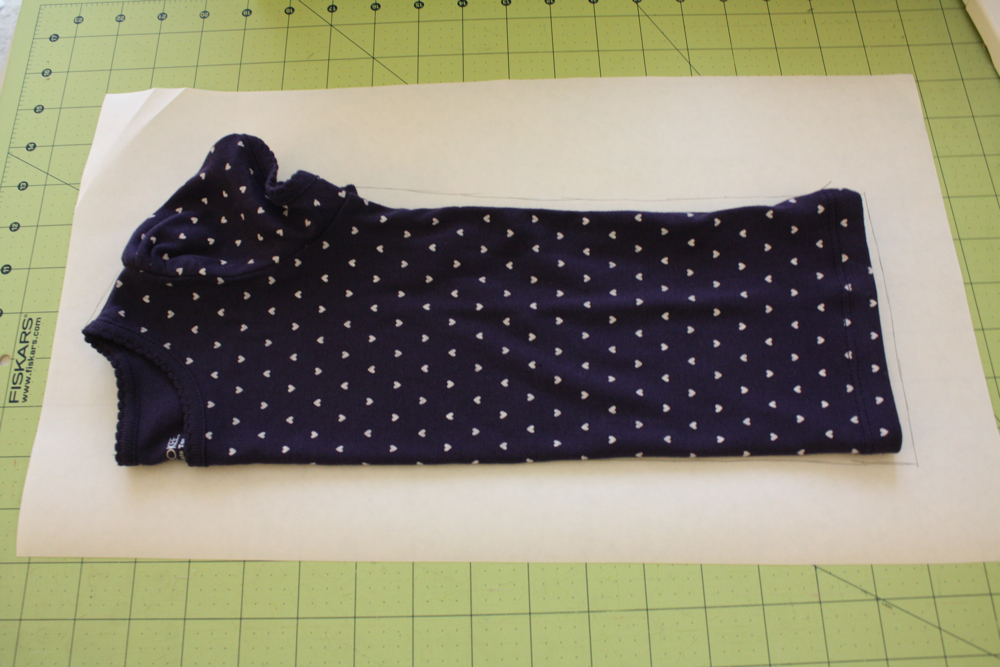
So here’s what I started out with-some thrifted shirts. Thrift stores are great places to find knit tees to refashion-our local stores often have quality tees that are in great shape!
So first you’ll need to make a pattern if you’re not using the 2T pattern. Using a tee shirt that fits your kiddo, trace around it to make a basic pattern.
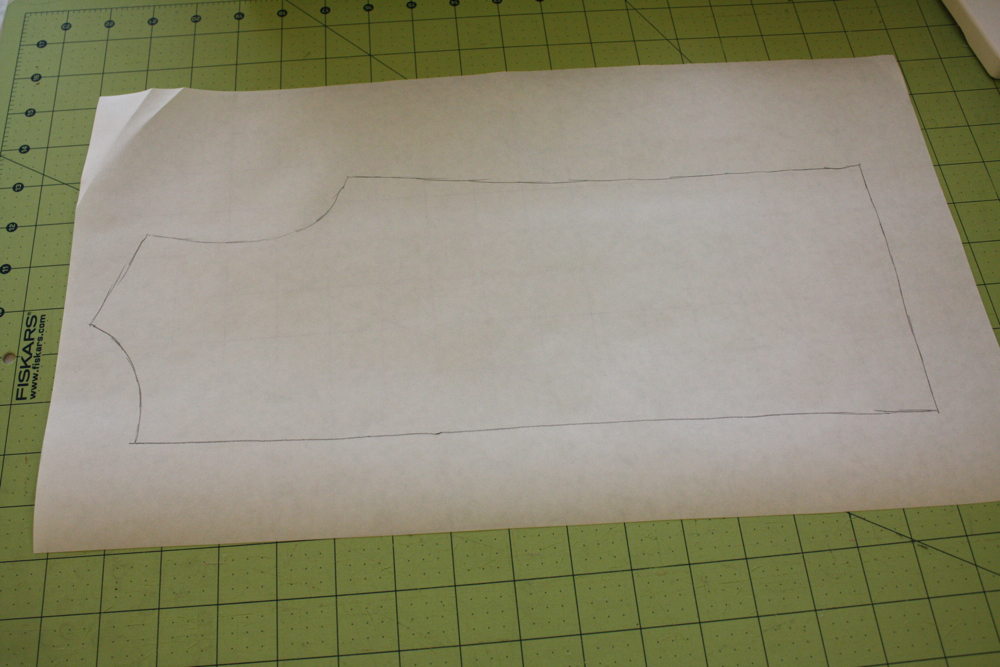
tada! easy peasy. Make sure to add in seam allowances on the side of the shirt, armhole, and shoulder seam. (I usually add 3/8″-1/2″) Trace the front neckline too. (I ended up scooping mine lower than this tee, it didn’t fit the first time-Sadie has a big noggin)
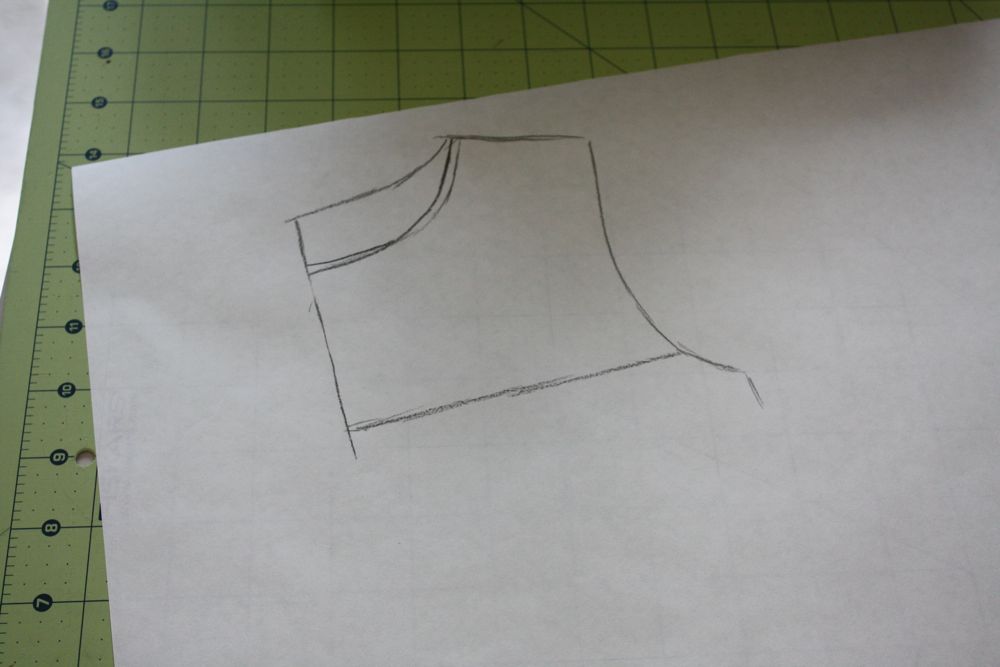
Next I cut out my pattern and traced the top part of the pattern again.
I wanted to have the front bodice go into the armhole, so I drew a line where I wanted that to be. Then I added seam allowance to that line. (you could easily just have it join together under the arm, I just have a habit of making things harder than they need to be)
Then, for the skirt pattern, I traced the armhole again, across where the bodice ended, and then drew a slight A-line dress shape. (you can measure your kiddo to see how long it should be)
Added seam allowance to the top of that pattern piece too.
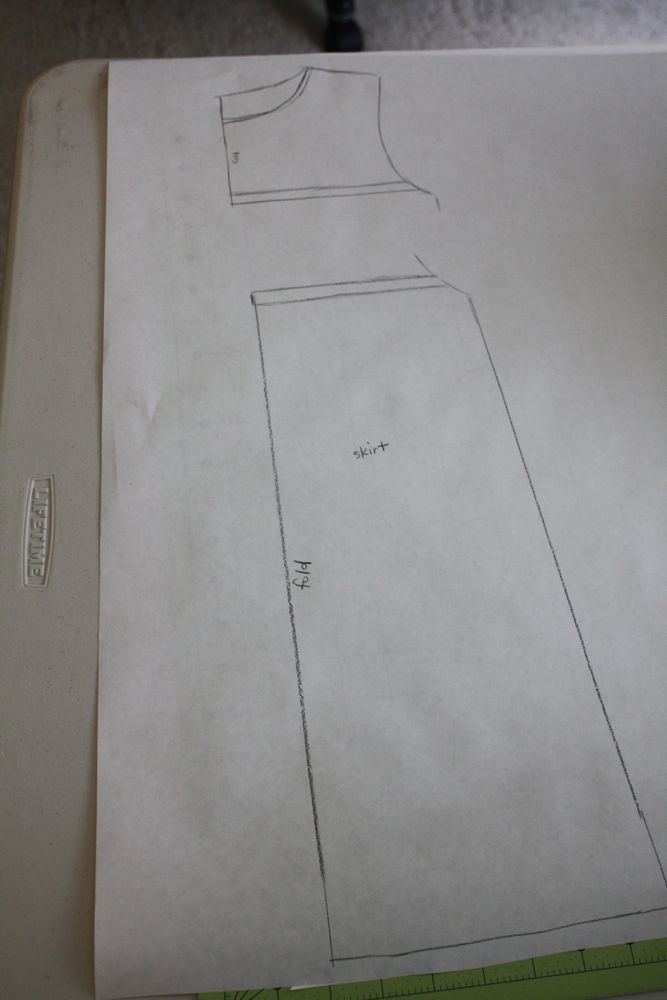
I also added about 3 inches to the skirt’s fold line for gathers.
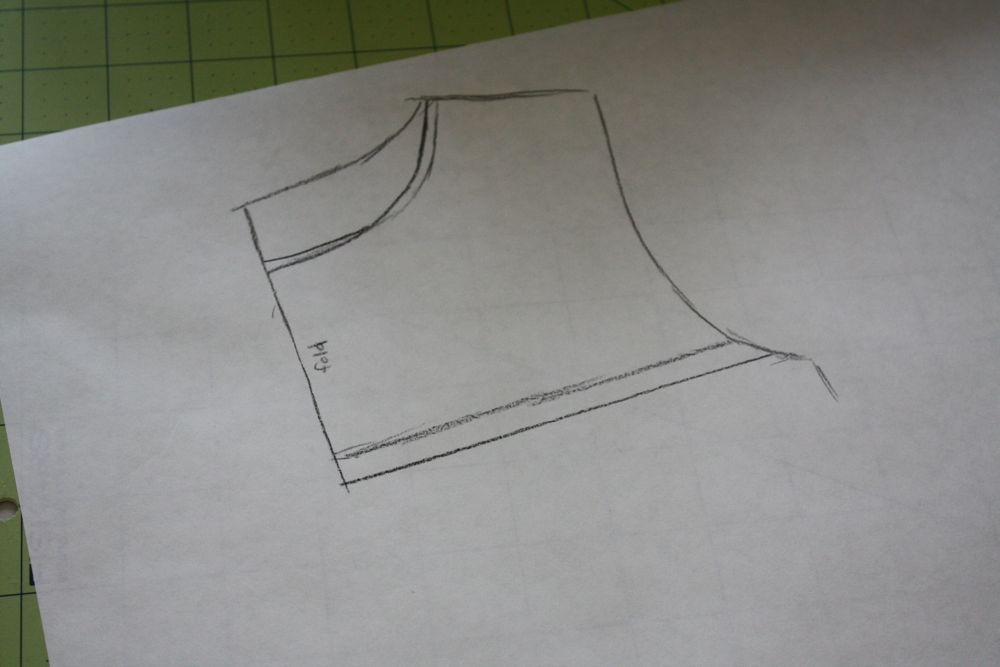
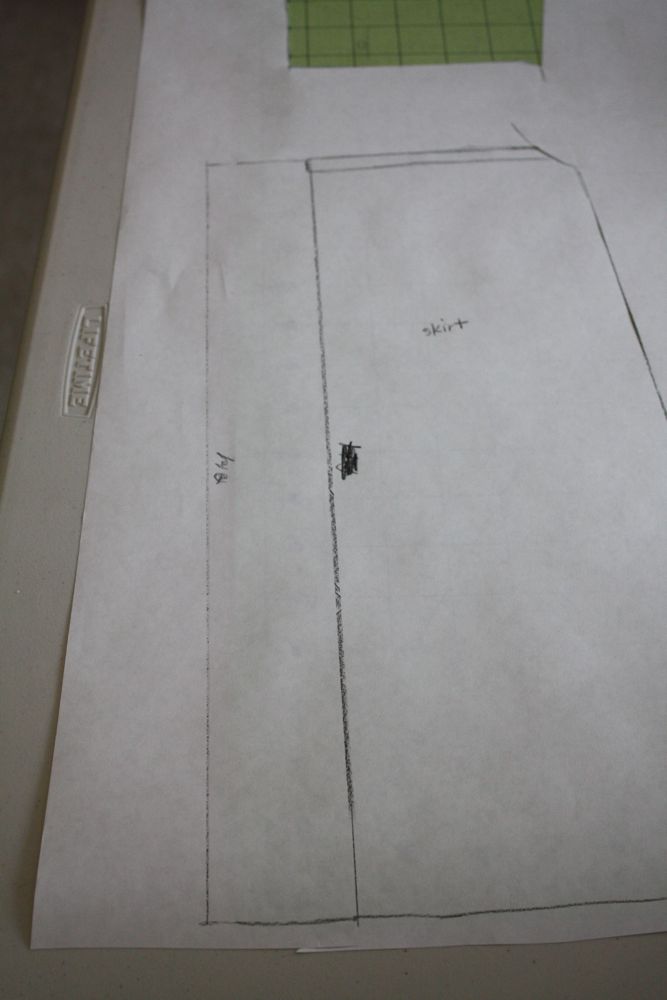
If you’re using the pattern I provided, here is a picture of the pattern on my measuring board for reference. From the fold, on the bottom is 9″, and the skirt is 18″ tall. (basically an 18″x18″ square) At the bodice it’s 7″ wide (folded), and then I cut it at an angle from the bottom to the top. You’ll also need to cut a little bit off the top corner for the armhole. Hope this pic helps!
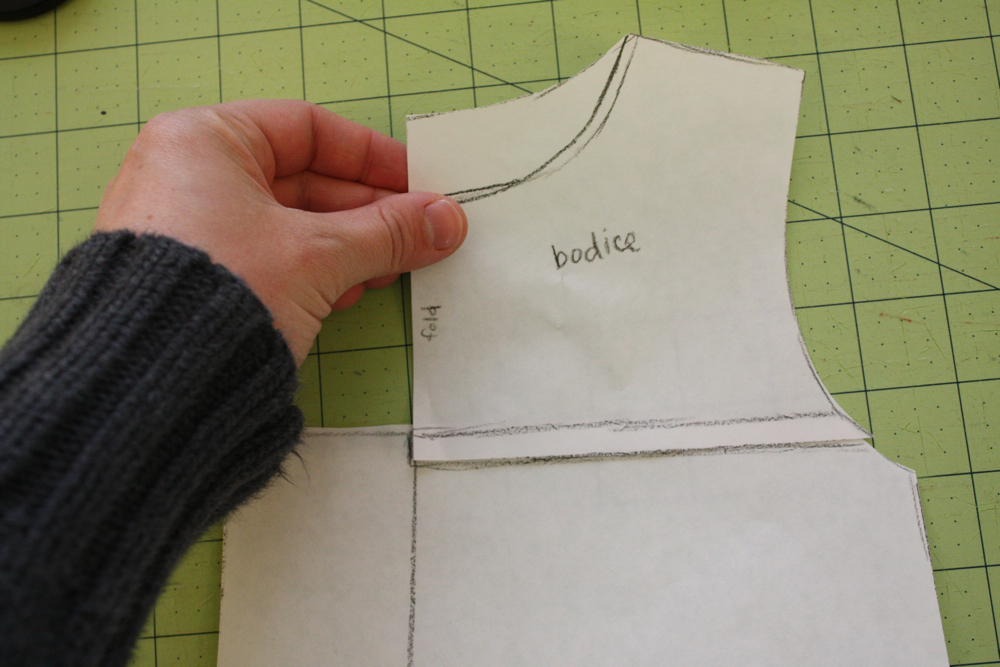
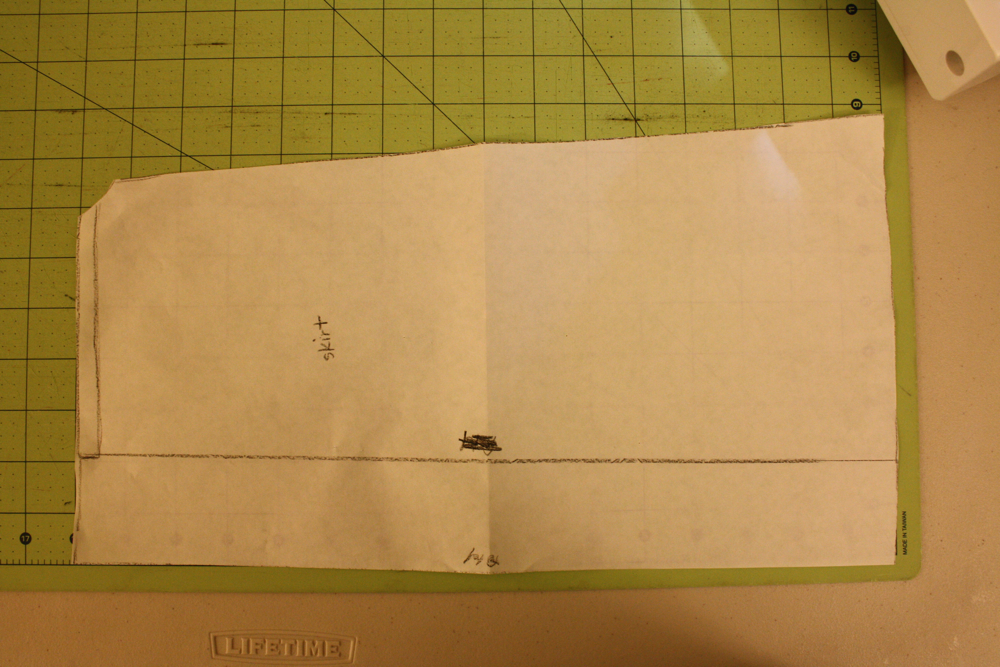
So now the pattern pieces should fit together like this. (with the seam allowances stacked, and seam lines matching up)
Tada!
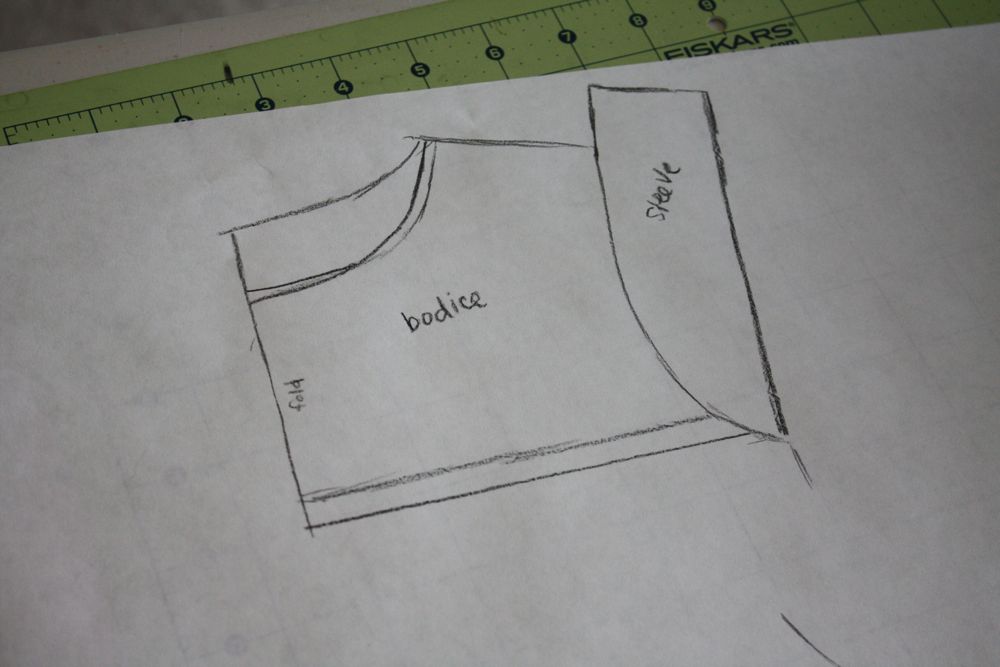
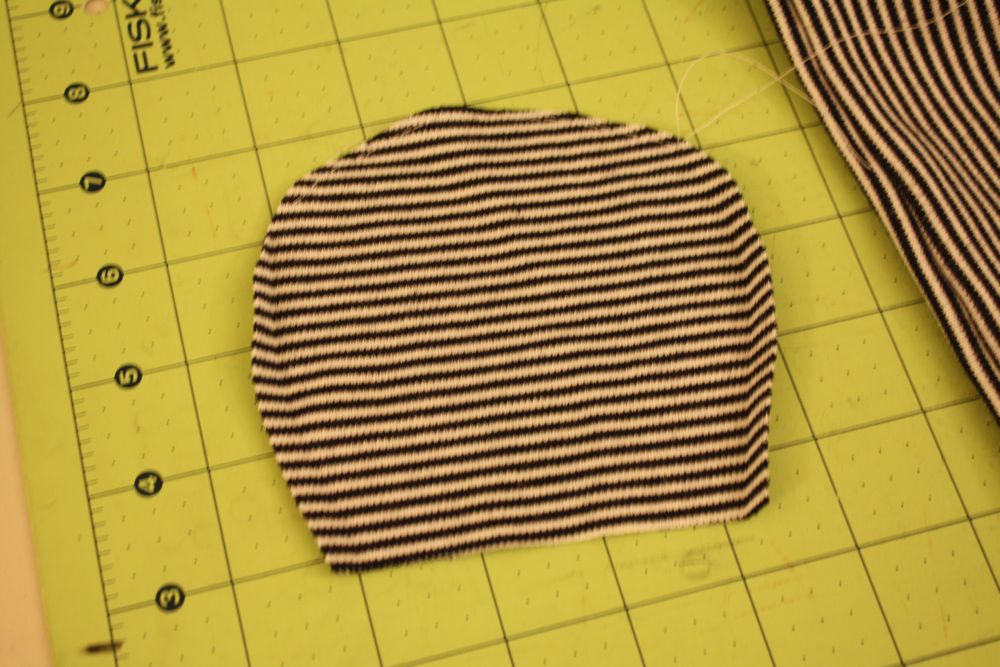
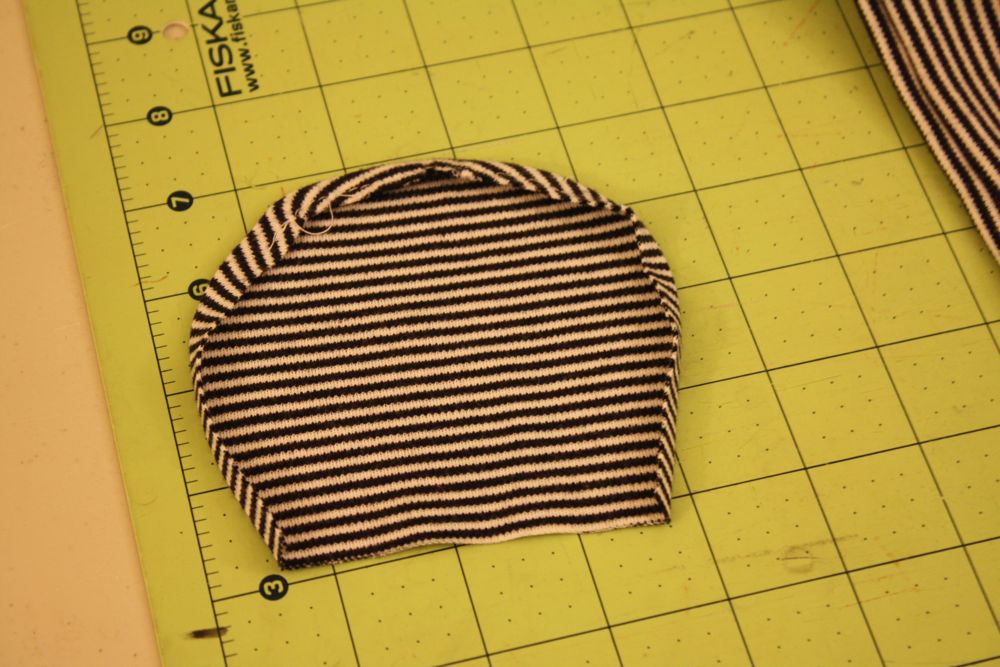
Then I made a sleeve pattern by tracing the armhole, coming up a few inches above the shoulder seam, and back down. The extra room up top is for gathering. The top is the fold, sorry didn’t mark it in that pic.
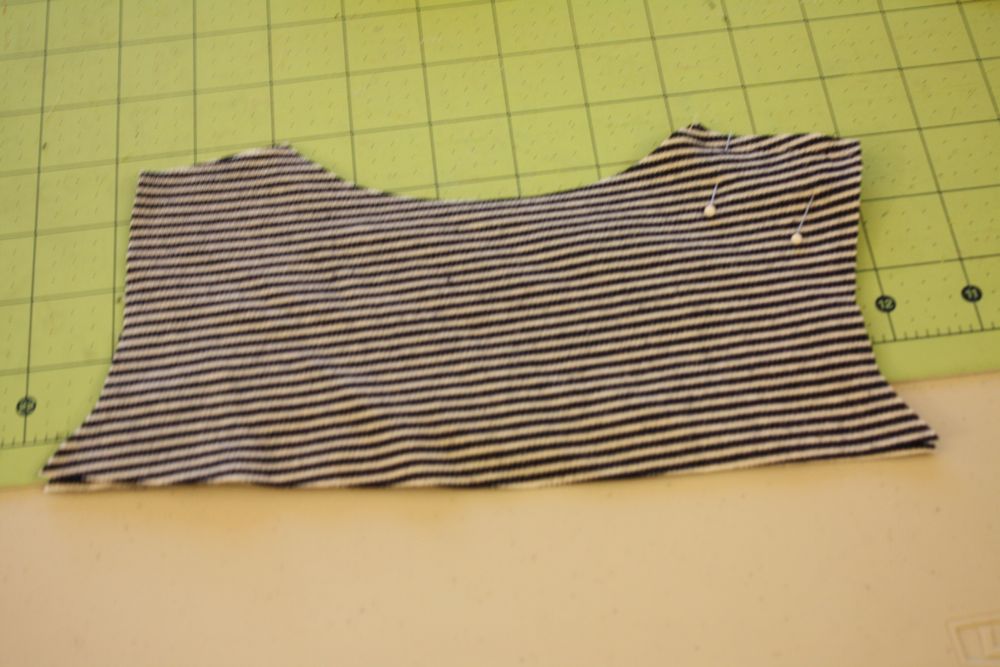
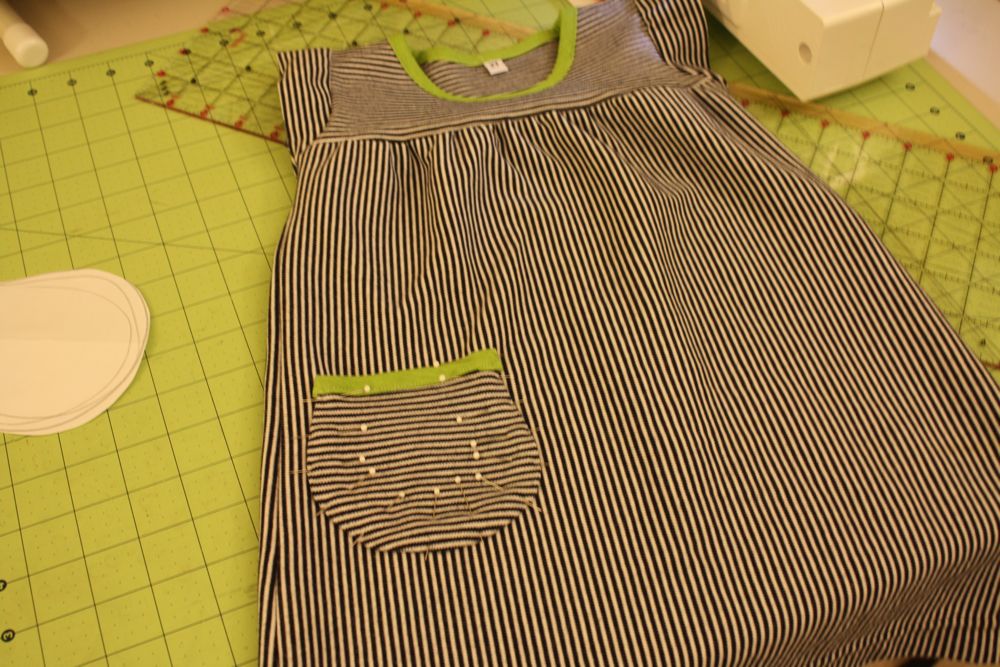
Then I cut two of my skirt piece, 1 of my front bodice, 1 of my back bodice, and 2 of the flutter sleeves. (all on the fold)

I cut two strips of my jersey fabric (doesn’t need to be on the bias) 1.75″ wide. I cut them as long as my fabric allowed and trimmed down after making the neckline and pocket.
I use spray starch to get the knit to sit still, it works wonders!
So, now pin one shoulder seam right sides together and sew.
Then make some “bias” tape by using these instructions.
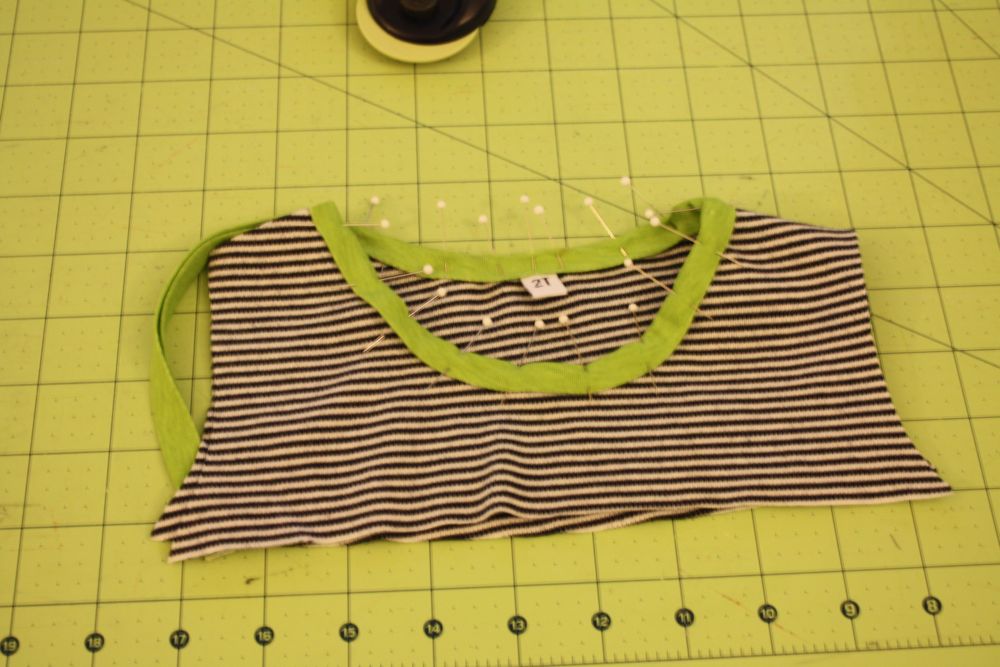
Then start pinning at one side of the open shoulder seam, enclosing the raw edge, and continue around to the other end. Insert a tag here if you wish! Then sew close to the edge, making sure to catch the other side of the tape in your stitch.
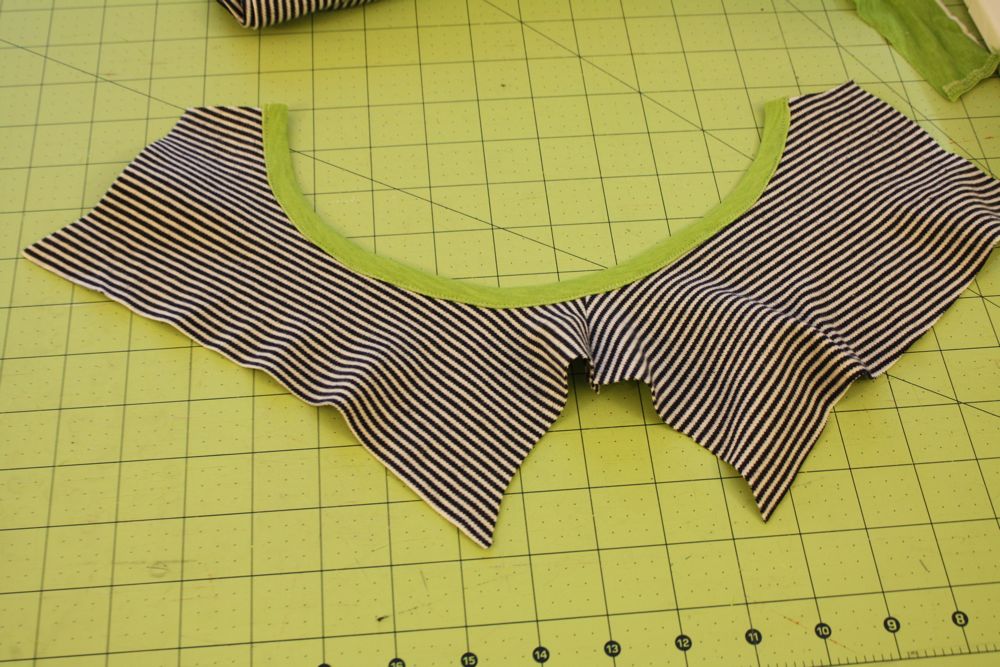
Then give it a good steam with your iron and pin the other shoulder seam (RST) and sew together as well.
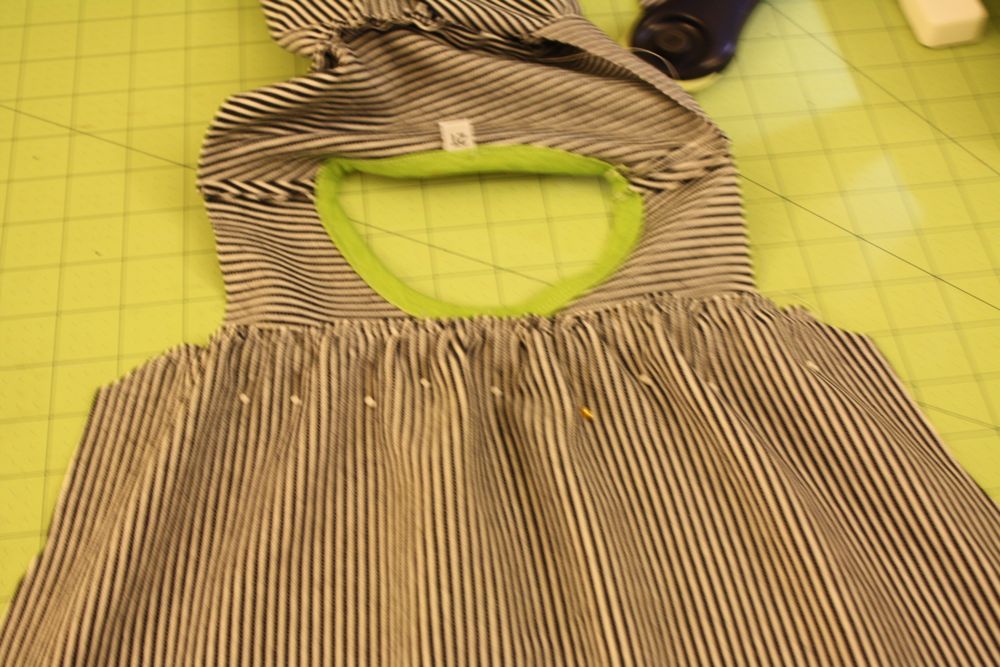
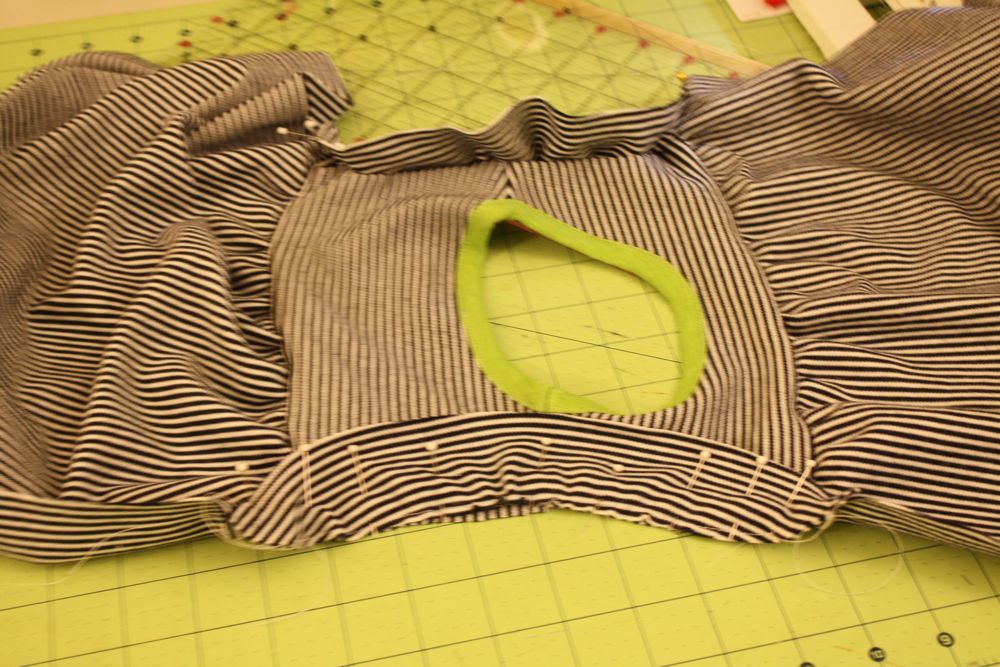
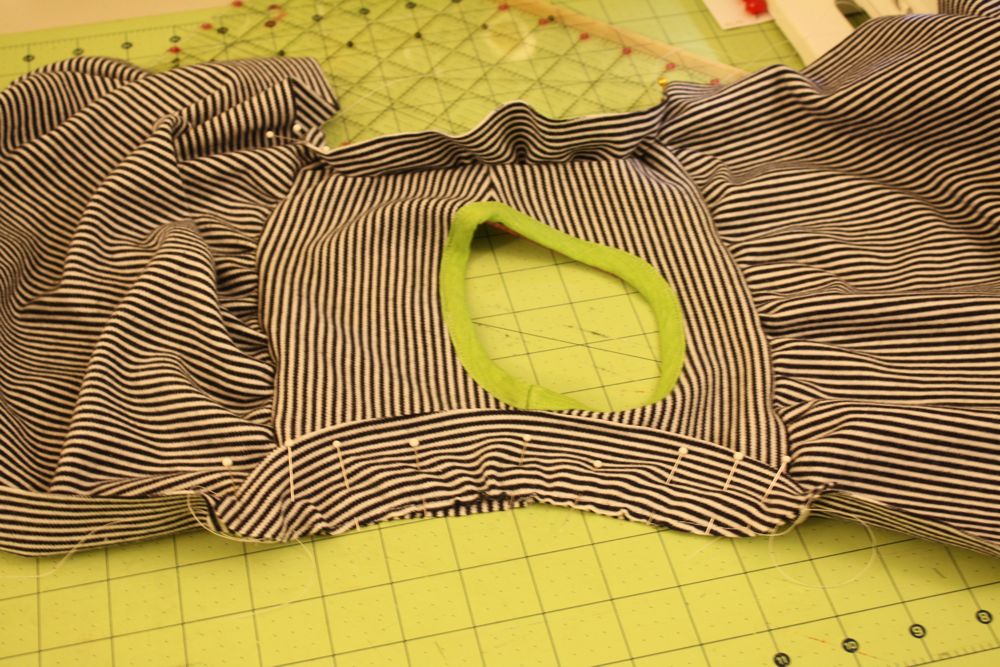
Next, sew a gathering stitch along the top of the skirt panels and gather to fit the bodice. Pin and sew both of those together.

Then sew a gathering stitch (I didn’t have much room to gather since I wanted to fussy cut my sleeves to have vertical stripes) along the curved part of your flutter sleeve, and gather to fit your armhole.
Then pin them right sides together, and sew them together.
Next pin the skirt panels right sides together and sew those up as well!
For the pocket, I drew a quick pocket pattern out, just a simple shape. Cut it out, and ironed the sides in about 1/4″. You can see where it started curving it got tricky. So I sewed a gathering stitch just along the bottom curved part, pulled one of the threads to gather it, til it pulled the raw edge in nicely. Pressed that.
Then I sewed the tape on to the pocket following the instructions here, and then pinned it where I wanted it on the dress, and sewed it on!
All done! Now you have a comfy and cute playdate dress!
Do let me know if you have any questions. Thanks!
Really beautiful! I love how it feets your girl. I am going to make one for my little A, too.
Thank you!
It looks great, so cute and comfortable!
Looks fantastic Jess! I really admire your work. I swear I will one day tackle sewing with stretch fabric…………
Love it! Just gorgeous. I need to make one for my wee one.
to.die.for. seriously you make me wanna find a little girl to sew for.
I like yours better than the original 🙂 Maybe one day I’ll be a bit less chicken about knits and try this dress… you made it look so easy
I have two questions:
1. Could I use this pattern for the Leah dress? I have a fear of sewing without patterns but really want to make that dress.
2. Could you give me a measurement on the bodice. I printed it out at 100% but it looks small to me. You mentioned in your post something about 7″ at the bodice but I wasn’t sure if you were talking about the actual bodice or the width of the skirt where it attaches to the bodice.
Thanks, I can’t wait to start this. I have a huge fear of knits but am trying to get over it!!
super cute! i want to make one for my girls!
Very cute! Looks just like the inspiration dress!
I’ve been itching to knock-off a Tea Collection dress forever, and now I may just have the courage to do so! Thanks SO much for sharing your tutorial – it’s the perfect playdate dress!
very cute, Jess! I have one question… where did you find the 2T label? I’ve been wondering where to find similar ones for the clothes I make my kids.
You read my mind. I was just searching yesterday for a tute on making a simple knit dress.
You rock!
You never fail to impress me Jess!
Do you have any tips on sewing on the bias tape without pulling the fabric too much? Last time I tried to sew bias tape on knit it stretched and “lettuced” on me.
Way cuter than the inspiration dress.
how precious! and i like yours WAY better than the inspiration dress! it was cute but yours is perfect!
I love all your tutorials, so fun and inspiring!
I better get sewing, my list of to-do’s is getting longer.
I think yours is better! Love all the outfits you sew up for your kids. Inspiring, to say the least!
jess, seriously, you are my kids clothing sewing idol. I’m totally making this (x2). 🙂
I Love it!!! I’m going to make this today!!
ARGH! I love this sooo much! I’ve been wanting to sew a tea collection dress, too, so this is PERFECT. Cannot wait to make it for my 3 year old…thanks for the tutorial!
This dress looks great!! 🙂 I love that you were able to reuse a shirt. I also like the contrast trim. To those making their own patterns, make sure the shirt you’re using for a pattern and the fabric you’re making your dress with have similar stretch (or add extra material as necessary). It took me a while to figure that out. 😉
Gorgeous! I want one for my little girl!!
I have basically the same question as this:
Taylor {Sew Much Love} said…
You never fail to impress me Jess!
Do you have any tips on sewing on the bias tape without pulling the fabric too much? Last time I tried to sew bias tape on knit it stretched and “lettuced” on me.
Anytime I sew with knit I ended up with it stretching and then gathering up together/puckering. Any suggestions on how to sew so it remains flat??
THanks!
yay, I just love the shape on this dress! Too cute! Simple and sweet, perfect!!!
Yay!!! A pattern! Thank you!
It’s printed and I just have to get to joanns to ge ta ball point needle…..
So cute – I LOVE tea clothes, and I can’t wait to try this. I also have to get braver about knits!
OK: to answer some questions (since I always forget something while finishing up at 11 at night, lol)
@ Casey: This dress is slightly different than the Leah tunic, it has different sleeves and the Leah tunic has a rounded bodice, but it would look similar, yes. The bodice measures 5″ across the bottom-equaling a 20″ chest. The reason the skirt is 7″ across is to allow for the gathers.
@Krystina: I got my labels on Etsy and love them! You can find the shop here: http://www.etsy.com/shop/worldsalelabel
@Taylor and It’s Sew For You: I use spray starch to make my bias tape and it helps so much to keep the knit from curling and stretching. Also, pressing with your iron after sewing it on kinda of shrinks up the stitches and everything kinda falls into place.
@ Emily: Great tip, thanks!
As always – I love it! I also love that your little girl is the same size as mine so I can use your template! THANK YOU
Oh that dress looks just like the one from Tea. Even better actually. When it popped up in my Google reader I totally thought it was one of theirs! I recently got their catalog and have bookmarked a zillion things to make one day. This may just have to come to the top of my list. It looks soooo awesome. My problem is that I can’t use thrifted tees since I need to make it in a size 7. Good thing I’ve got a knit fabric hoarding problem 😉
It came out great! Quite cute.
I’m just in awe at how many cute things you whip out! Seriously! You are super-woman!
thanks for sharing! it’s a lovely dress
No need to apologize for only having the pattern size you used available to share; it would take an insane amount of time to create multiple sizes and you really do give fabulous instructions for making your own patterns. 🙂
I think I have the opposite problem as you–I love to sew with knits but am just getting started with sewing kid clothing using quilting-weight cottons. The serger is my absolute best friend when sewing knits because the stitches are automatically stretchy enough for knits. 3 cheers for sergers!
holy moly i wish u had two little boys! haha i found your blog thru pinterest and im IN LOVE! you are so talented!
I LOVE IT! I actually saw a little girl at our storytime who was wearing a long shirt very similar to this. I sketched some pictures to try to attempt it later. It had two pockets on the front (same shape as yours) and I think it had some gathers or small pleats in the bodice. I’ll have to look at my drawing. You did a great job and the dress is adorable!!
I recently started sewing and you have really inspired me to try new things and have taught me many things as well! Thanks!
Beautiful as always =) Thank you.
amazing!! I’m definitely going to give this a try!
I like it a lot. Hope to give it a try one day
hey Jess – I saw you were having a giveaway from Incomparable Buttons (from their ButtonMad blog). Sign me up!
So that’s how I heard of your blog, but I was perusing your tutorials when I found this one. I had no idea that it was TODAYs post, but I love it! I’ve got a 2T little girl and I’m going to try it 🙂
(Oh, and I LOVE the little hedgehog button on your previous post – totally makes the outfit!)
I love this!! I think I’ll make this very soon for my 15 month old. But one silly question about sewing with knits: What sewing stitch did you use for this dress? Zigzag, longer stitch or just regular? Thanks!!
Super super cute Jess. I love the simple, comfy, girly style. I just might have to make one for Olivia. 🙂
P.S. Yours is way cuter than the store brand dress. Way.
First, love tea clothing.
Second, love that my daughter is almost a size 2. Makes things easier although I’ve dived into attempting to draft my own patterns. It’s been fun. If you have time visit my blog: bekatelyn.com
Okay, now I really need to sew up some of the stuff you do. I’ve pinned it all on pinterest but now I need to sew.
Seriously inspiring! I have a beautiful yard of knit fabric and am anxious about sewing with knit… do you have any good resources for “how to?”
I think yours is far cuter than the inspiration dress. Thanks for the tute, I’ve been wanting to make up some quick summer dresses for a friend with 3 girls ages 3 and under (I know, right?) but am nervous about the sleeve thing (my friend prefers dresses with little sleeves rather than straps, all her girls are very fair and sunburn easily). This tute explains and shows the sleeve thing so simply I think I can do it. Thanks for the great blog.
I am SOOO going to have to make one of these for my daughter! I love the clothes from Tea Collection, but they’re usually outside of my budget.
I linked to your tutorial on Craft Gossip Sewing:
http://sewing.craftgossip.com/tutorial-little-girls-playdress/2011/05/29/
–Anne
Love this tutorial & pattern.
However I do have a question. Is there a way to get the pattern pdf without having to have a facebook account? it keeps asking me to sign into or sign up for facebook and I don’t want to do either.
Great as usual!!! You are amazing, I´m going to try it, but I´m just wondering, should I make any measurement of the girl´s head to draw the neckline? I am afraid of making it too small since it hasn´t any closure…
This is adorable! I love the striped knit.
wow amazing tutorial – as in I think I could do that in a larger size! thank you!
So cute! I love the trim you added to the pocket. It looks better that way. That fabric is messing with my eyes… it’s like an optical illusion. Are you trying to hypnotize me?
this is AWESOME.
I have been looking for a dress tutorial for something JUST like this! I have several of that Tea dress for my daugther and always wanted to make some more. Thanks for this so much!!!
Do you think it would be possible for me to use this pattern with a cotton fabric? Obviously, I would have to do a button closure in the back, but otherwise, what do you think?
I don’t see why it wouldn’t work with a cotton, as long as you did a closure in back! I’d love to see it if you try that!
This comment has been removed by the author.
It won’t let me download the pattern from Scribd without paying a subscription fee. I’d make my own pattern… but I’m making this for next spring and don’t have anything 2t. Do you have this pattern on Google Docs like the June Bug Dress? Thanks for sharing your gifts with us!
I *LOVE* this dress!!
Google Docs says the document has been remoed- or am I just being an idiot and can’t find it?
would love to make this for my twins. Google docs sates it’s not available.
So so incredibly darling. I love this dress. I want one for my granddaughter.
Wonderful dress, and thanks for the easy to follow tutorial! I’ll def try it out for my little girls! Cheers!
WELL DONE!
Great Job! You make it look so easy!
So excited to be making this for my daughter – just a few questions: it looks like you’ve left the sleeve raw – is that right, or did you just skip the step of hemming in the tutorial? I was thinking of making it sort of double-faced and top-stitching it, but don’t know if that would work with a knit as it may get too bulky. Also, it looks like you’re using a straight stitch everywhere as opposed to a zigzag. Please let me know! Thanks so much for the great tutorial and inspiration!!
Yes, the edge are raw, since it’s knit I decided not to finish them. 🙂
I love this. I’m going to try one for my 8-year-old this weekend. I’m really into making knit dresses for her lately, and this one looks perfect. I honestly like yours more than I like the inspiration dress. Thank you!
Wow, great tutorial. I would like to think that I could try something similar but I don’t know if I am confident enough. Beautiful dress.
Thank you for sharing
Amy
Just this with some old band tees for my DD. Thanks for the post
I wish I had a sewing machine, an knew how to do this for my LO
I wish I had a sewing machine, an knew how to do this for my LO
I wish I had a sewing machine, an knew how to do this for my LO
I wish I had a sewing machine, an knew how to do this for my LO
I found this tutorial about a month ago. Wow !!! Just WOW !!! I went to Goodwill today and found a size L men knit shirt. Perfect for my daughter. I’m going to make this today. Woo hooo !!!!! Thanks for the tutorial. Hope mine will turn out like yours =) Wish me luck.
I just made this for my daughter using a shirt printed with our church logo. Now she will have festive church clothes that match the adults at the parish picnic. Too cute!
I found a dress at a national kids chain store (to go unnamed) that was adorable but crazy expensive for something my daughter will grow out of in a few months. I found your playdate dress that was very similar. I did a little adjusting to the pattern to deal with cotton instead of knit but it turned out very cute. Here is the link to the pic: http://dl.dropbox.com/u/4425583/Maggie%27s%20Playdate%20dress.jpg
Thanks again for a great site and wonderful tutorials!
I had a go at using this tutorial to refashion a long sleeved jersey knit top that my mum donated to my refashioing pile. It had a lovely print pattern and some embellishment around the neckline that I managed to use with some clevel pattern placement. I had to rejig the pattern a bit to incorporate long sleeves since the weather here in the UK is pretty grim right now, but it worked out ok I think. I posted about it at http://ribbonsandbibbons.blogspot.co.uk/ and linked back to your tutorial. Thanks for sharing!
Thanks for the spray starch tip!
Your’s looks better than the inspiration. I like that your stripes are going vertical on the body of the dress and sleeves but horizontal on the bodice and pocket. It makes a big difference and is more pleasing to the eye. Also, the trim on the pocket makes the trim on the collar make sense.
Does your 2T printable pattern contain seam allowances? Thanks so much for the tutorial…love the dress!!
pretty cool!thx….i will try to do it n maybe I will upload it….thx so much
super cute! i want to make one for my girls!
I really think your´s looking more beautiful than the inspirational dress. I like that your stripes are in different directions. I like your sleeves better as well. Good work.
I have been wanting to make a dress like this for ages, and I gave it a try as an upcyle. Came out looking nothing like yours, but I love it anyway! Gives me an excuse to do it again so that my girl actually has a dress that looks like this 🙂
http://bethbeingcrafty.blogspot.com/2013/03/upcycled-mini-muumuu.html
Wow! What amazing dresses. I can not wait to have a go at making some for my daughter. Have just cut up one of my old tops and I will be stoked if it turns out half as good as yours – thanks 🙂
Ooooh, very excited to have found you! I love this dress, and love your developing confidence. I’ve been sewing for one week and am absolutely hooked!
I just finished sewing up this dress for my daughter last night and I forsee myself making a few more of them! I think my kiddo must be big because I made the 2T size, but just shortened the length and it fits my 11 month old! The dress is for her first birthday 🙂 Your blog has been SUCH an inspiration for sewing for my daughter – I can’t wait to try out more of your tutorials & the patterns you recommend 🙂 It’s so hard to find patterns/tutorials for girls clothing that doesn’t look like grandma sewed it for them 🙂 yours are terrific – perfectly sweet & modern 🙂
This is adorable! My daughter would love a dress like this! I love it that you had an inspiration dress to work towards!
Awesome instructions!! You could put stay on tape on sewing line to hold knits from stretching.
Loved this idea! I’m very nervous with knits, they never work out well. I dont know how I manage to stuff it up every time, so I just gave up trying years ago. However, when I stumbled across this tute, I just liked it so much I had to give it a go, and it came out great! I even drafted my own pattern (which has been pretty hit and miss in the past)! I used a singlet I bought on clearance from Kmart for myself that turned out to look awful on me, so my little girl got a pretty dress for $2 and I got rid of a shirt I didnt need 🙂 thank you!
yay!