


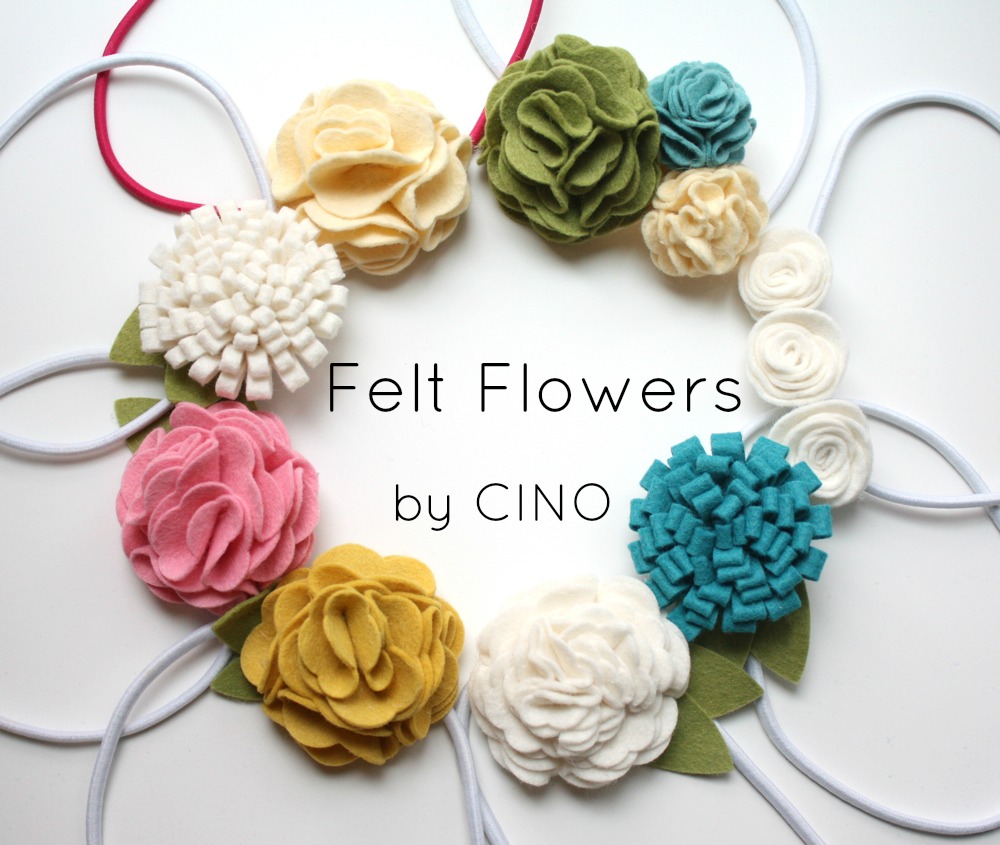
Get ready for some felt flowers this week! I had a blast making a bunch the other day and made a few tutorials for them, they’re simple stuff, but so quick and fun to make.
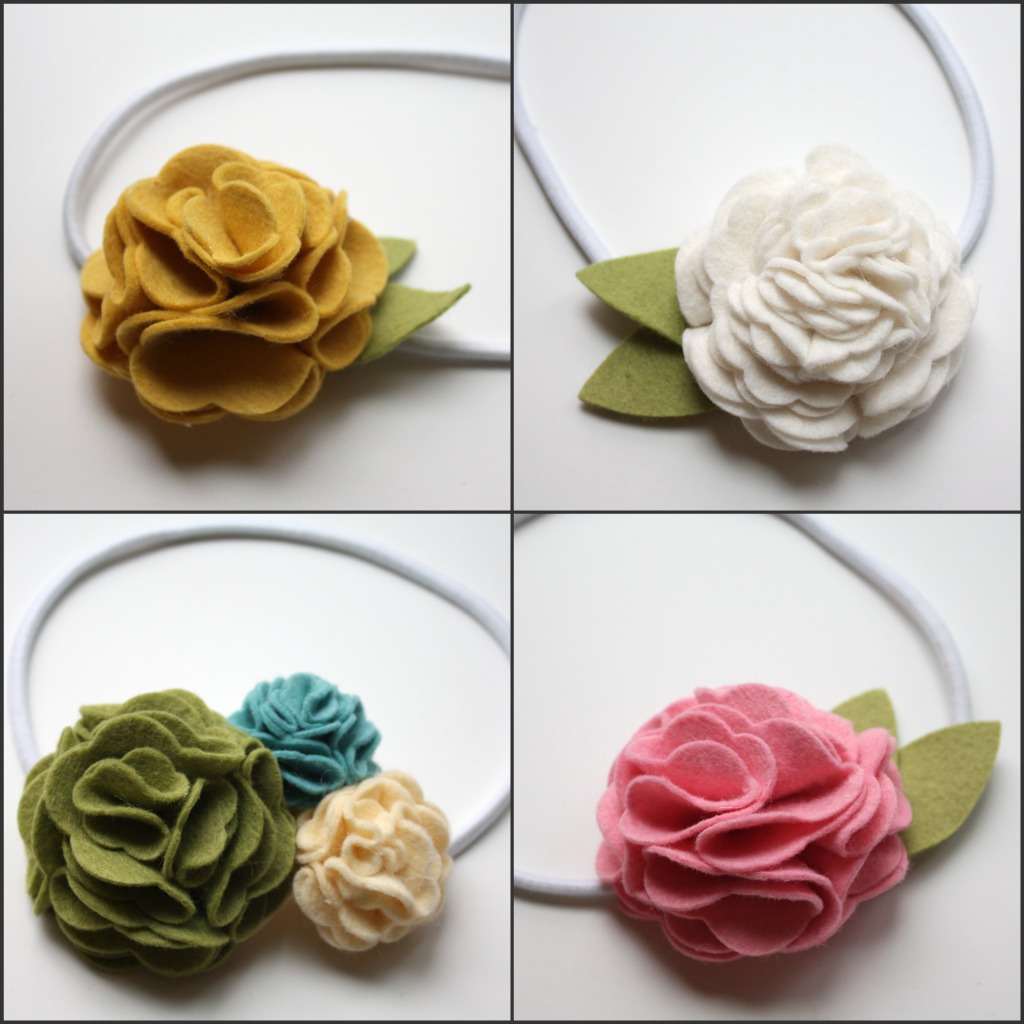
Today I’ll show you how I made these easy layered flowers.
First I cut out a bunch of flowers from wool felt, using my Go Baby! Rose of Sharon die.
I use my Accuquilt cutter (affiliate link) constantly for felt work. You could easily cut out floral shapes by hand though!
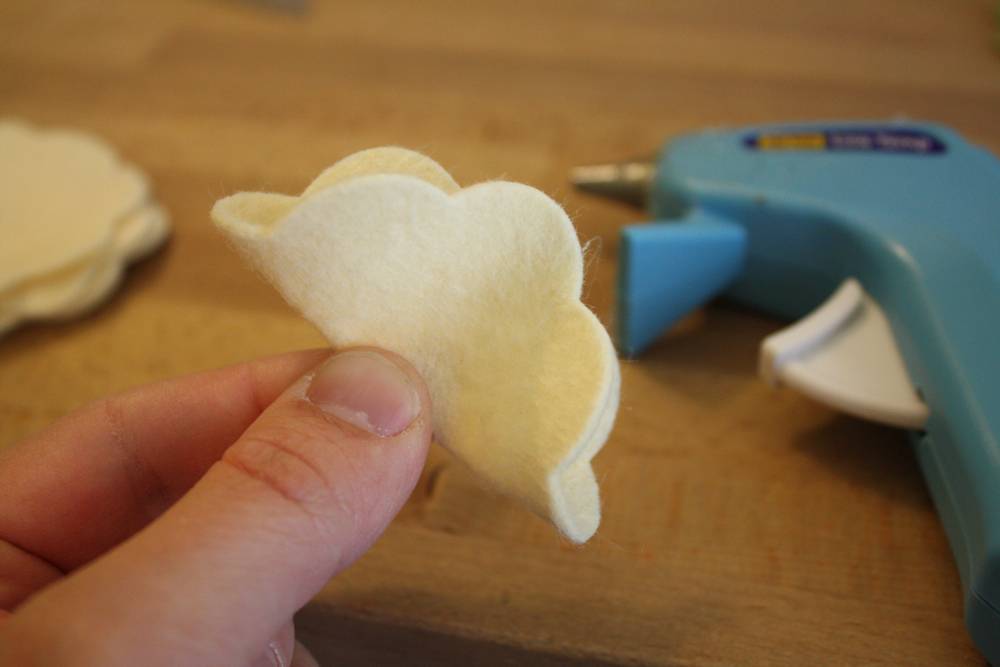
Then fold in half, and dab a little hot glue in the middle, let it cool.

Fold in half again and dab some more glue!

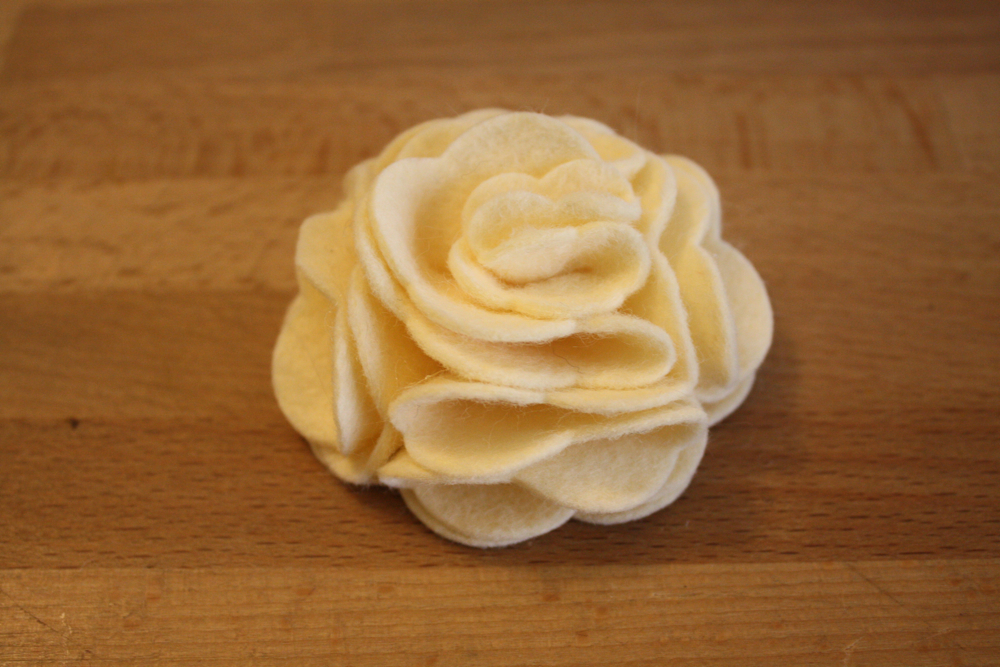
I usually used 5-6 of the same size flowers for each one, plus a few smaller flowers to fill in the center.

So then glue down the quartered flowers like so.
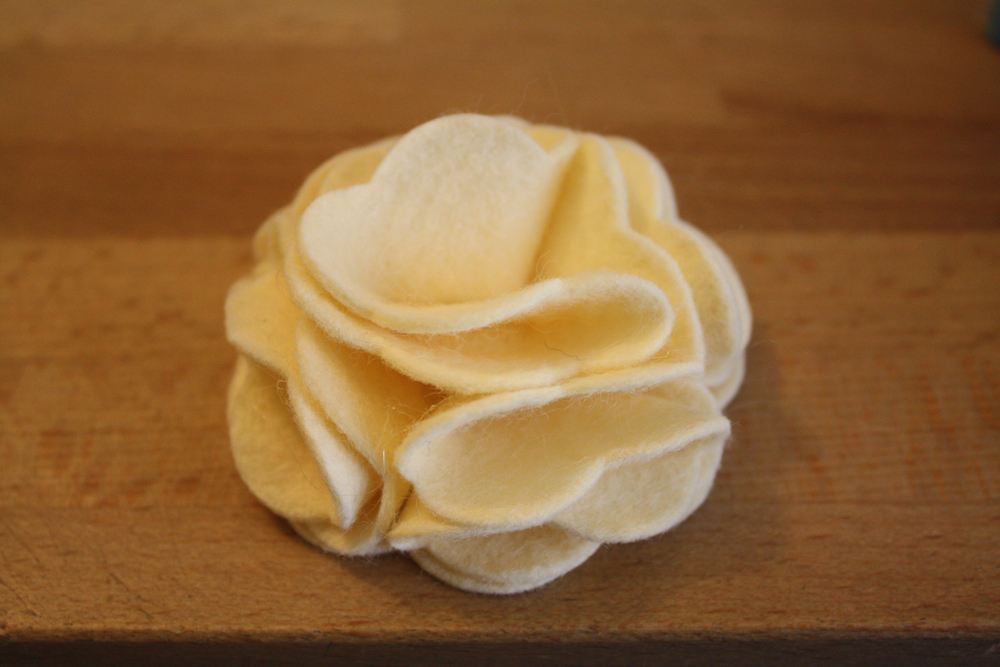
Then glue one more quartered flower in the middle.
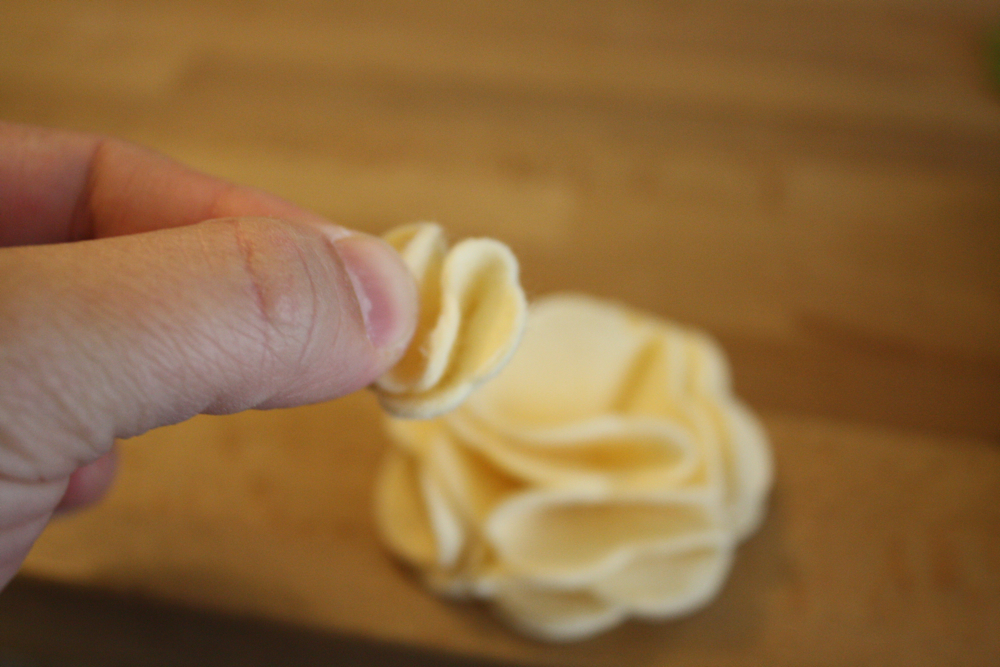
These needed some more to fill in the middle, so I quartered some smaller flowers…
and plopped them down in the middle! (using glue of course, haha)

Add a circle of the same color felt on the back of headbands to make it look nice and neat.

They look so cute on headbands, clips, brooches…car antennae….haha almost gotcha, huh.
They are adorable in miniature size!

More tutorials this week!
your flowers look beautiful, thanks for the tutorial! they are going on my TO DO list 🙂
these look great! Thanks for the tutorial.
so pretty! I’m going to pin them for a day when I have time for this type of thing. My 6-month old daughter has decided that Mummy has better uses for her time than crafting 😀
lovely Jess! What great little Christmas gifts for all my daughters friends at school.
I’m wondering though, where did you get the headband elastic?
Thanks for your always inspiring blog:)
So gorgeous!! I’d love to have a go when my daughters have a bit more hair for the ‘big girl’ hairbands!!
yay! I have been wanting to make some felt flowers for my daughter. Now I just need to make sure the hot glue gun works and find some things to attach them to….seriously, what’s cuter than a little girl with a flower headband?
So cute, thanks for sharing :o)
pretty! i copied you and got the Sharon flower die, too. haha.
I bet your girls love those!
Wow, such detailed instructions with lovely results. This looks so easy and fun, love all of the colors and choices, thanks for sharing!
I’m going to have to try this. My youngest loves flowers in her hair.
Now I not only MUST get the GoBaby! for Christmas (hint hint, honey!), but now I need to dig out my glue gun, too!
Those are so pretty! I’m pinning this to my to do list. 🙂
They are especially adorable in miniature! I will totally make some if I win one of those cutters; I’m not going to cut them out by hand! (I tried and they were not pretty)
this is great!
I love the mini ones – never thought to do that! Thanks Oh and now I think I need to add one to my antenna too 😉
Oh and I am with Fran – where did you get the elastic bands?
Cuteness!
so pretty! i will definitely make some for Sutton’s Christmas stocking. She will love ’em!
Just gorgeous!
Katie x
Love the felt flowers! I especially love the blue and white ones… dahlia’s maybe? Anyway, can’t wait to see the rest of hte tutorials.
How did you know I was planning on making felt flower hair clips and needed ideas for how?? I just recently (three weeks ago?) found your blog, and since then I made three dresses from your design, read through half the archives, and in general have loved your style. It actually makes me want to sew more. And yes, I know I now sound like a complete nut job. I swear I’m not, beyond the usual crazy we all have. Ha! Anyway, thanks. 🙂
j adore toutes ces petites fleurs!
Bonne journée
Pascale
I love these. They are so pretty and well done! Thanks for sharing.
Uh oh, Jess! Are we gonna have to start up HAA again?! You’re making me want to make a million hair accessories again!! ;D
I love them. Where do you buy your headbands at? And do they fit your girls? I also have a 3 year old and 1 year old daughter and I haven’t found headbands that I like on them.
Thanks for sharing this tutorial! They look very easy to make. I’ve made some flower brooches/pins before, wish I had Go Baby! The shapes look so much more clean and professional.
These are really cute – thanks for the tutorial!
I made them for my girls’ Christmas pictures and they turned out fabulous! Thanks for the awesome tutorial, Jess!!
omgosh I LOVE these!!!
I love these and cannot wait to make them. I blogged about them here… thanks for sharing the great idea!
http://afewextraminutes.blogspot.com/2011/12/felt-flower-headbands.html
This is the greatest tutorial and makes me want a Go Baby even more now. I linked your tutorial on my blog today. Here’s the post: http://crazydazedesigns.blogspot.com/2011/12/flower-power.html
thank you so much for these tutorials! such wonderful gift ideas!
Cool tutorial, I’m having so much fun making my own, I was wondering on the hairband elastic, did you glue it to the flower or did you leave a space so the flower and backing act like a big felt bead?
Hi love the idea 😉 but i dont have teh accuquilt how can i get the floweer pattern? Thanks
http://sewinglovers.blogspot.pt/
@Scorpius Blue-I did glue the headband to the felt to keep it in place, but you could leave space and slide it onto a hard headband!
Me parece muy bonito tu blog, me gustan los tutoriales, esta bien explicado. Me lo guardo para cuando necesite este adorno. Gracias. Mi blog “mispuntosyotrascosas.com” te invito a visitarlo.
Lovely with clear instructions. I have to cut with scissor.I would make dozens of them if I have the die cutter.
Hello, mza name is Mara.Zoua are a fantastic blog and zour little handamade creations are extraordinaz.I am from Romania but I like verz much handmade thinks, so I try developing and applying new technics of my style.I have a little girl and I shall create this headband inspired bz zour blog.I hope we shall collaborate with you.My blog is about decorations on the glasses, wood,little furniture and gives to anyone thoughts, piece of advices, quotations.My blog is http://picturadecorativa-mara.blogspot.com.And when we want we can exchange mutual banners.Bye, bye.
Thanks..just what i was looking for
So cute. I was looking for some felt flower tutorials. Thank you for sharing this! 🙂
Thanks for sharing. They are so lovely. Blessings.
Any chance you sell these already made? 🙂
Hi!! These are so cute!! Where can I find such neat colors of felt? Thanks!
-Meredith
Love your tutorials
So pretty!
http://cafecraftea.blogspot.com
I am a great lover of flowers. Thank you for sharing your tutorial
I love these felt ones as well! NEED these for my baby girl!
Hello, I love this tutorial
where can I find the white elastic headbands you used?
Can you recommend a good place to buy wool felt?
thank you so much
I got them at my local dollar store, and my wool felt I get from woolfeltcentral.com 🙂
So so pretty! I want to try and make some for my three girls. I was just wondering if you use 100% wool felt or a blend to make these flowers? I wanted to order some felt, but never know where to get it or what I am looking for online without being able to touch it. Any suggestions for where to buy it online?
Thanks!
I use a wool felt blend from woolfeltcentral.com…they have TONS of colors!
Have you ever tried dies from other manufacturers with your Go! Baby, such as Darice? Any problems, or suggestions?
I haven’t, sorry!
Hi! May I know what have you used for the band??
I usually use fold over elastic or a plastic headband 🙂
Hello Jess,
I have just found your wonderful blog after finding these felt flowers (pic below) via Hubpages, and wonder if you can answer a question I have for you. On November 29, 2011 you posted a tutorial on Felted Flowers. This picture shows the 4 flowers that going along with your tutorial. I noticed the white flower right away &that the tutorial for it wasn’t included in yours, since it looks so much different than the others. I just wonder if you have a tutorial on that one & if it’s one you can share with me? I would appreciate any feedback you have for me. Thank you so much Jess.
Best regards,
JoAnne Woll