


Are you all set with your fabric, etc!?
Let’s jump right in and make a pattern!
Did I lose any of you?

So. You have that shirt that fits your child (looser is better in this case), right?
Lay it out, folded in half like so. I use white wrapping paper for my patterns-but you could use anything. Even a few pieces of copy paper taped together. (been there…done that)

Trace around your shirt like so, leaving a 1/2 inch around the shirt to allow for seam allowances and room to grow into the shirt a little.
I added some length to my shirt since it was kinda short.
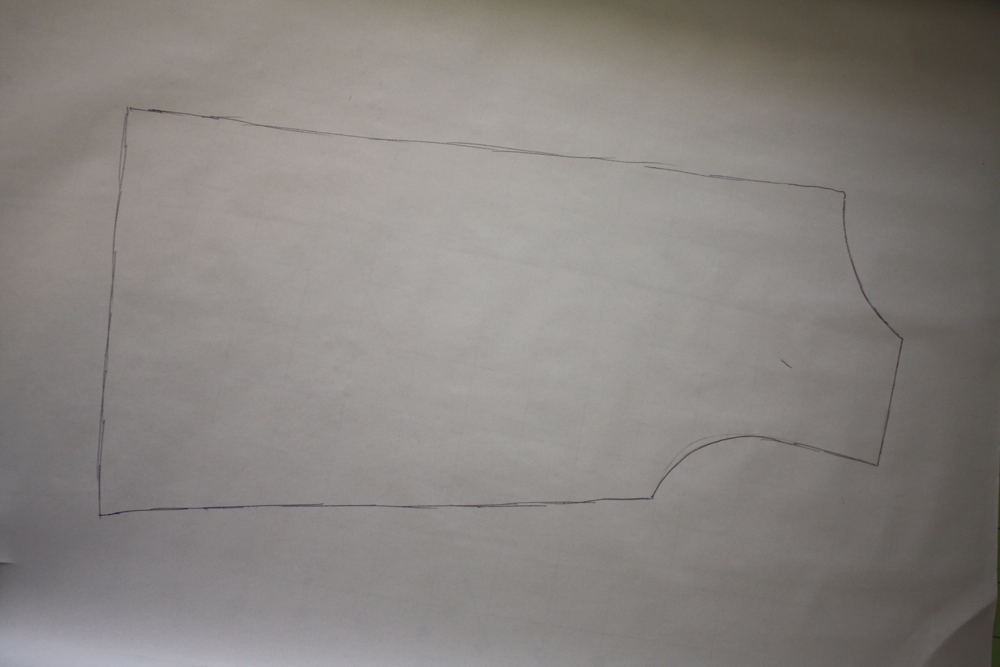
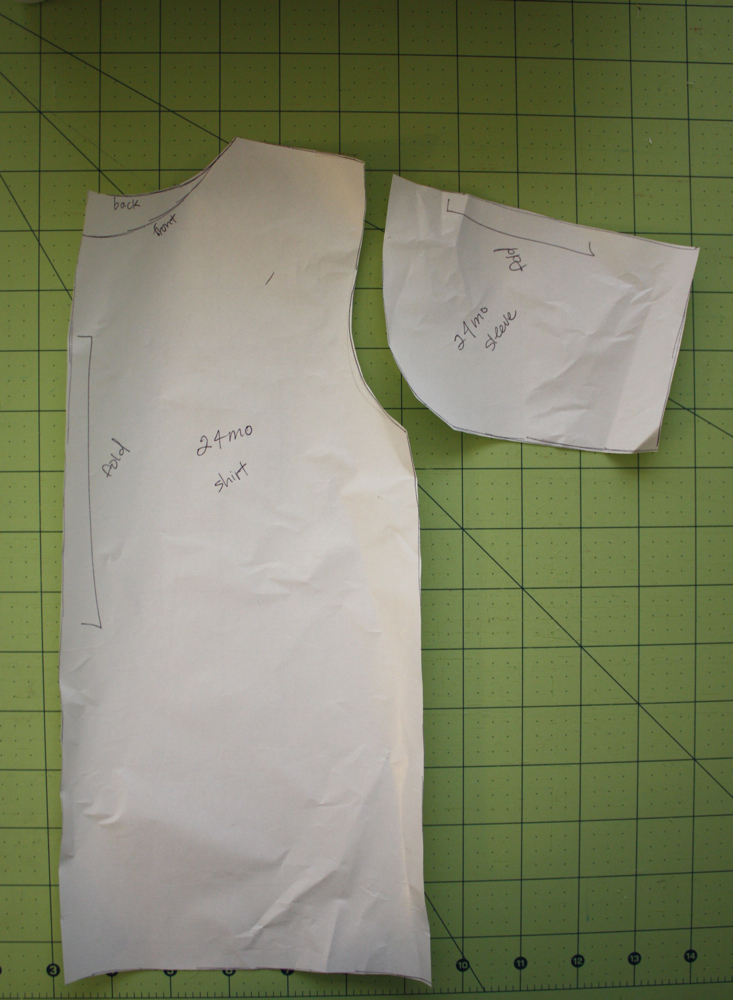
This is what it should look like!
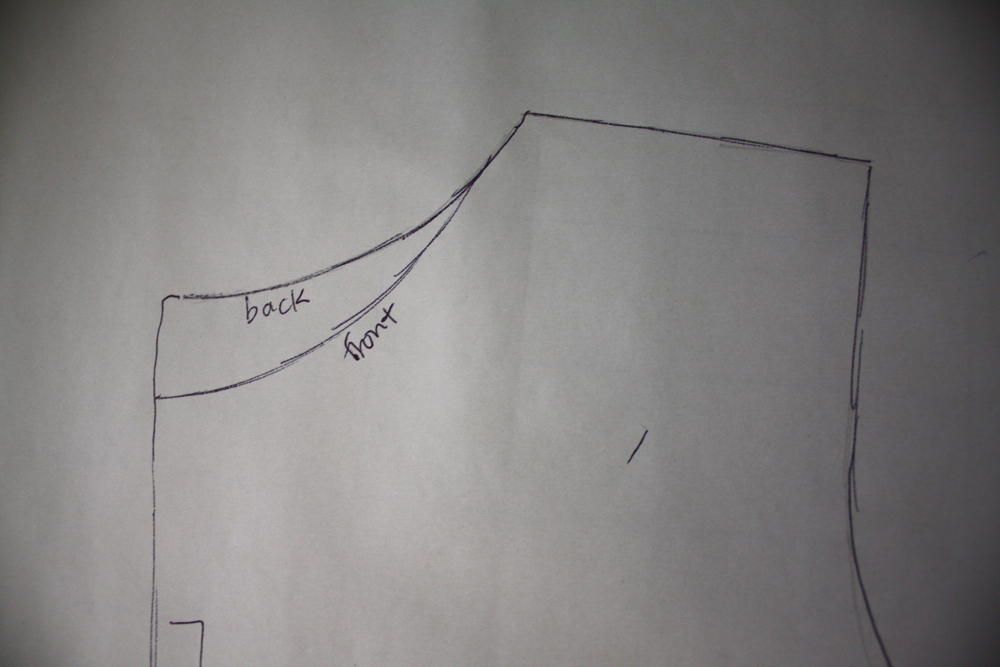
Make sure to trace where it dips lower in the front.
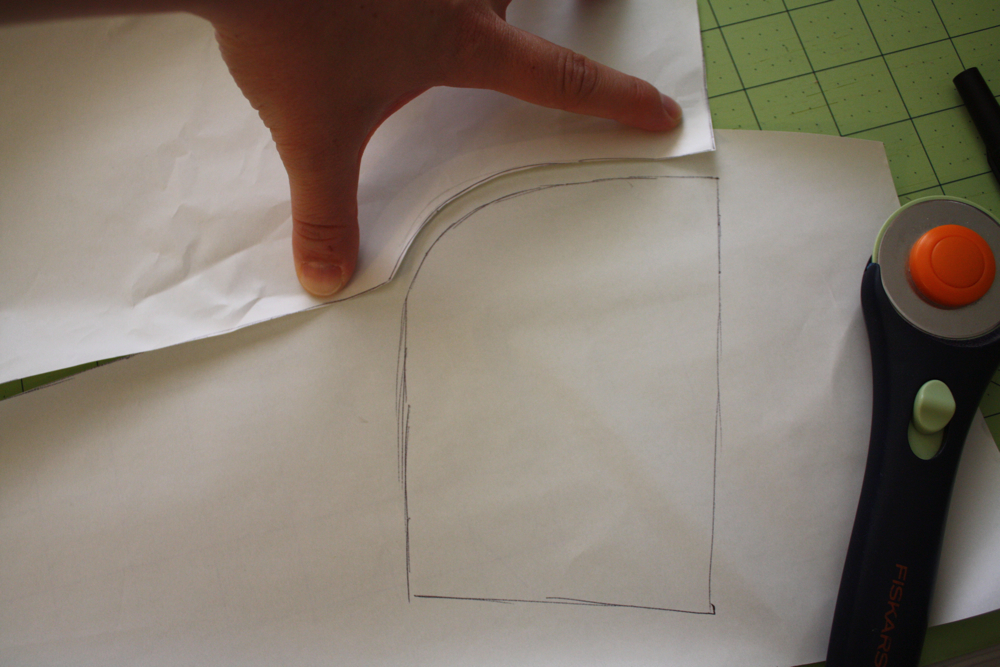
Next, cut that pattern out, and draw your sleeve piece. It should follow the curve of the shoulder seam and then come out straight like the picture shows. You can adjust sleeve length easily by shortening or lengthening it.
This is what you should have! Label them-where the folds should be (see pic), and size, etc. Mine ARE brand new-i just had to wrinkle them up so they’d lay flat-ish.
Now trace out your shirt piece and cut out another one exactly like it. That will be your back.
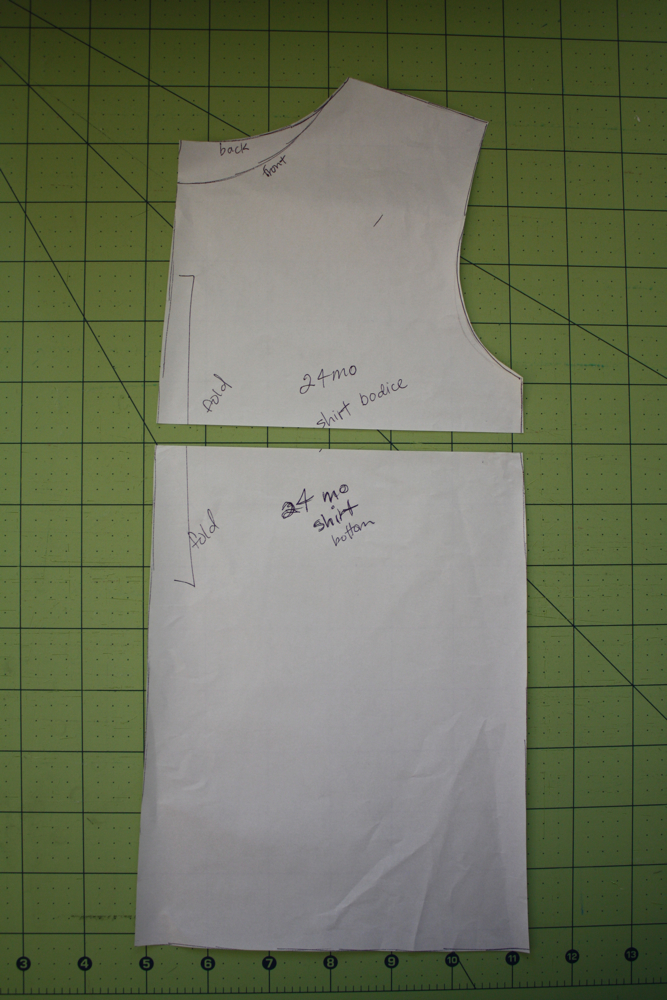
Now we’ll mess around with the front piece.
You’ll cut it in half about 1 1/2 inches below the sleeve part.
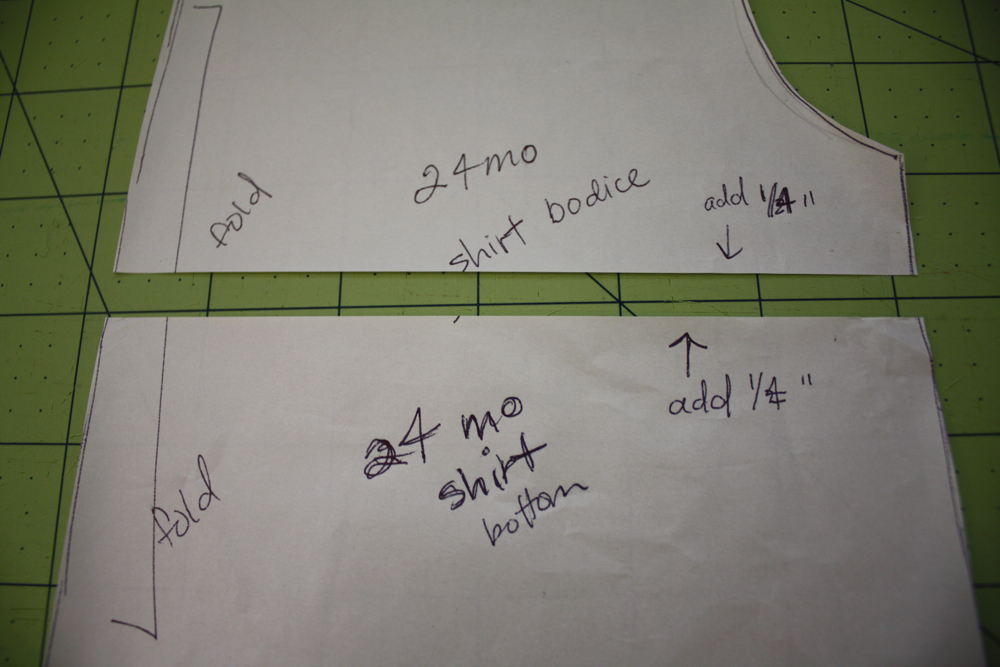
Like so… now make sure to mark that you need to add 1/2″ (do as I say, not as I do/write! hehe)
to each side when you cut. See pic.
Also cut out the part where it dips down in the front on your front pattern.
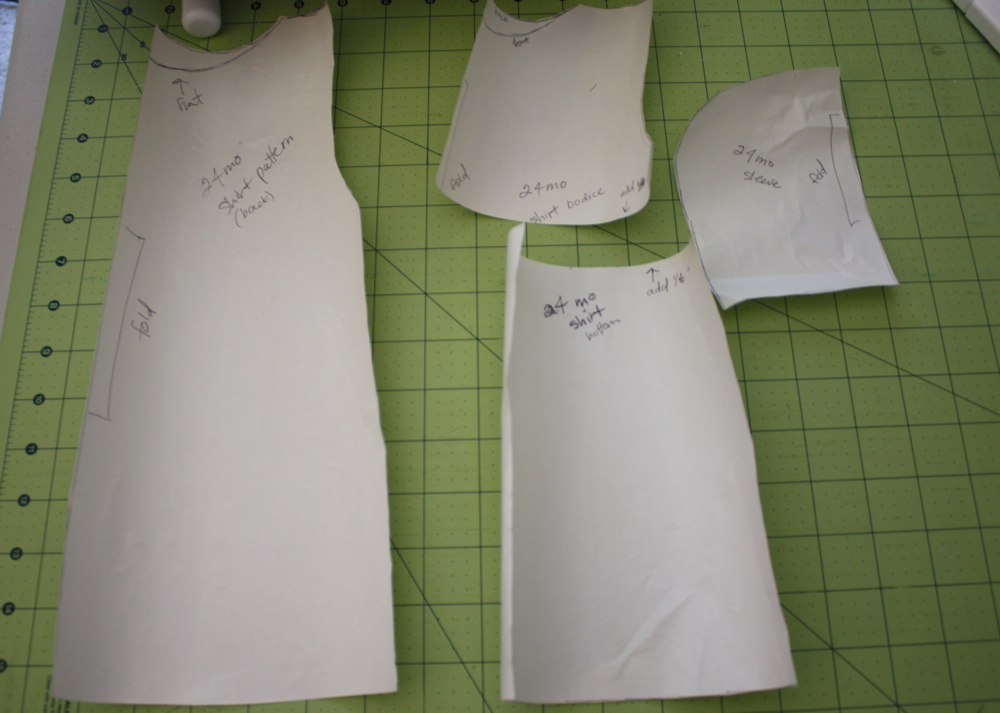
Here are your pattern pieces! phew hard part is over.

Now cut out your pattern pieces!
1 back
1 front bodice
1 front shirt “bottom” (is there a better word?)
2 sleeves

tada!

Now for the extra stuff.
Cut out 2 pieces of fabric for the ruffles. I cut mine 1.5″ x 6″.
Placket-cut a piece 1.5″x the measurement of the middle of your bodice piece. (mine was 4.5″)
Cut a piece of fabric on the bias for your collar. Just make sure it’s long enough to go around, and I cut mine 1 3/4″ wide to use with my bias tape maker.
Also, not shown..cut a piece of main fabric for the button closure in back. I cut mine 6″x3″ but you may need to adjust for different sizes.
Of course, let me know if you have any questions, and I’ll answer them in the comments.
Tomorrow: The bodice and placket…fun 🙂 You’re gonna end up with a CA-ute shirt!!
If you’d like to show off your in progress shirt-add it to the flickr group and we can check out each others work! Awesome!

you know what’d also be super cute, adding an extra inch or two to the front and putting a little gathering in the middle. Depending on your kid, I guess, mine just looks best in those kinds of shirts, and it’d be waaaay easy to throw in on this one. Maybe I’ll have to sew along and add that alteration…. and maybe make a baby sized one to match… so many products, so little time! lol.
Yay!!
**scurries off to get wrapping paper**
what fabric did you use for yours?
yay, this’ll be fun!
This is going to be SO much fun!! 🙂 Looking forward to making a shirt for my lil miss. I also wanted to share, when I need to make some patterns I use paper grocery sacks 🙂 Sturdy and free 🙂 When I go to my local store I always grab a few, they never seem to mind.
Hi,
I’ve been looking forward to this … and I was with you until the placket piece. Do you have a picture of that step? I didn’t understand what you measured and 1.5xed.
Thanks so much
Sorry about any confusion…the measurement I was referring to was the top bodice piece. Measure from where the neck scoops down (in the middle) to the bottom of that pattern piece. You can always trim it down-so making it long is ok! Hope this helps!
also-grocery sacks are super smart to use for patterns! Thanks for the tip!
and I love the gathering idea!
All my pieces are cut…I’m ready to sew!!!! =)
You have a bias tape maker??? (said with envy, jealousy, (place adjective here) in my voice 🙂
OK, I’m finally done cutting. I managed to mess up the front bottom piece twice, but the third time was a charm. Can’t wait for tomorrow!
I got fabric.. it’s a little too late here to cut pieces but I will definitely cut em’ tomorrow 🙂
What kind of fabric did you use? Was it a knit?
I´m done cutting. I have some ideas for altering this shirt. Will share with you all after finishing this shirt.
OMG! i am soooo attempting this adorable shirt!!!
Great sew along! I’ve posted it on my blog, The Handmade Experiment in a Must Make Monday post – http://wp.me/pkcUM-DO
Your tutorial make it so easy to make! Thank you for sharing this ^_^
Last time we moved, I saved the paper the movers used, flattened it out and didn’t fine even ONE bug. Makes wonderful patterns and, lining for the canary cage.
This looks great…I have an a-line pattern – do you think i can use it for this (still cutting front piece into upper and lower) and just add sleeves to it? I was looking at this to adapt the packet to another project but i think i have to make this cute shirt too! 🙂
This looks great…I have an a-line pattern – do you think i can use it for this (still cutting front piece into upper and lower) and just add sleeves to it? I was looking at this to adapt the packet to another project but i think i have to make this cute shirt too! 🙂
*placket
I love it, a great idea
thanks for sharing
I also use heavy weight non-fusible interfacing for pattern pieces. It lasts forever that way.
Also, you can use another shirt, one that is larger or a design you like but cannot get in your kid size, use it for your material. Good way to recycle a larger shirt for your kids shirts for play, and good practice for your sewing. I have also used large sized panties that are cotton knit, to make small sized baby shirts and kids panties. You do all of these things when you live in a place that has no fabric stores. Large sized clearance clothing or thrift store clothing is a good source of material to make kids clothes and some adult ones can be made.