


I am thrilled to be a part of Simple Simon & Co‘s prolific series-“What I wish I’d known when I started Sewing”.
Which is many things, for me. Alas, most of my sewing knowledge was gained due to plentiful mistakes, trial and error, and A LOT of fabulous online tutorials. So…let me share with you my favorite sewing trick/tool. Trool.
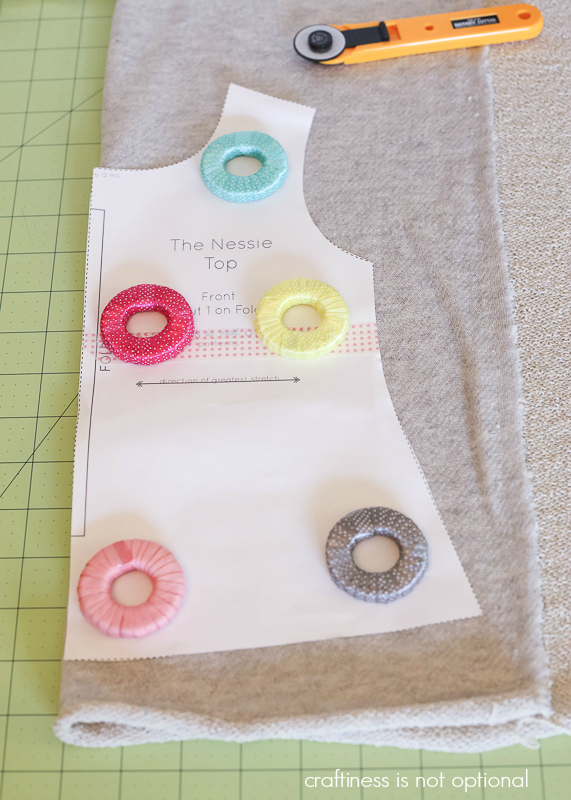
When I first started sewing (ie when I didn’t really like it…..GASP), I learned that I was to pin my patterns to the fabric, then cut out the pieces with scissors. I honestly think that’s part of what made me throw it down and run away screaming give up sewing the first time. It was much too fussy for me, and my cuts were never crisp, or correct for that matter.
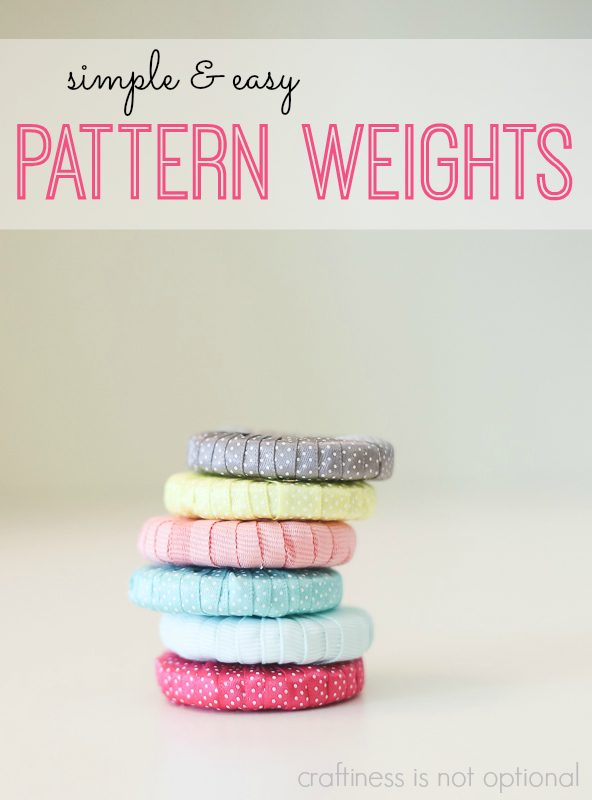
Fast forward to when I picked up sewing again, about 6 years ago. I quickly found these amazing things called fabric weights that you used to keep your fabric in place while you cut it with a rotary cutter-not scissors! LIFE-CHANGING. (ok, that’s a bit dramatic. SEWING-LIFE-CHANGING) It’s the way I cut out most of my fabric these days. Sometimes I do have to whip out the scissors for hard-to-get-to parts, but since I got my small rotary cutter (see below), it gets into most of those spots just fine and dandy! I seriously love my pattern weights-I have a whole collection of them in a bowl on my cutting table and use them constantly. So that, my friends, is my favorite sewing tool! Read on for a quick tutorial! They are so easy (and cheap) to make!
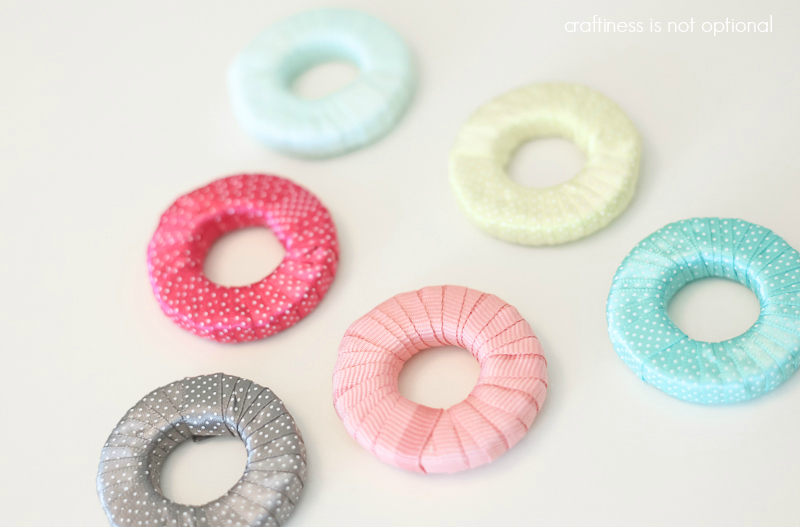
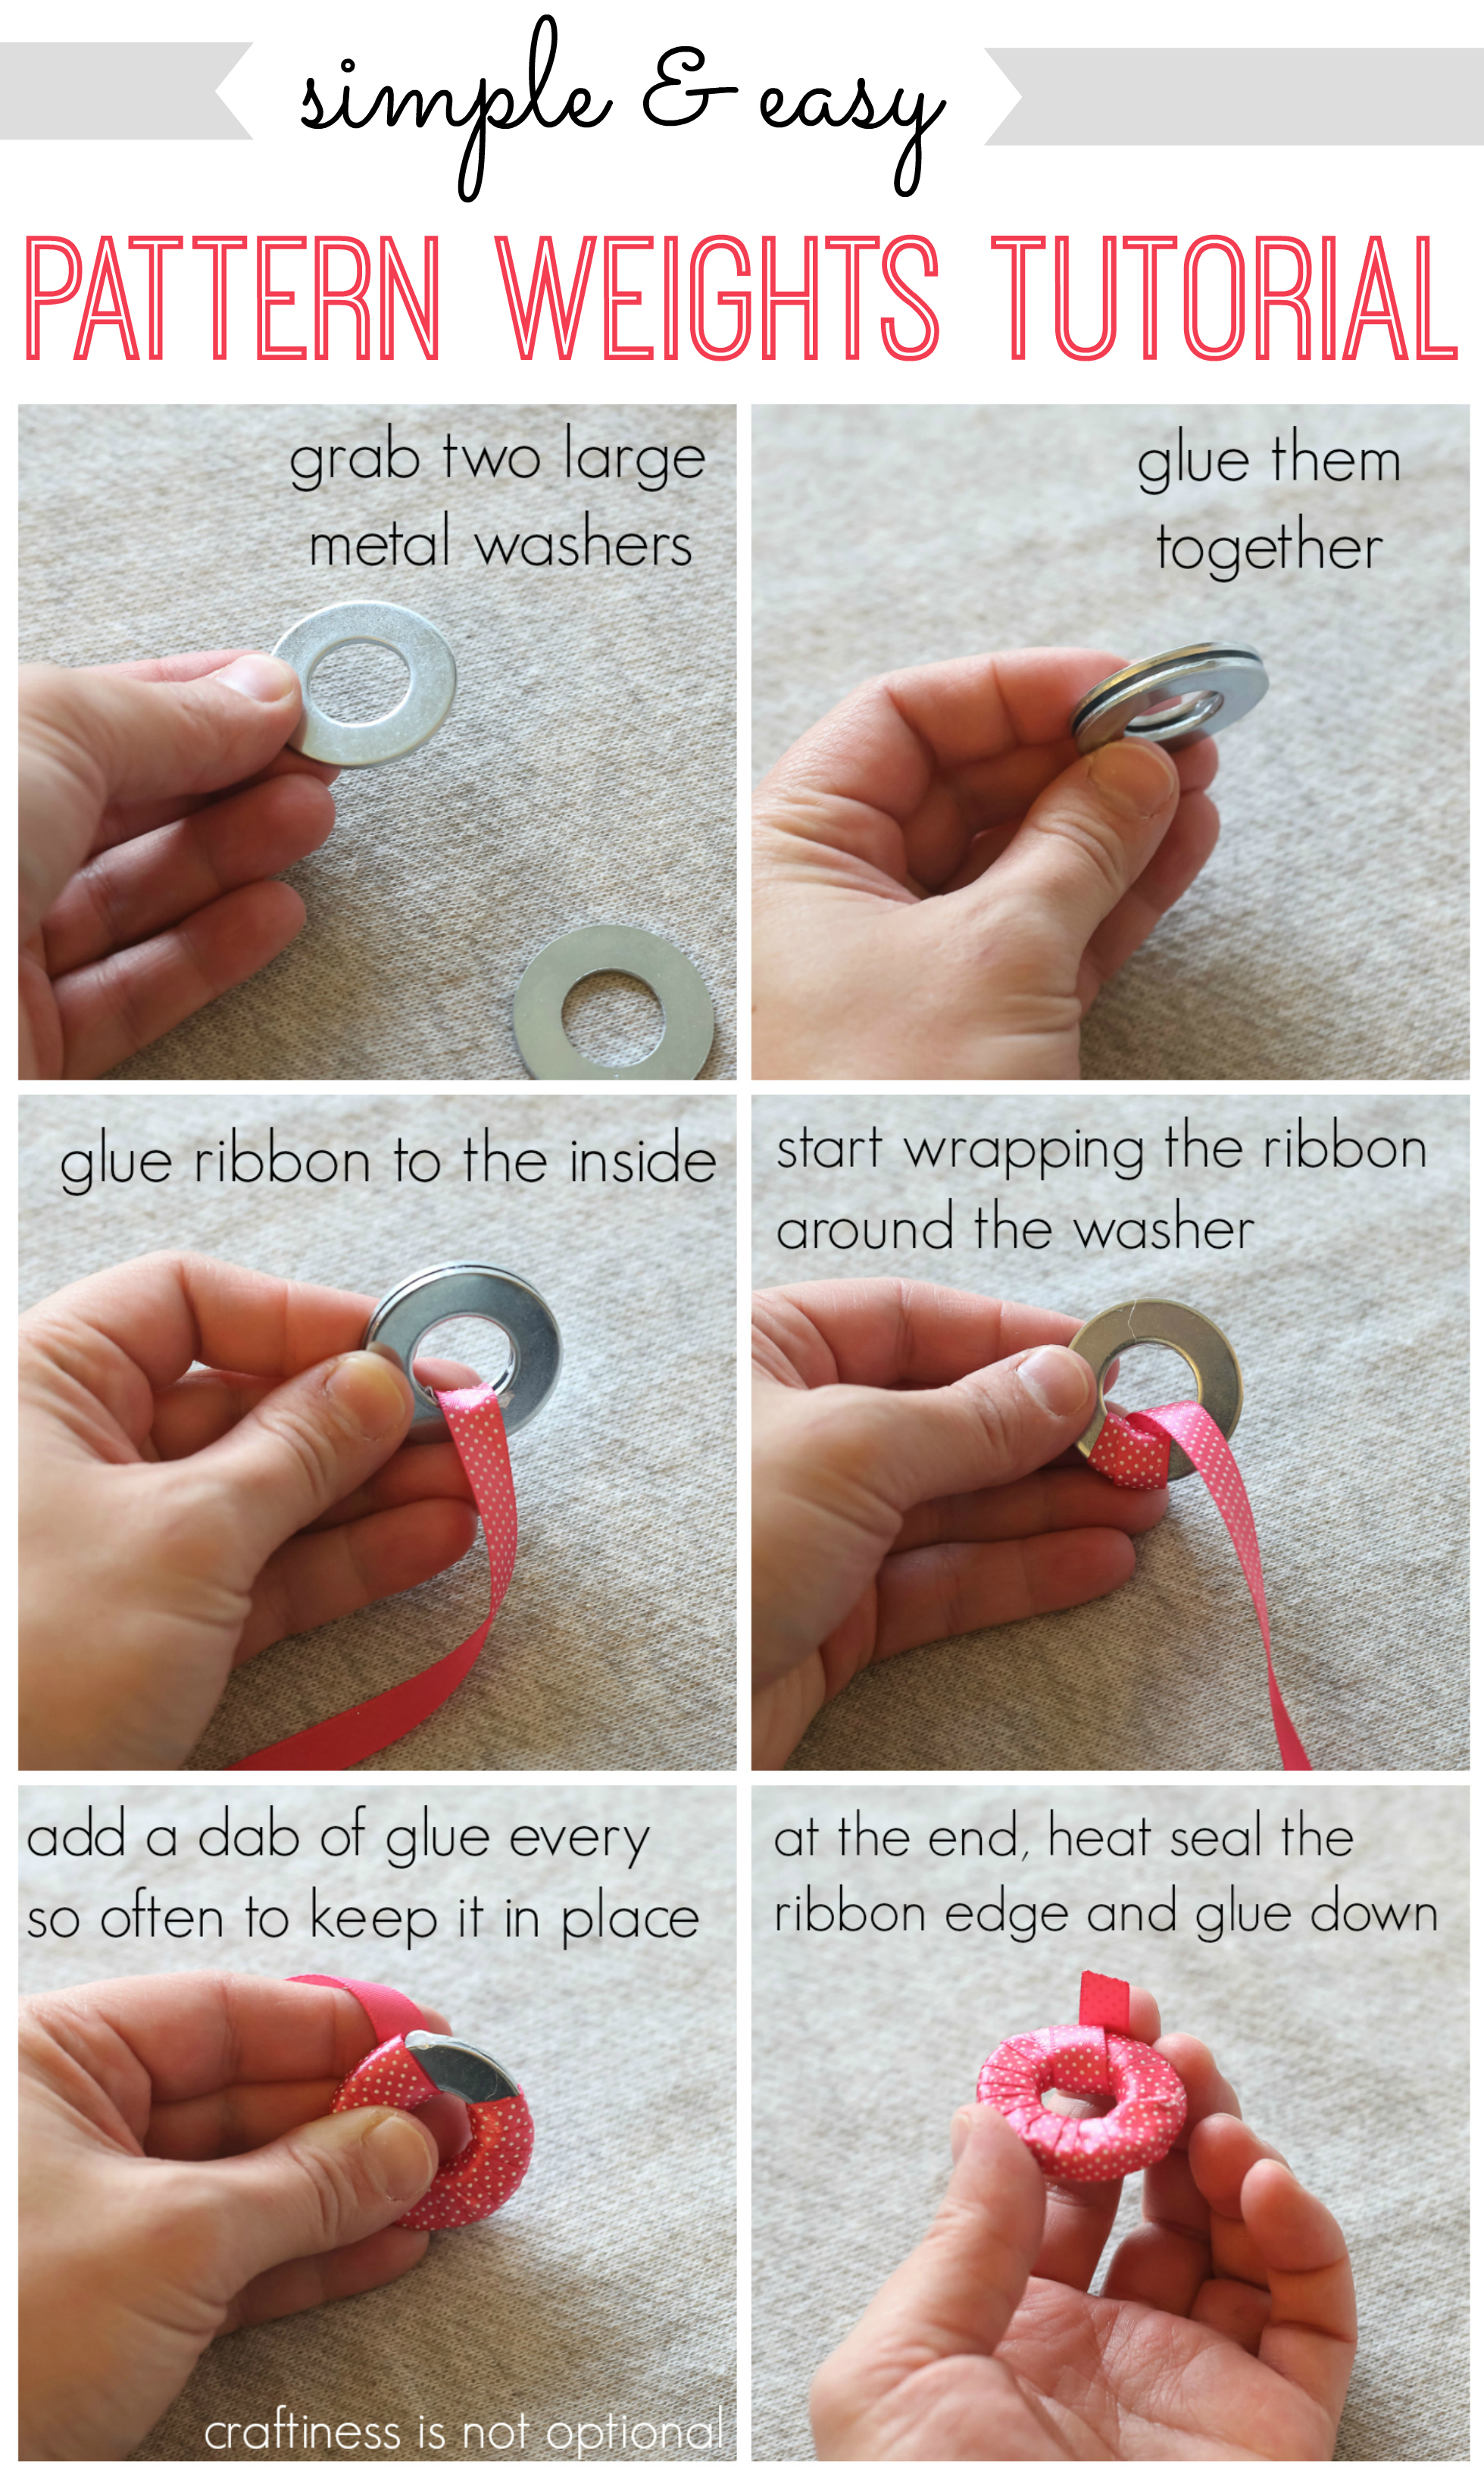
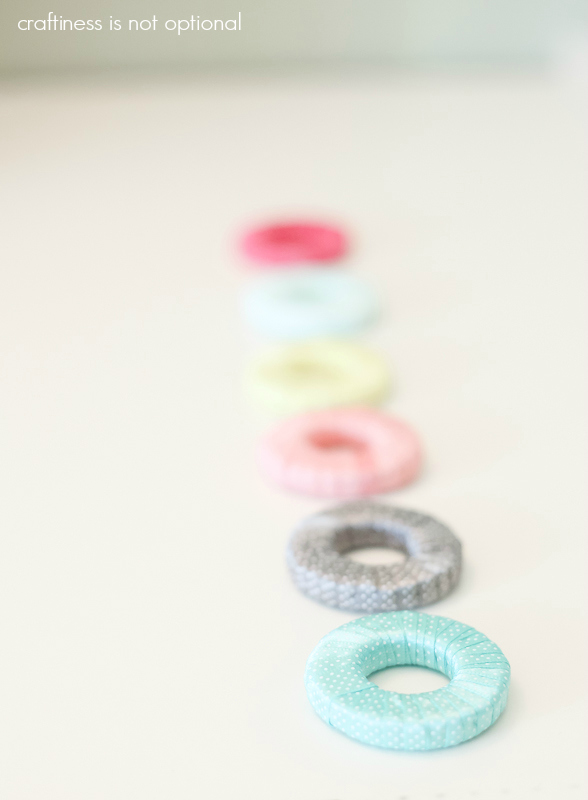
tada! make a whole slew of them and keep them handy! they are amazing. (I just use hot glue for the tutorial, FYI)
Enjoy the new-found joy and ease of pattern cutting.
Thanks to the SS&Co gals for having me!
AHA! I hate using patterns and this is probably why! Years (and years) ago I made a few clothing items. I hated the thin pattern paper and how I had to pin then cut. I am saving this on my computer (and in my noggin!) for future (way future–like grandkid future) use!! I think I really like the idea of the paper PDF patterns. When I saw the picture with the heavier paper, the weights, and the rotary, I thought “WOW, that makes sewing with a pattern not look half bad!”. And of course the weights need to be cute! I create my own patterns for my shop stuff (not clothing so easier patterns!) and then transfer to a piece of cardboard–trace and cut!
I’ve seen these made with yarn, but your ribbon weights are so cute!
Thank you for this idea! I still pin- or sometimes pull the spice jars off the shelf to use as weights. This sounds so much more practical and cuter!
pattern weights save sanity, great tutorial!
Ooh, I like the idea to double the washers. I made some of these without doubling them and sometimes they just aren’t heavy enough.
What a great idea! I have a giant tin of ribbons that my kids love playing with. Now I just need to get some washers.
So simple, I will have to try this. Yes this really is sew life changing
I’m do glad I read my bloglovin feed today. I could really use some of these fabric weights.
So simple. Love. I was shocked at how pricey the ones in the stores are. Perfect solution.
I love these little pattern weights. I have dome dull old massive ones that I was given (very generously) by a bookbinder that I met. I think however that I shall be making some ever so pretty pattern weights…off to the the DIY store I go!!
p.s. will also be buying myself a mini rotary cutter!
sooo simple and sooo helpful!! It is a perfect tip. Thank you very much for sharing.
great idea! I’m so lame. I use whatever is nearby as a pattern weight. Usually it doesn’t work out very well …heh
Ah! I often have my ugly, un-ribboned fabric weights in photos – this is a great tutorial! I might try washi tape first…
Thanks for the tutorial!! I am going to make some up tonight. I hate pinning patterns! I tend to shy away from them because of this reason. I am also going to have to get one of these little rotary cutters. I love the ribbon color choices you picked…reminds me of Spring:)
I want to run out and make these right away. My husband might be mad, though, since we’re moving in a couple of months and this would just add extra weight to my sewing box…
I love my pattern weights!! I’ve got a Craft Gossip post scheduled for later today that links to your tutorial:
http://sewing.craftgossip.com/tutorial-ribbon-wrapped-pattern-weights/2014/01/30/
–Anne
These make good weights for wall hangings too! When you bind your quilt and attach the hanging sleeve, include little hanging corners on the bottom of the piece as well and insert these weights for a straighter hang.
great tip!
Great tip! I tought they were for when you trace the pattern on patternpaper. I always pin my (traced) pattern on the fabric and cut it out with sissors. It’s very time consuming, and it’s the part of the sewing thing I really don’t like. I think I’m going to make pattern weights, now I know this. Thanks for sharing!
This is so helpful! Thank you!
I’ve been using fifty cent pieces, but this is better!! If you add one extra wrap that is a loop, it would be easier to lift.
YAY! This is just perfect! I have been using these super cute round stones from a river that I painted in jolly colors, but I don’t have enough of them! And they are kind of hard to find… But with this idea I shall have enough weights in a flash! Thank you!
Love these! Glad I found you on Pinterest.
Quick question — do you find it difficult to cut a straight line with your rotary cutter? I’m completely straight-line-with-a-rotary-cutter impaired without my straight edge:( Any tips for that?!
Practice practice practice! I’m pretty good now but that took awhile! Also, there’s no shame in cheating and using your ruler! I do that too sometimes 😉
I love, love, love my pattern weights! I didn’t discover them until about a month ago, but they truly are life changing. Up until that point I was under the impression that rotary cutters could only be used to cut straight lines! (How embarrassing!) My sewing life is so much better now that I’ve seen the light.
Pure genius! I was just moaning about having to pin a pattern to muslin, only to cut and put it together and again pin to project fabric. I’m off to the store to buy some washers and some ribbon! Thanks sew much!
This is wonderful. I recently discovered the joys of rotary cutting vs pinning. So much easier. I use alligator clips instead of pins quite a bit too. Makes hemming and quilting easy peasy.
love this idea!! my grandkids may be making these for their sewin’mama tomorrow!
bth be sure to use a selfhealing mat under the rotary cutter!! (something i wish i knew when i started sewing!)
I made them, and I love them. Need to make some more! Thank you so much for the tutorial
http://littleblackduckblog.wordpress.com/2014/02/16/pinned-it-tried-it-pattern-weights/
GENIUS! I have been sewing for decades, I’m an old school, self taught girl – the pinning IS ridiculous – and though I own a rolling cutter I’ve never really used it (in 20 years). I’m making those weights this weekend – joy, joy, joy!
Thanks!!
LIFE CHANGING! Headed to the store tonight. I HATE pinning – especially knits and I have a lot of knits I will be using this spring. Thanks for the inspiration!
These are lovely and a great tutorial.. I have used it on my own blog – with a link back to you, of course. Hope that’s OK.
of course 🙂 thanks!
An easy way to make weights is to take the washers (3), super glue them together and tie a piece of thread around them and dip them into plastic dip used to coat tool handles (available at most hardware stores), let them dry and bingo! It holds the washers together forever and is a good non-slip surface. Also prevents any rust that may form on the washers from showing or touching anything.
I’ve been using old, awkward, and ugly canned veggies. This is much better and prettier, thanks : ))
My grandmother used kitchen knives (case knives) for pattern weights. (Sorry I passed up a collection at a yard sale.) I have looked for something that would fit curves and small spaces. I collected milk jug caps, pennies, and inexpensive toys or party favors to glue together for pattern weights – easy to grab and easy to see, hope they are heavy enough.
These are so pretty and delightful. I must make some up for gifts! And for myself.
Amazing! Hardware store is now my tomorrow job! Thanks 🙂
I’ve just completed my weights today and looking forward to trying them on my next shirt.
Like many others I’ve glued to large steel washers together with hot glue. Unfortunately the glue seems to lose its tackiness quickly (effect of being sandwiched between two cold pieces of metal?) so I then put them on the oven at 250 for just a couple of minutes. The glue remelted and they melded together better.
Once cool I spray painted them with Plasti-dip – a rubberizing paint. Now one side of my washer weights cling REALLY well to the pattern paper and no more annoying slipping! Overlapping a few of them on both the pattern edge and the fabric is a sure way to keep everything aligned. They grab onto the fabric even better than the paper.
A lot of work but they are a perfect, simple, utilitarian device that does the job perfectly.
Thanks you so much for this post, I made some of these a while ago, and while the hardest part for me was judging how much ribbon I needed, I’ve made about a dozen of these weights and it’s changed how I sew for the better. I now actually get to spend time sewing instead of using up nap-time pinning, cutting, and unpinning my patterns from the fabrics
merci d’y avoir penser pour nous. Le petit plus : c’est beau !
I am making these now and they are coming out great. Thanks for a great idea!