


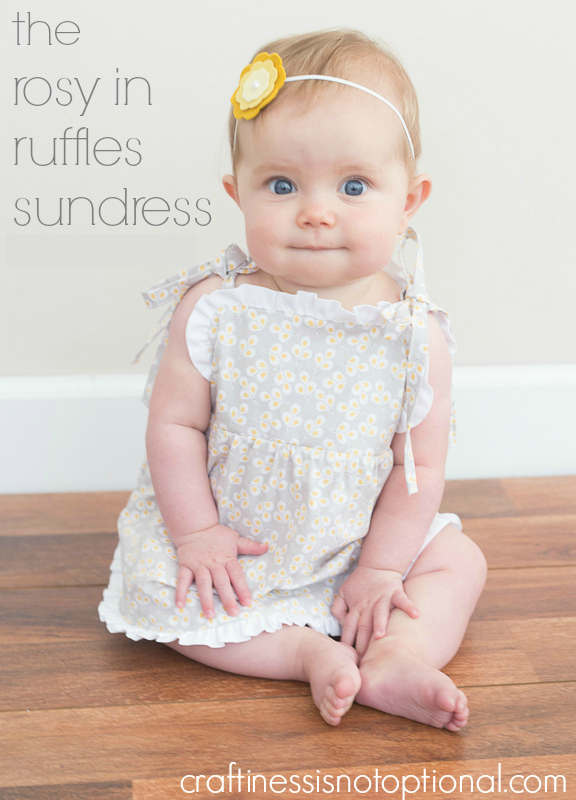
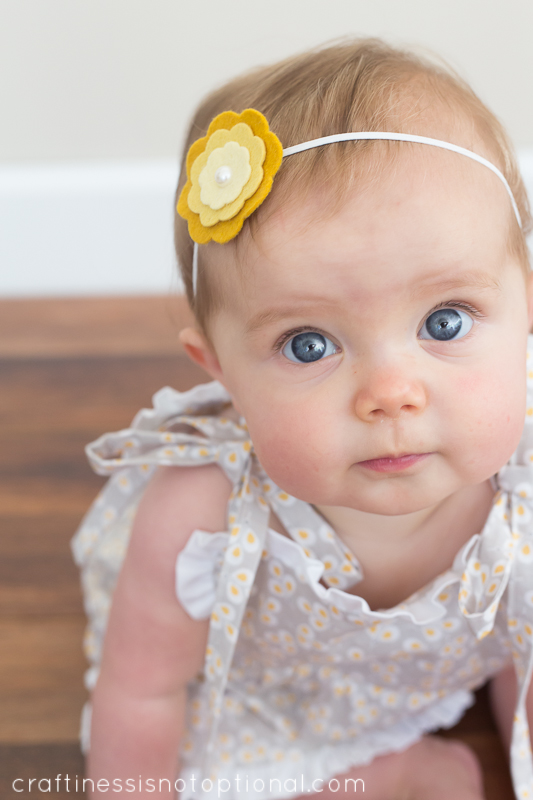
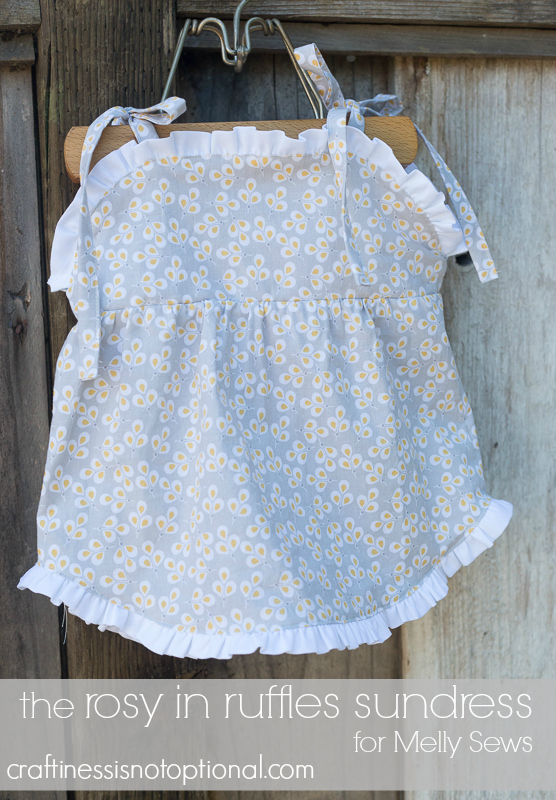
I’m pretty darn excited about how this sundress turned out! And on Miss Ava…man alive I want to gobble her up, she’s so darn cute. There’s just something about baby sized clothing lately…I just can’t get enough! Maybe it’s that she can sit up now and it’s so much more fun to take pics of her. Anywho…I’m psyched to be posting today for Melly Sews’ 30 Days of Sundresses series! I admire Melissa so much, and she’s such an awesome seamstress-her blog is full of fantastic info and projects!
So for my sundress, I made a simple ruffled sundress, with a curved bodice and ties on top-it’s really easy and quick (quicker if you don’t add the ruffles, piping or ric rac would also be adorable!) and I added a slightly gathered skirt with a scooped hem to mimic the top of the dress, and for easy wear for my little sitter!
Ohmygersh. swoon.
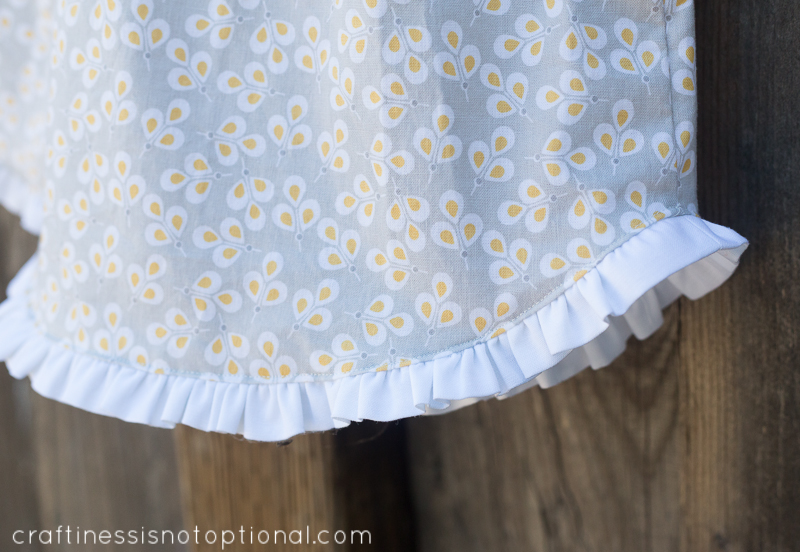
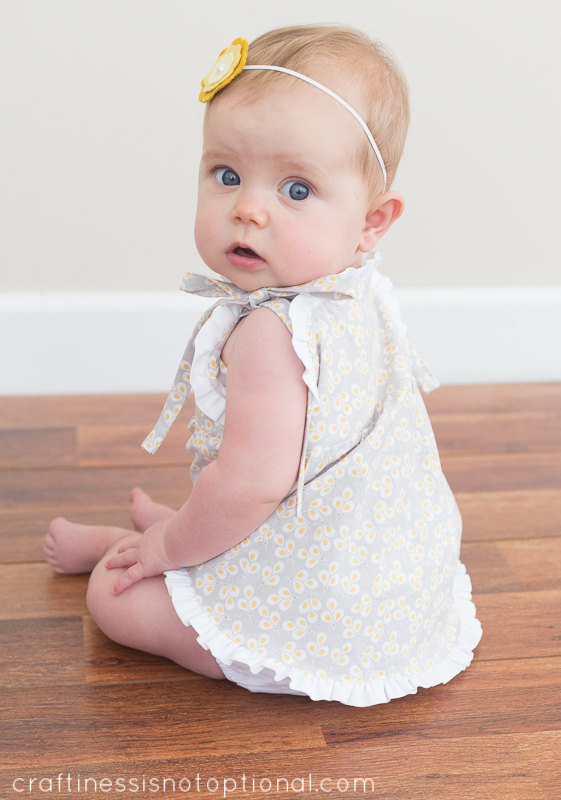
a little detail shot of the scooped hem.
Edit: I forgot to mention the fabric! Doh! It’s Leaves in Yellow from My Minds Eye via my sponsor Lily Bella Fabrics!
So here’s how I made it! This is a 6-12 mo size, so the straps and ruffle lengths will be for that size, if you are doing a larger size, obviously increase the lengths as needed. Generally ruffle pieces are 1.5 -2 times the width of the fabric they are gathered to fit to.
I recently learned how to digitize my patterns (from Melissa’s course!) so I have also created a free pattern for you to download, which is in a 6-12 mo and 12-18 mo size. Sorry about the limited sizes, but that’s how it goes, you know? This pattern has only been tested by me in the 6-12 mo size, and it’s not perfect, but it is FREE. Seam allowance is 3/8″ on the pattern. I may come back to it someday and grade it up, but no promises! So take that for what it’s worth. 🙂 For personal use only please.
Click below for the full tutorial!
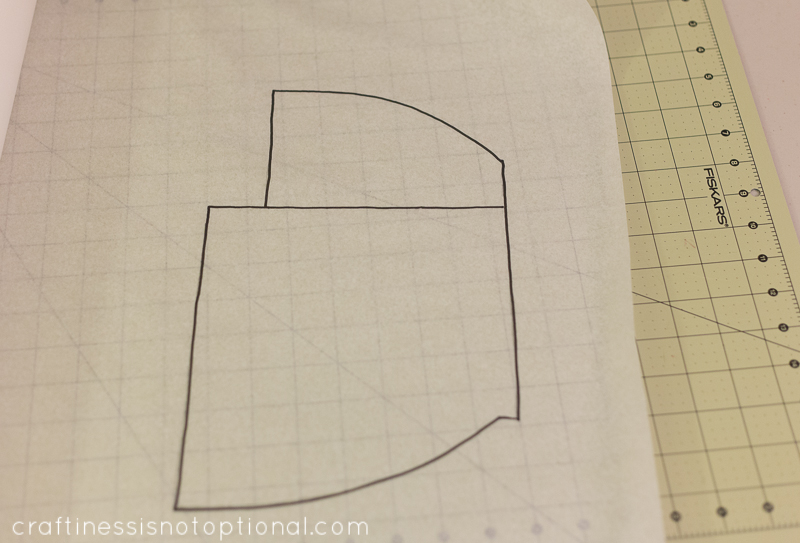
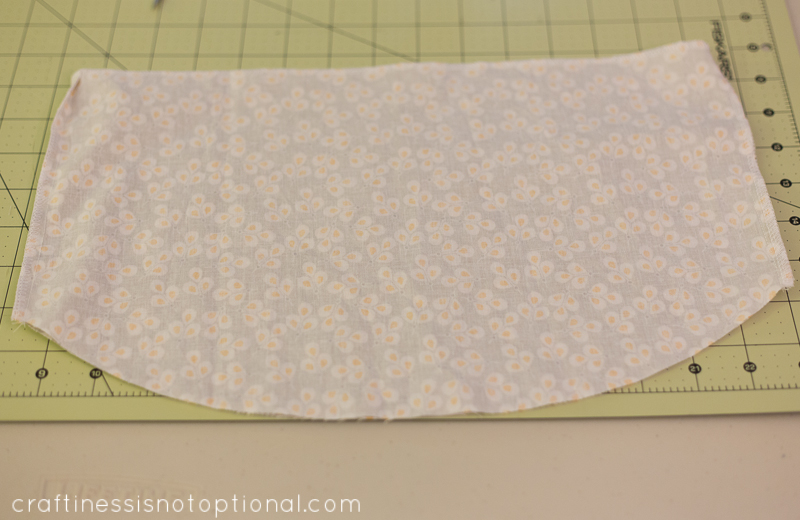
So if you’re making your own pattern, use your child’s chest measurement and a dress that fit to figure out the width and height of the bodice piece. I curved it out like so to create the sloped bodice and to fit under her arms. The paper I use for my pattern making is medical exam paper, I get it here (affiliate link) and it’s cheap and awesome for tracing. Thanks to Kate for that tip awhile ago! Just realized I never passed it on. The skirt I created using the same width as the bodice, and curved it down like so, I also added 1.5″ to the fold for gathering room on the skirt. Add seam allowance to the side of the skirt pattern.
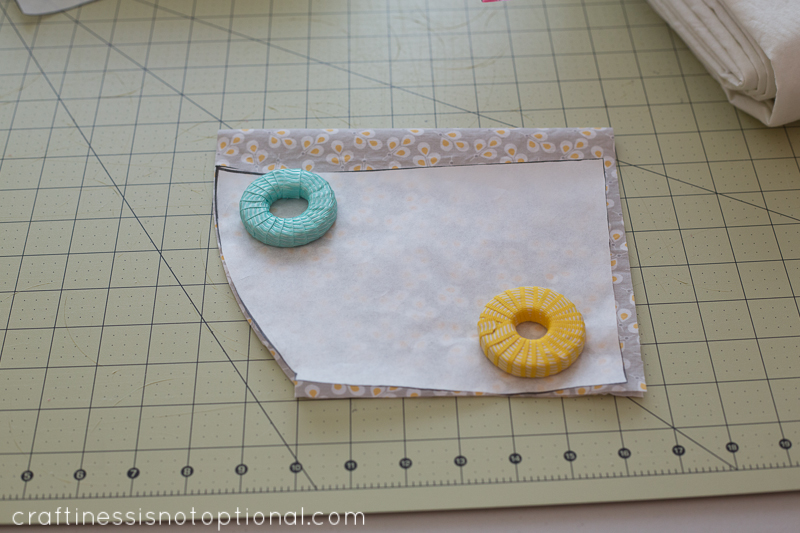
Now you can either recreate the pattern (like I did in the other pic) and add width to the fold for the skirt, or just add 1.5″ like so when you cut out the skirt to create room for some gathers. Also add seam allowance on the top of the skirt.
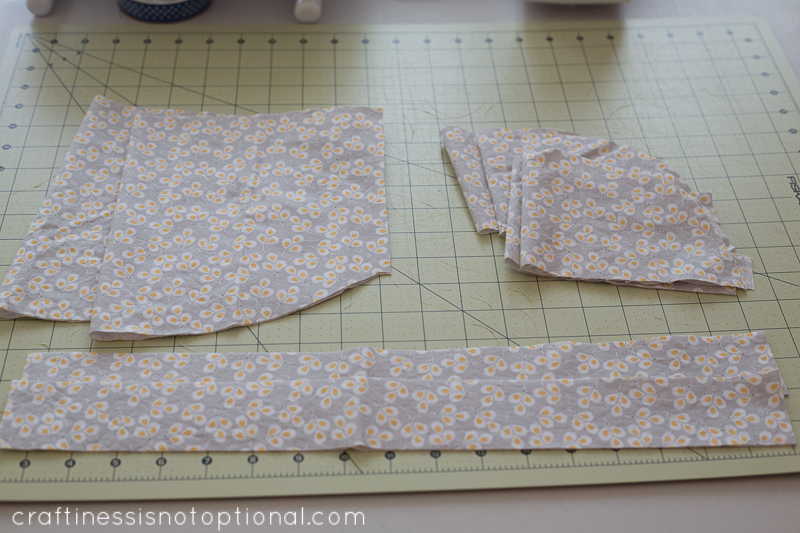
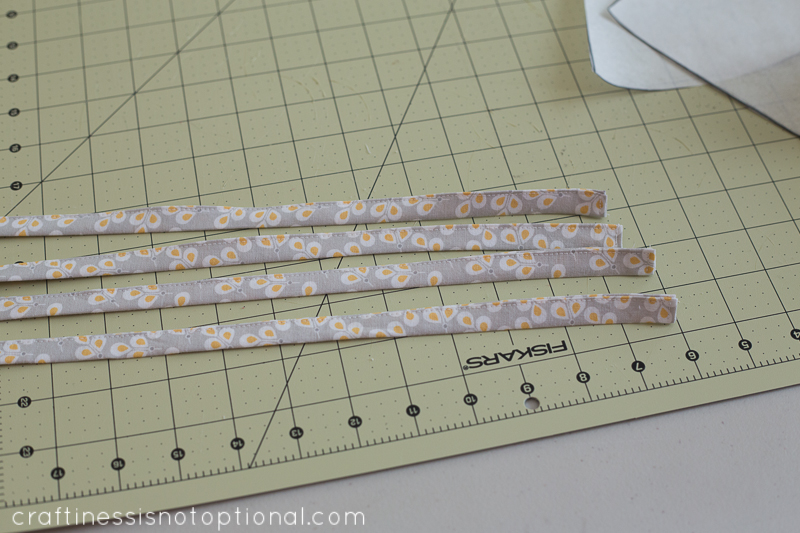
So now cut out two of the skirt pattern , four of the bodice (both on the fold), and then 4 strap pieces. Mine were 15″x2″. This size works for both sizes on the free pattern, and probably just lengthen them a bit for larger sizes.
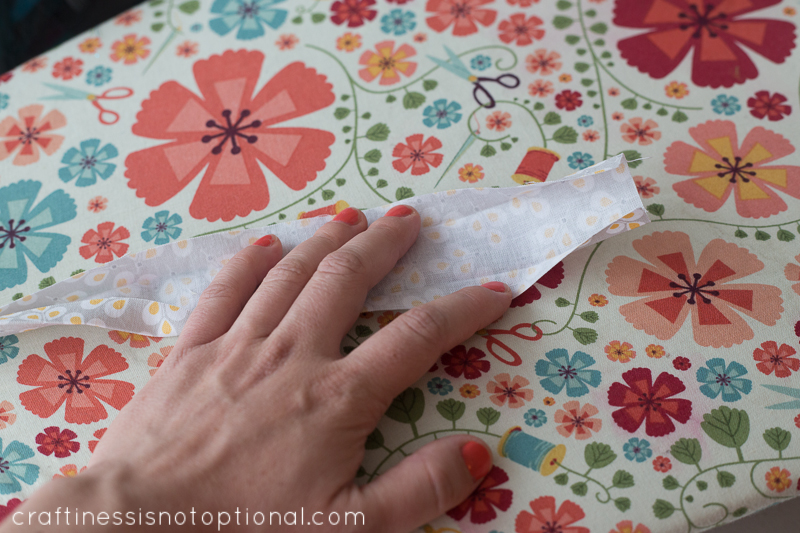
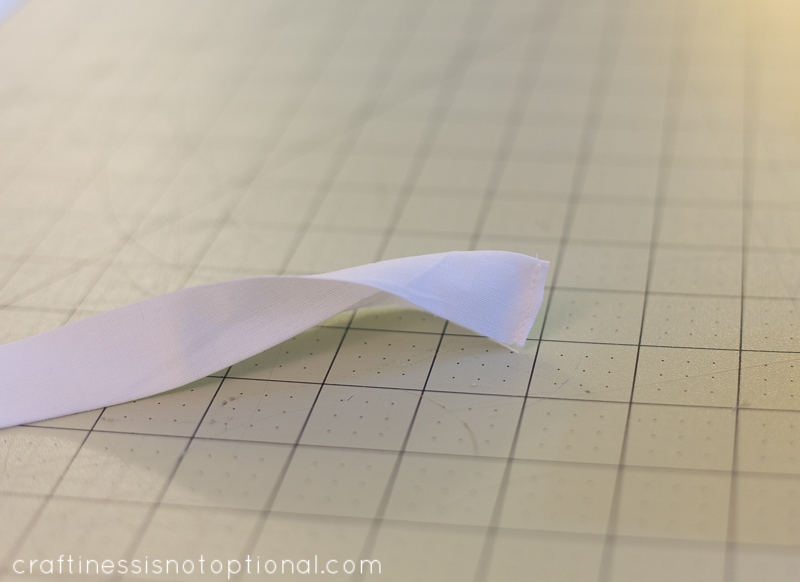
Next press in half with wrong sides together lengthwise, then press each raw edge to the middle like so.
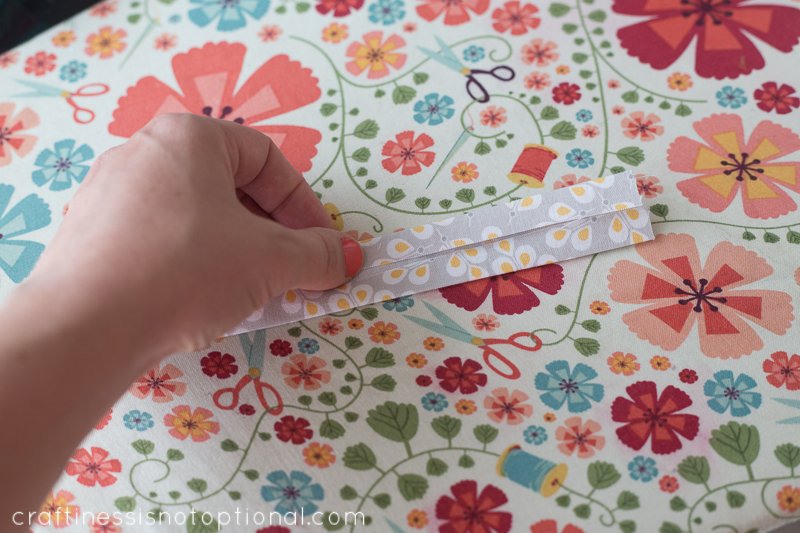
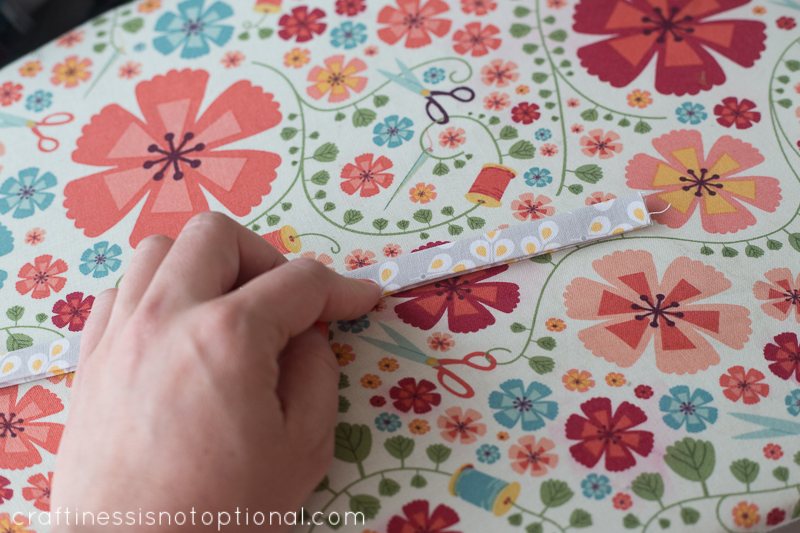
Then fold in half again and press.
Next:
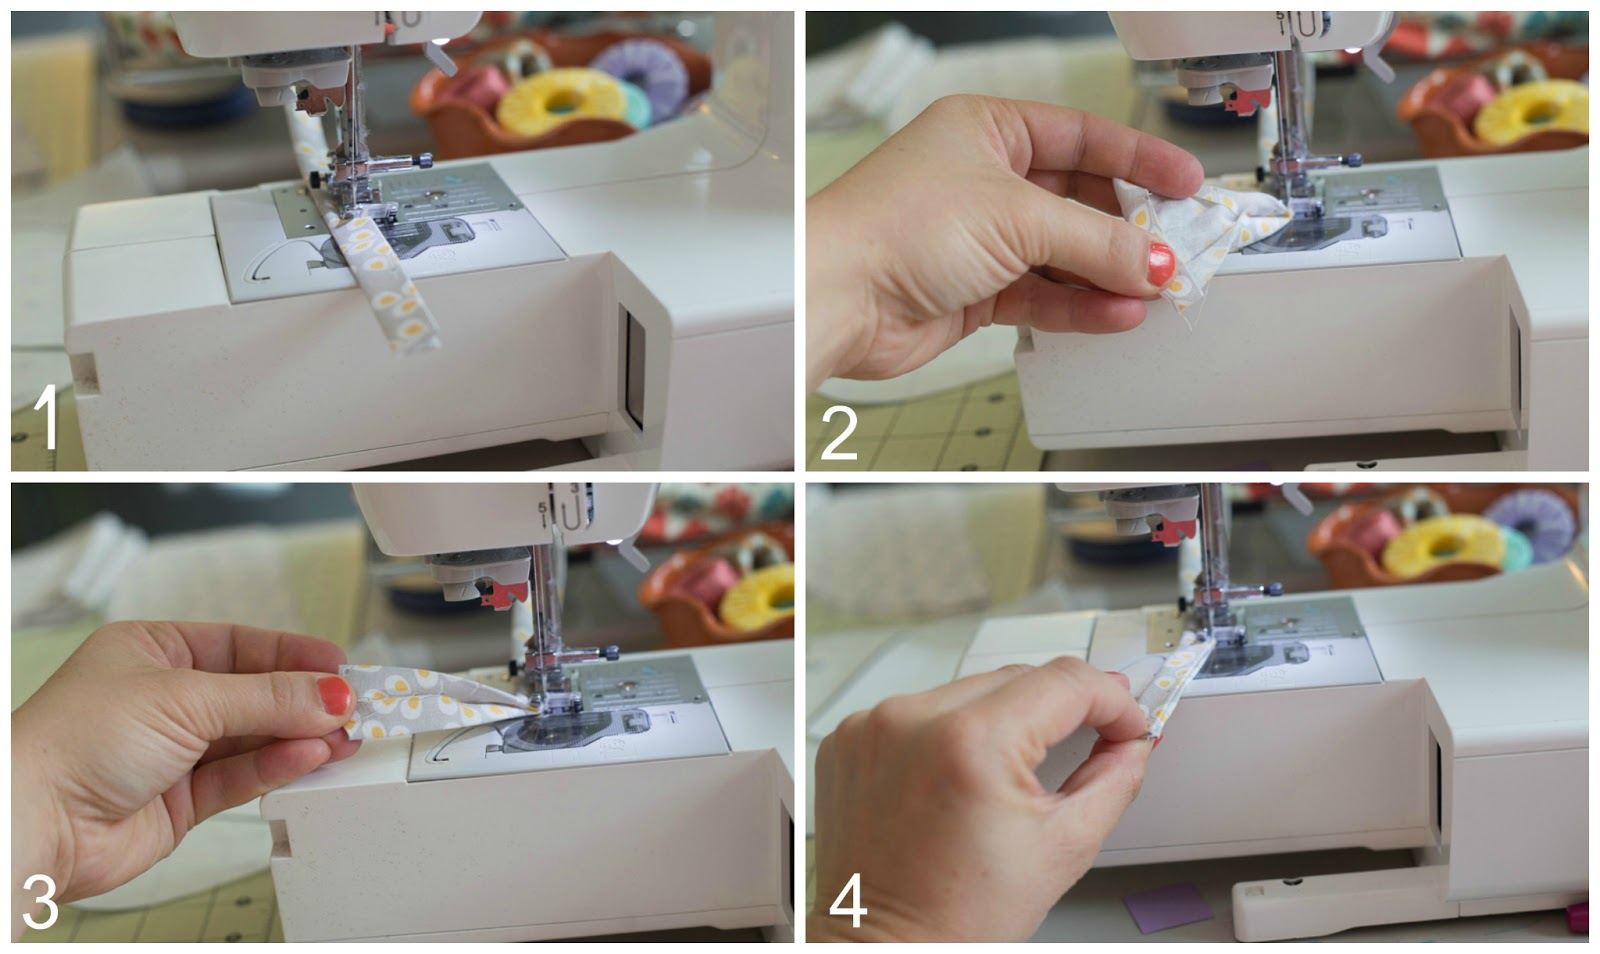
1. Topstitch 1/8″ from the edge. Stop about 6″ from the end or do this next part before you start sewing and pin it. I just did it on the fly!
2. Unfold the strap pieces, then fold in the end 1/2″
3. Then fold in the long sides…
4. and in half again to enclose all raw edges. Continue sewing down the strap and then pivot and sew across the short end, then backstitch to secure.
Continue for the other 4 straps.

Next: the ruffles. I measured the top of my bodice, then cut my pieces 20″x 1.5″. One for the back, one for the front. Press in half, wrong sides together.
Next twist one of the short ends of a ruffle so that the fabric is right sides together and sew. Trim excess turn right sides out, and press. Repeat for other three short ends.
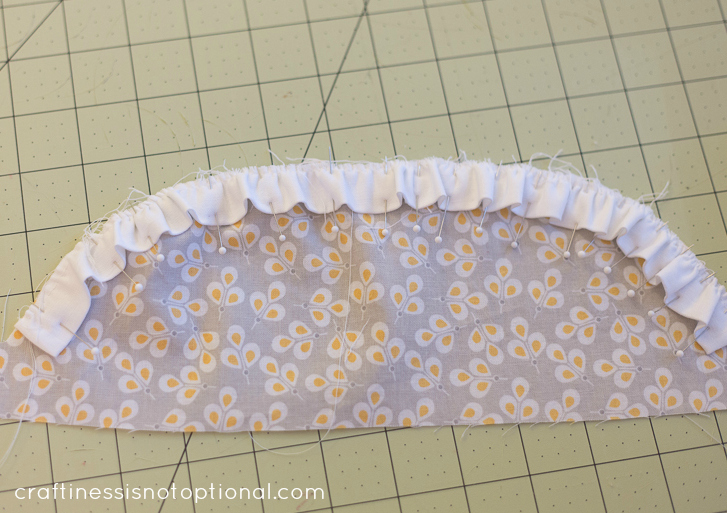
Then sew a gathering stitch along the raw edge of the ruffle and gather to fit a bodice piece. Make sure to leave about 3/4″ to 1″ of space from the end. Baste to the bodice piece 1/8″ from the edge.

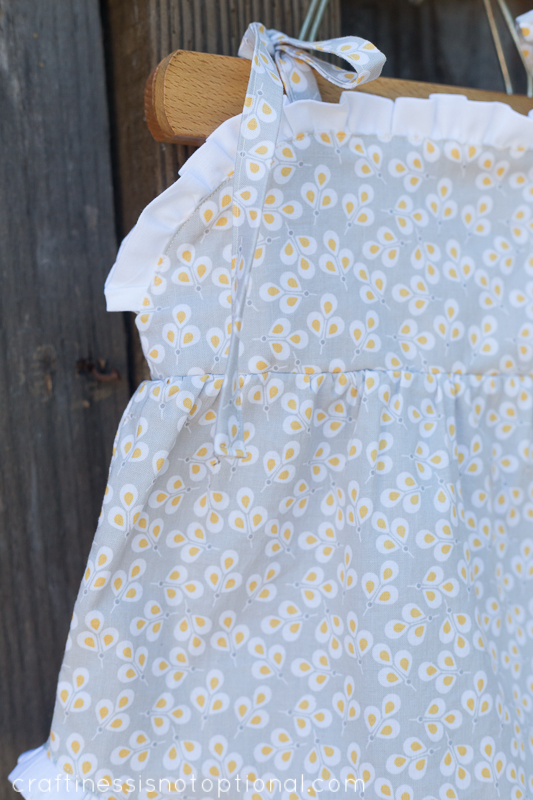
Next pin the straps to the bodice piece and place the other piece on top. I placed mine 2.5″ from either side of the middle of the bodice. (markings will be on the free pattern) Then sew together with a 3/8″ seam.
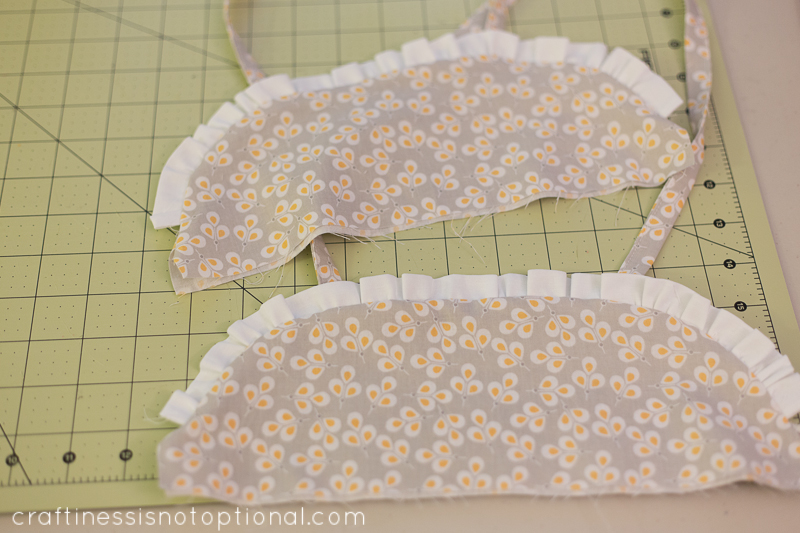
Repeat for the other bodice pieces, then turn right side out, press, and top stitch along the curve, avoiding the seam allowance on the side.
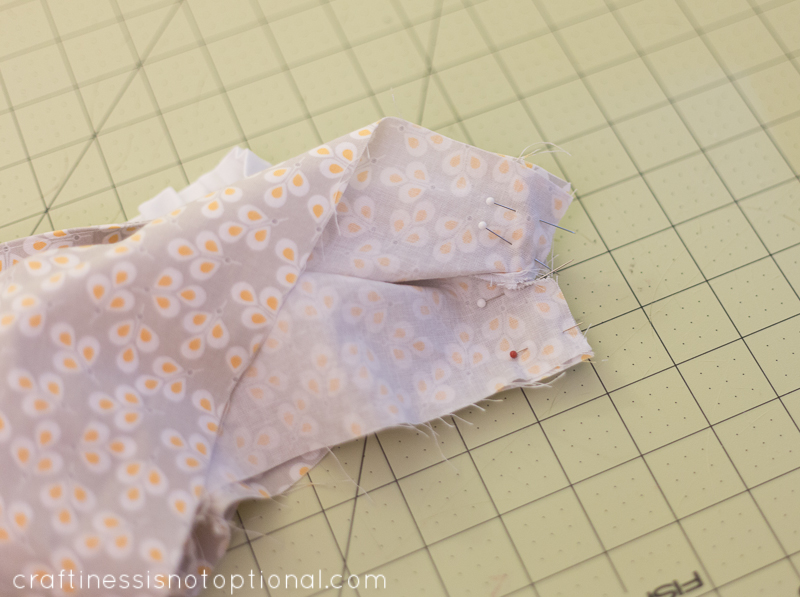
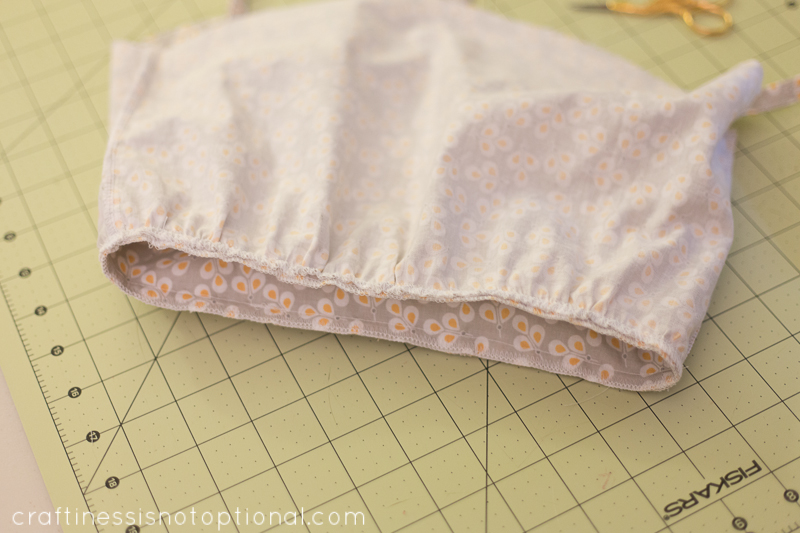
Then open up the side seam allowance and pin each side right sides together and sew.
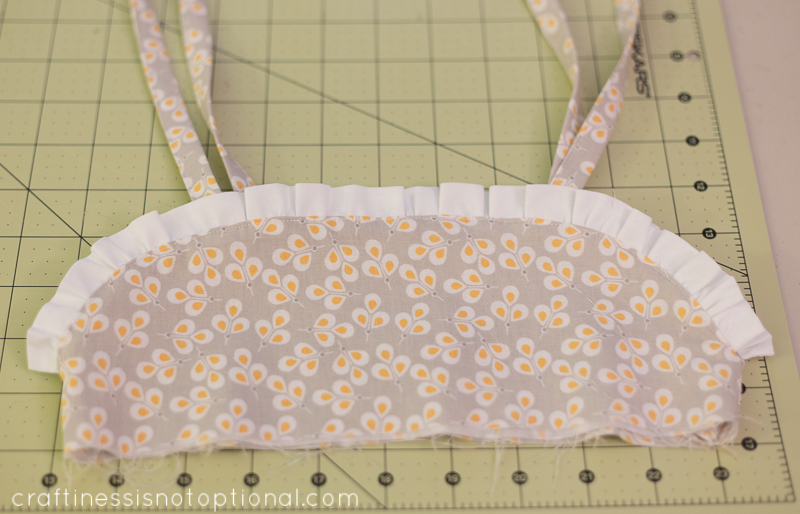
Turn right side out and press side seams.
Next sew the skirt pieces right sides together at the sides, using the seam allowance notches provided. Then I finished those seams with my serger and also serged along the bottom and top of the skirt, and the bottom of the bodice.
Next sew a gathering stitch along the top of the skirt and gather it to fit the bodice, lining up side seams. Turn the skirt wrong side out and slip the bodice in, right side out. Pin and sew together, then press the seam allowance down, and also the gathers gently from the right side of the skirt.
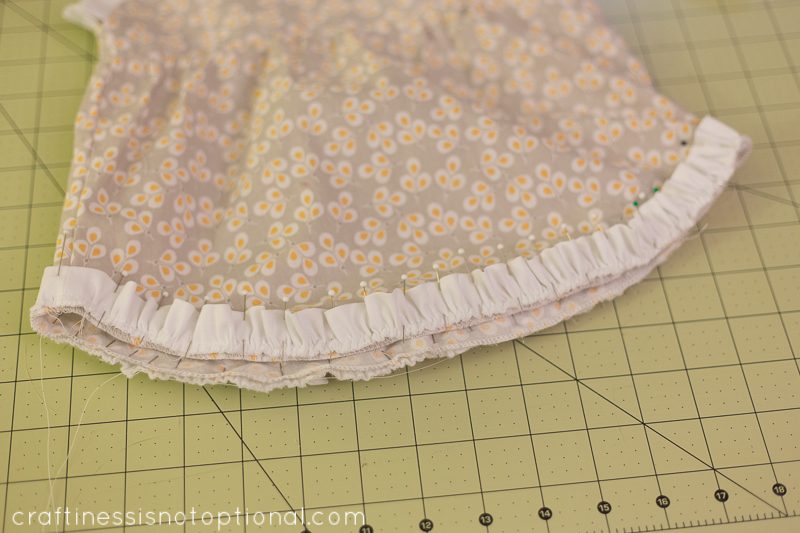
Lastly, I sewed on a long strip of ruffles along the bottom of the skirt. It was about 2x the width of the skirt, and also 1.5″ wide, same as the top ruffles. I sewed two pieces right sides together at the short ends, then folded the long strip in half lengthwise, with wrong sides together, (serged the raw edges to prevent fraying) then sewed a gathering stitch and gathered it to fit the skirt just like the top ruffles. Sew, then turn down ruffle, lightly press, and topstitch along the edge to keep in place.
Tada! Hope you enjoyed it, and I would love to see if you make one! If you have any questions, let me know! Thanks Melissa, for having me! Make sure and check out all the other awesome bloggers’ sundresses!
Absolutely gorgeous, I will try to make one up tomorrow..
Thank you.
I was just about to start begging you for the pattern before I scrolled down further, thank you for this beautiful pattern and tutorial!!
This is sooooo cute! I have a huge list of things to sew but I think my 10 mo. old might need a new dress today! Thank you for sharing the pattern and tutorial!
Gorgeous! Thank you so much for the pattern, this has jumped the sewing cue. Love the headband also.
where can I find the pattern
Another adorable dress! Seriously, do you ever have a sewing fail? 😉
bahahaha, that first picture!!! I die. You did a pretty fantastic job making this dress and that girl.
-A
Ava’s sitting up!? She is so adorable!
Oh, how cute it is! Wish I’d have a babe like your sweety 🙂
Oh so adorable! I need another baby just to make one of these for her!…or maybe I can just find a friend’s baby 🙂
This is so cute! However, I do not believe that baby is real – how on earth did you get her to sit and pose so perfectly! I have a 9 month old and it’s impossible!!
Love it!
Too cute–enough said. Oh, the dress is really cute too 🙂 I think bloggers get away with gushing over their own kids. Can you imagine carrying on like that in the non-blog world? People would be carrying on about how “so and so” can’t stop talking about their kid. Ha Ha. We love seeing those pics–who can deny the cuteness? You are blessed!
Oh, how sweet this is. Your daughter is super cute. You did such a cute job on that dress.
This comment has been removed by the author.
Gorgeous dress…Ava is growing up!!
So adorable and easy, Jess! Thanks for participating.
All I can say is – adorable 🙂 The model and her new dress 🙂 Thank you for sharing 🙂
Hi Jess, I love your sewing and Photography. Any chance of posting some tips on how you get such lovely photos.
Hot dang you make the cutest babies. I think my favorite baby time is when they start sitting up but they’re still all babychubby, too. Adorable little dress, too!!
I know Teresa would love a dress like this…
What an adorable sundress! Thank you for sharing the pattern. I wish I had a girl that was still this little. It almost makes me want to have another baby so I can sew cute things for her…almost. 🙂
Hi Jess
I’ve made 2.5YO version, super cute!
If you want, you can check it out on my blog: http://tweeemmerkeswater.blogspot.be
🙂
Awww, lookit those cute little chubby cheeks! And what a sweet little dress to go with them. =)
I used this pattern and made my 9 month old, Claire, a 4th of July dress. It turned out so cute! The pattern was great and the directions were super easy to follow! Thank you!
This is adorable! Thank you for sharing the wonderful tutorial.
Hi! I’m a new sewer, do you think I can pull this off if I’ve never sewn a dress before? To do the ruffles, do I sew 2 rows with basting stiches and then pull the string to make a ruffle? Do you use interfacing for this dress? (Sorry if these are stupid questions!!)
Sure! Give it a shot! Ruffles: exactly as you said..and I don’t think I used interfacing 🙂
omgg tooo cute!!!
will defs try and make this for my bubba girl x thank you
Thank you so much for this pattern & tut! I made this for my 7 month old and it turned out beyond precious!!! perfect for a new “sitter.”
The first bodice piece I made turned out WAY too wide, so I made another and scaled back the width off the fold. This one fit her perfectly and now I have a complete bodice that will fit her next summer 🙂
Thanks for sharing this pattern!
I just made one for my 2 year old the other day, without the ruffles. It’s super easy and quick to make, though it turned out way to large for her. I ended up sewing an elastic onto the seam allowance around the waist, and that helped a bit, but it will probably work better as a top next summer. She’ll still wear it as a dress this summer though. 🙂
Gorgeous! Thank you so much for the pattern, this is first time , thank you so much , its lovely,
I really appreciate for your generosity, i’m really happy …..
thanks!
Amazing pattern! so simple and cute, thanks!!!
Hi! Thank you for the pattern! I was wondering, do you think it would be possible to make the bottom into shorts instead of a dress? I’m not skilled with making patterns, so just wondering how I would do this?
Thank you!
probably! You could find a shorts pattern you like and then just grade the two so they fit!
{Hope this isn’t a duplicate, as I lost the first one!}
Hello, Jessica! I know you posted this tutorial quite a few years ago, but I just wanted to add my sincere thanks for such an adorable, easy-to-sew dress. My lifelong best friend will be a first-time grandma in a few weeks, and since I sewed her daughter many outfits back when she was a baby, I thought it’d be nice to sew her granddaughter something special. Upon doing a quick search for some inspiration (since my own daughter is now in college), I found your blog and ruffled sundress and knew it would be perfect! And even better, you offered a free pattern! Now I can’t wait to go fabric shopping (since the one you used is no longer available).
I’ve thoroughly enjoyed browsing your blog–sooo many cute ideas! I’m definitely gonna snap up your Bapron pattern, which will make a great addition to the sundress, and I fell in love with that felt flower headband your beautiful daughter is wearing, so that’s on my list, as well as several things for myself, such as the ironing board cover, the zippered pillow, etc., etc.
Thanks for the endless inspiration!
Thank you so much! That was such a nice comment! 😀
Thank you so much, I shared with grandma so she can make it for my baby. The dress is adorable on your baby.