


Have you seen the movie Secretariat? I watched it the other week, and it was pretty good. Especially the last race! (I may or may not have been bouncing in my seat, cheering him on!) I love me a good horse flick, so I thoroughly enjoyed it. (used to be somewhat obsessed with horses and horse racing when I was younger…and by younger I mean….last week.)
The main character, Penny Tweedy, played by Diane Lane, wears some fab clothing. (the story takes place in the 70’s) One outfit in particular caught my eye. I knew I HAD to make my own version for the Sadester.
Here’s the original, from the movie.
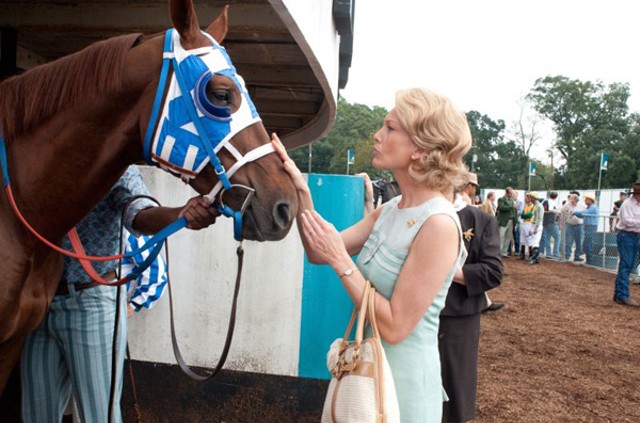
Not the best shot, but the only one I could find. (awesome bag, too)
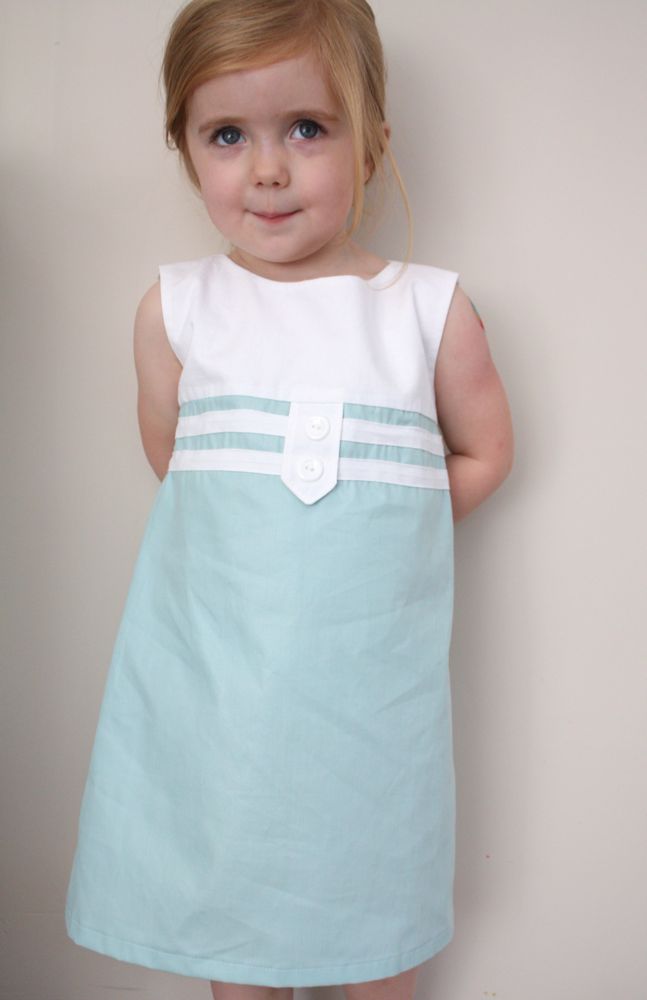
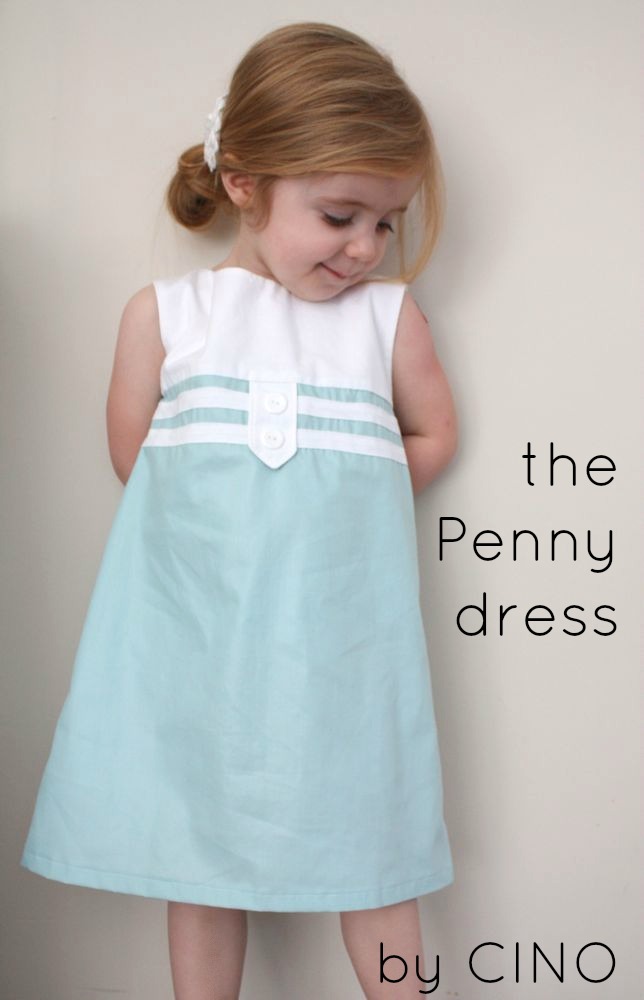
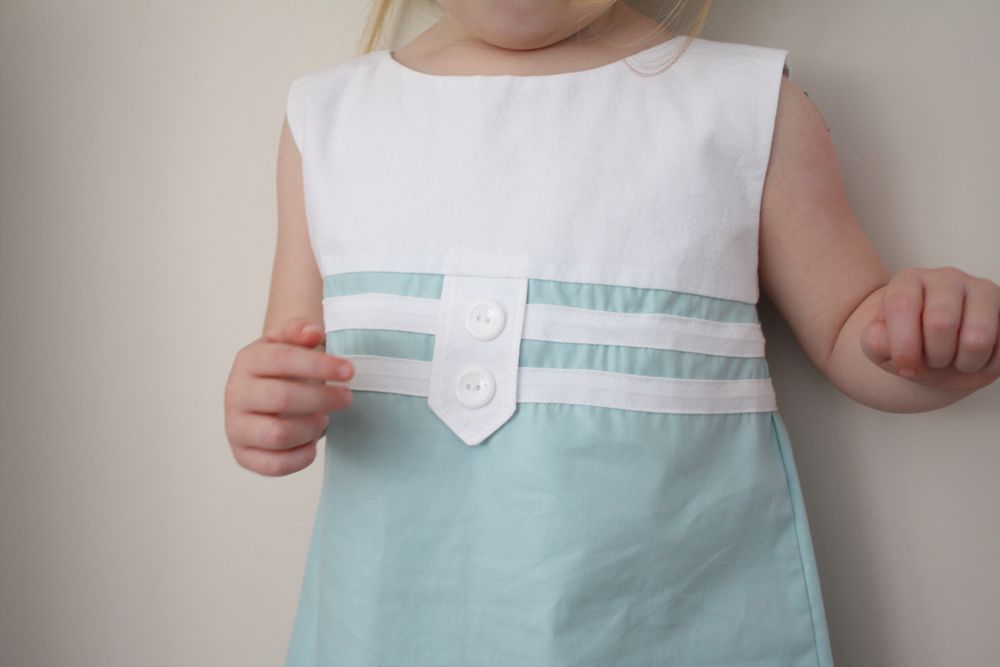
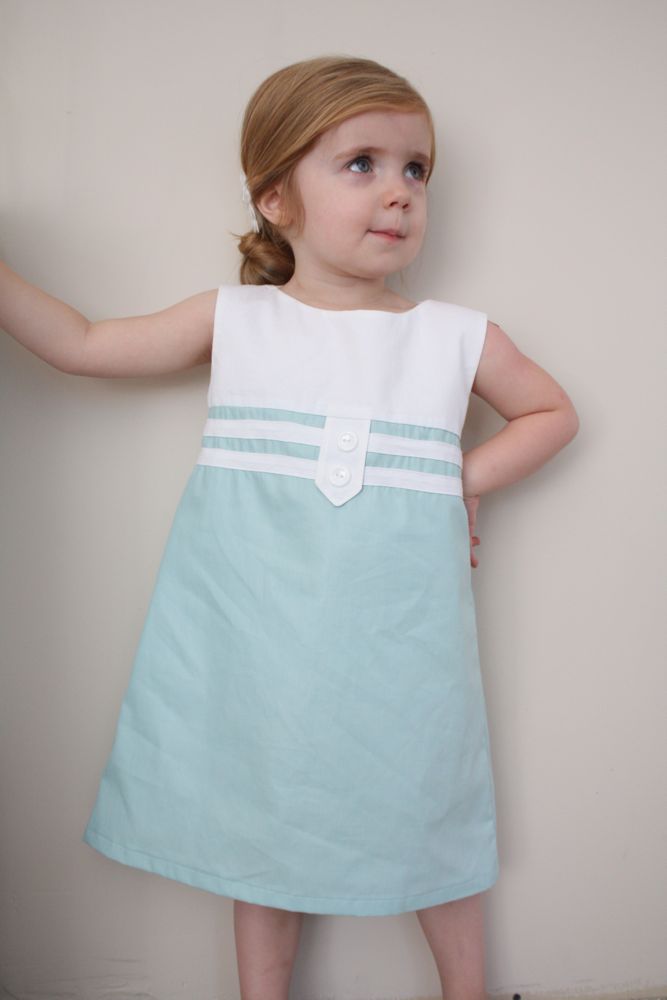
I love the simplicity of the two toned dress, and added details. The bias tape trim and button flap are easy to do but are striking, no?
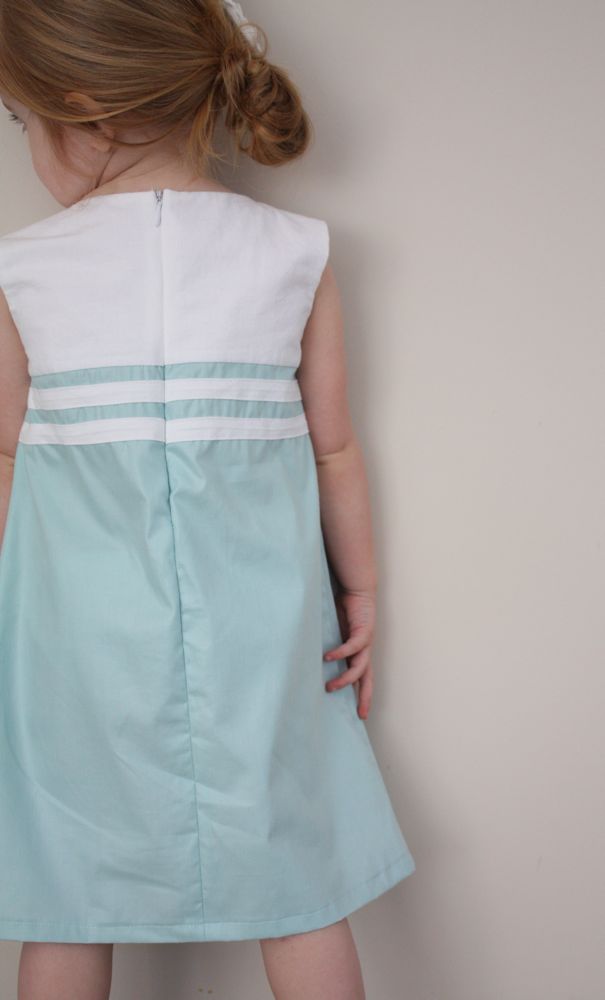
It zips up the back with an invisible zipper. (and looK! I lined up the bias tape pretty good. miracles do happen)
Little Miss Sassypants likes it too.
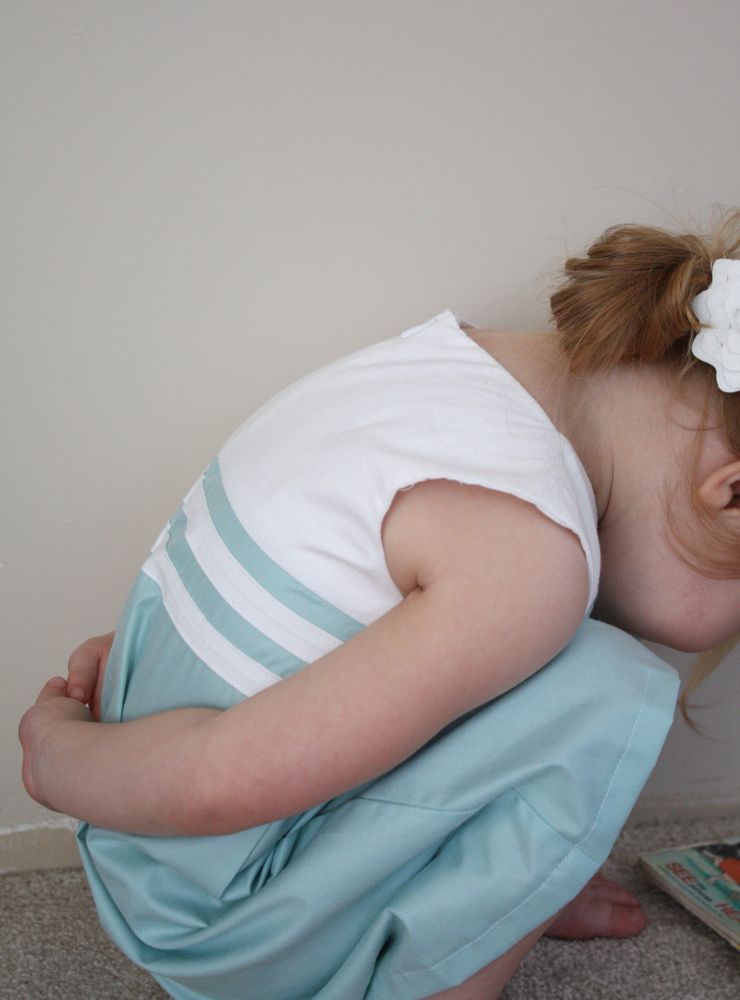
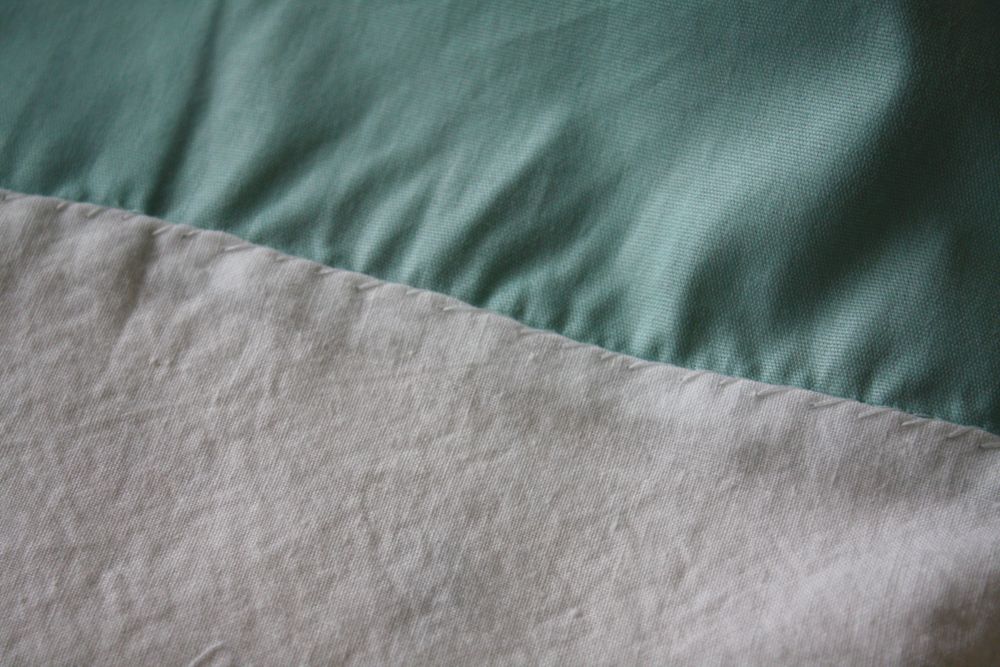
I don’t remember where I got the aqua fabric, but it’s got a pretty sheen to it. The white fabric is just bleached muslin.
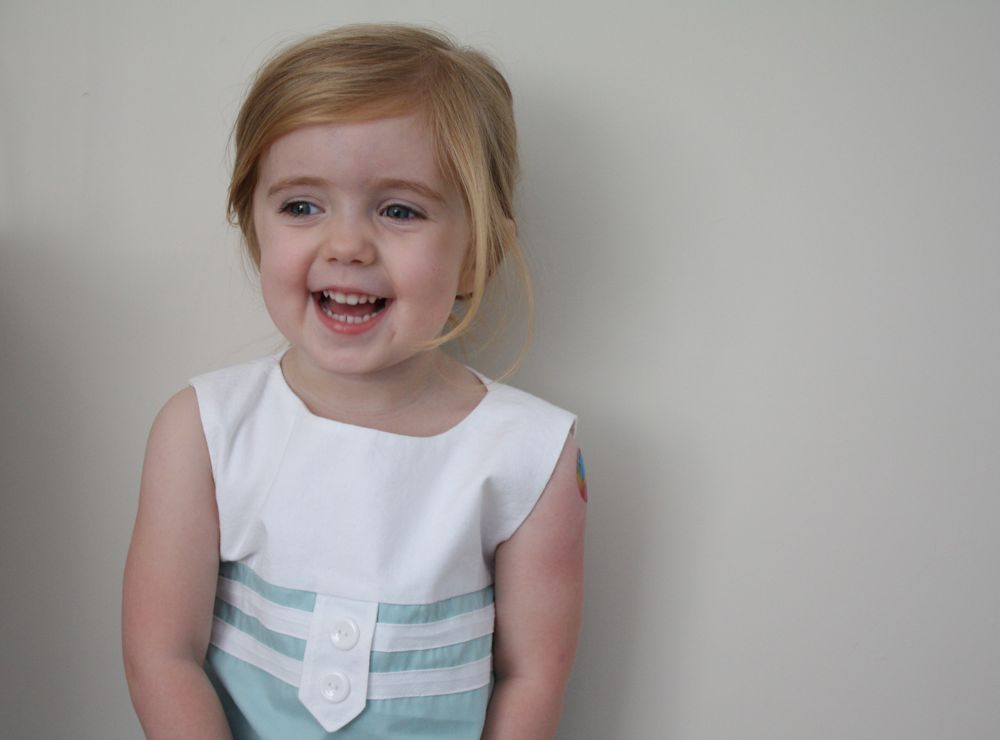
Poor thing had her shots the day before. (hence the band aid and red arm.)
So here’s how I made the Penny dress.
You’ll need:
main fabric ( I used about 3/4 yard of the aqua)
accent fabric (same for the white)
buttons
matching thread
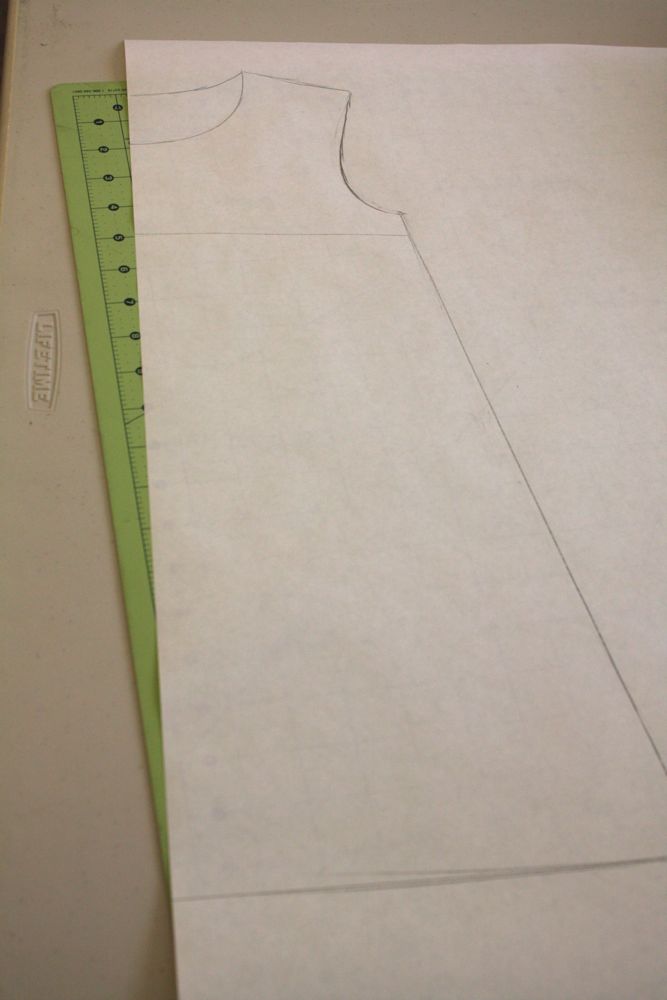
First, trace around a tee that fits your child and then draw a simple A-line dress shape. You can also use a purchased A-line pattern to help get the size right if you’re worried about that. Make sure to add seam allowances around your pattern. (I usually use 1/4″-3/8″)
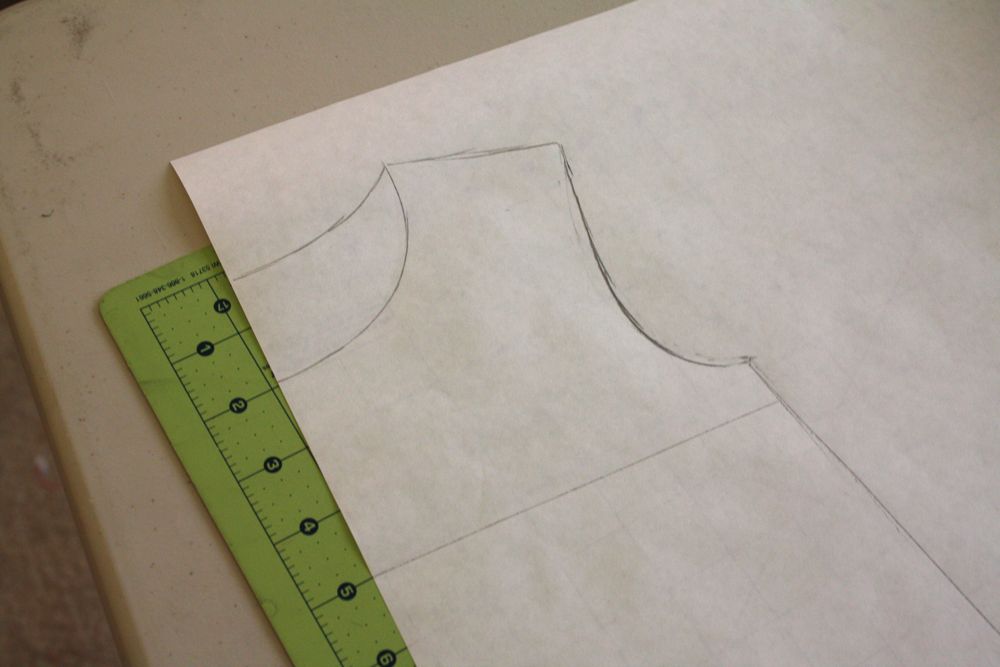
Then about 1″-1.5″ below the armpit, draw a line across.
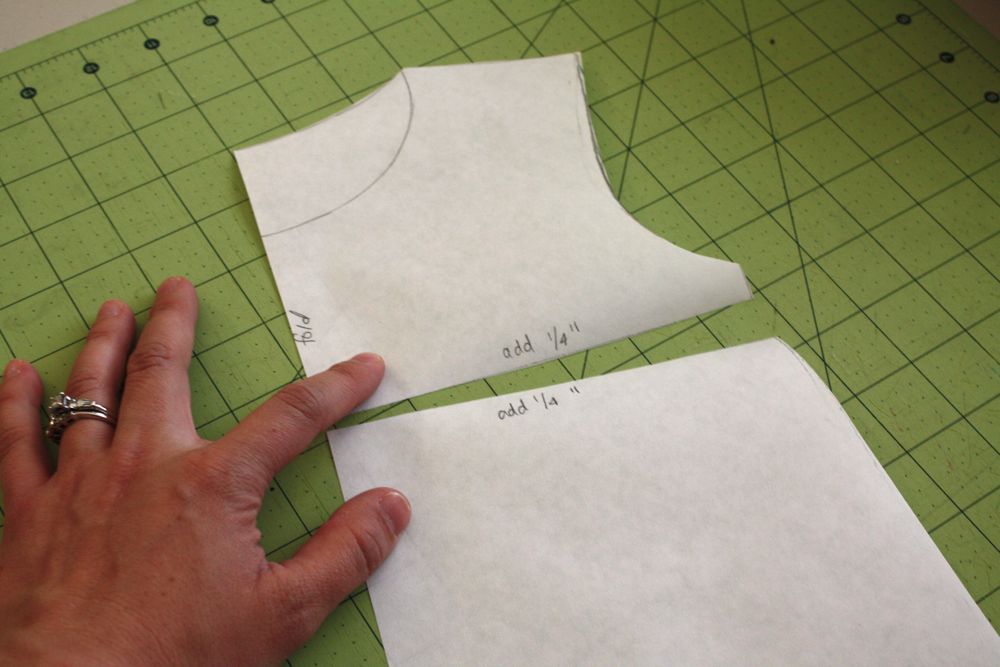
Cut the pattern apart, and write on the pattern your directions. (which way the fold is, to add seam allowance to the bottom of the bodice and top of the skirt…also add 1/2″ to the edge of the bodice piece when you cut your back pieces…for the inv zip)
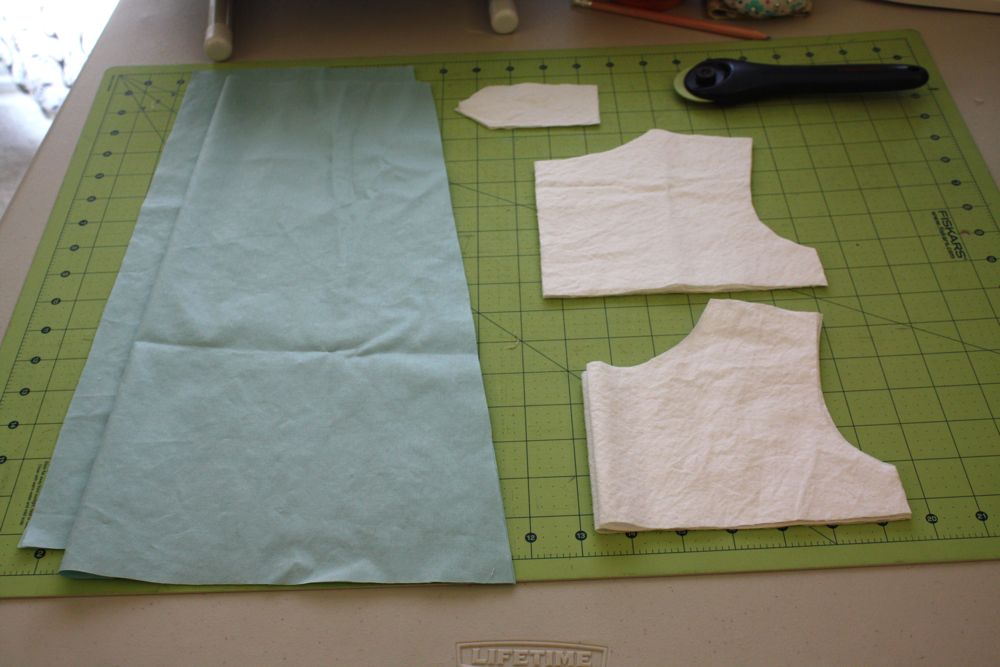
Then cut out your pieces. Cut two on the fold for the front bodice.
Cut four of the back bodice piece, adding 1/2″ to make room for the inv. zip. Not on the fold.
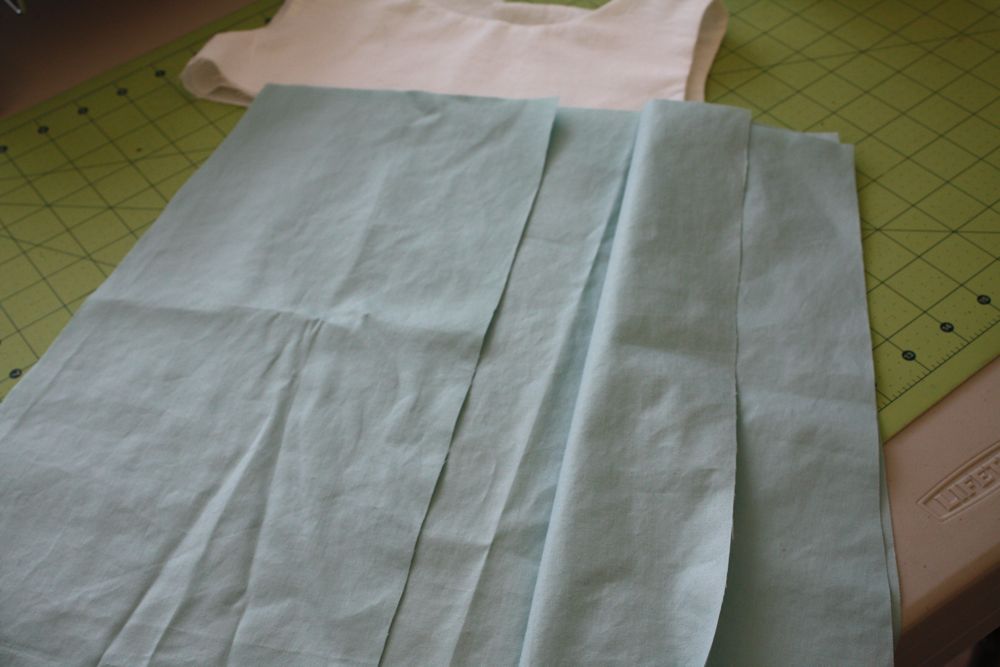
Cut two of the skirt piece, one on the fold, and one piece with an extra 1/2″ for the zipper and seam. The bottom of each piece (skirt to bodice) should match up along where they are to be sewed together.
Also cut 2 small pieces of fabric 2″x6″, then cut one end into a triangular shape.
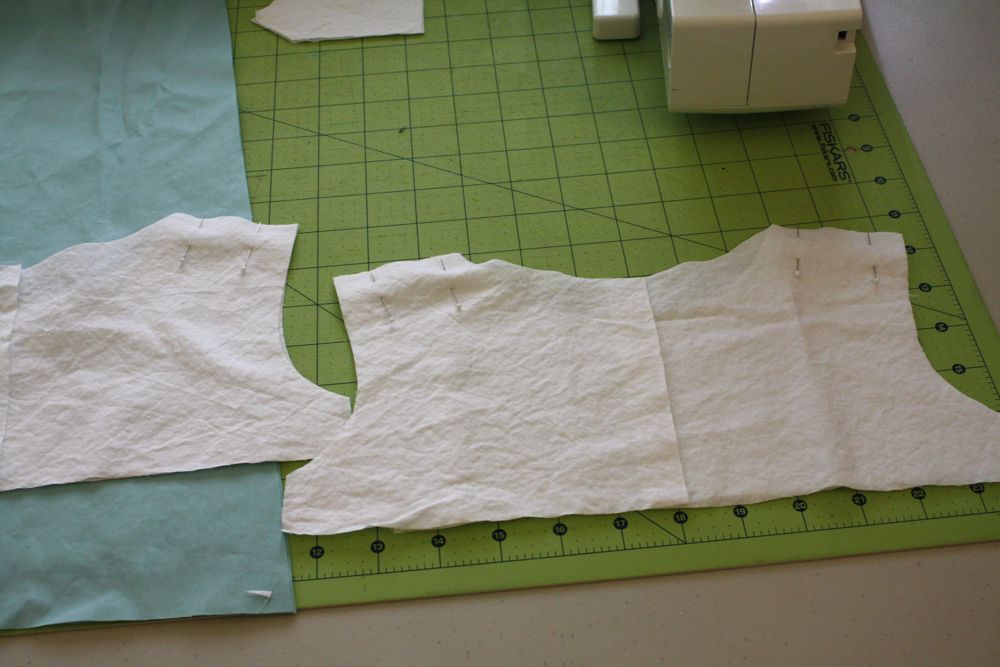
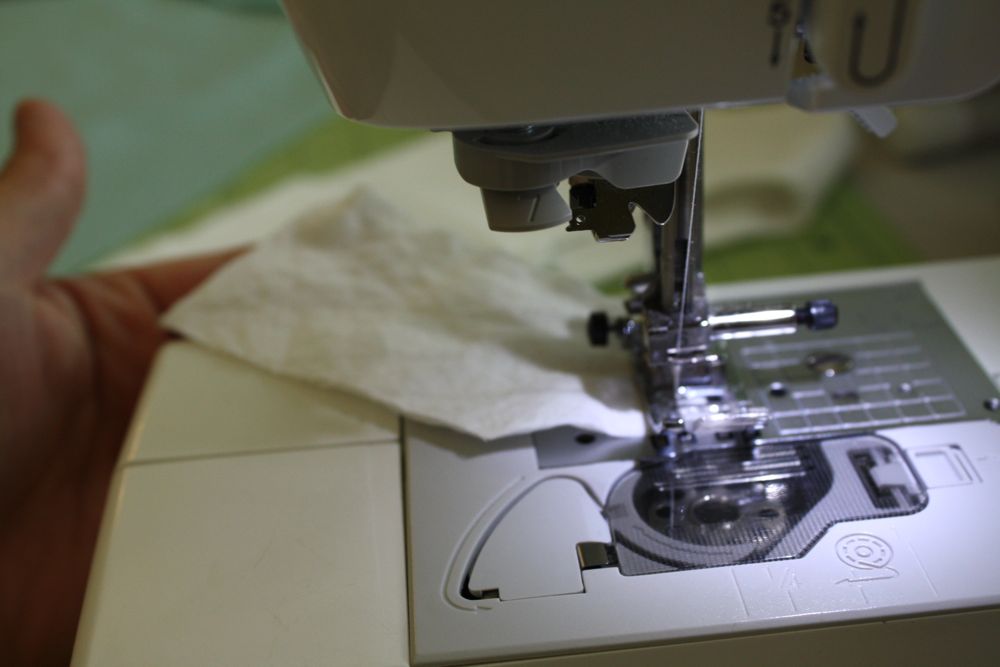
Now pin the front bodice to the back bodice pieces, at the shoulder seams, and sew together. Do this for both sets.
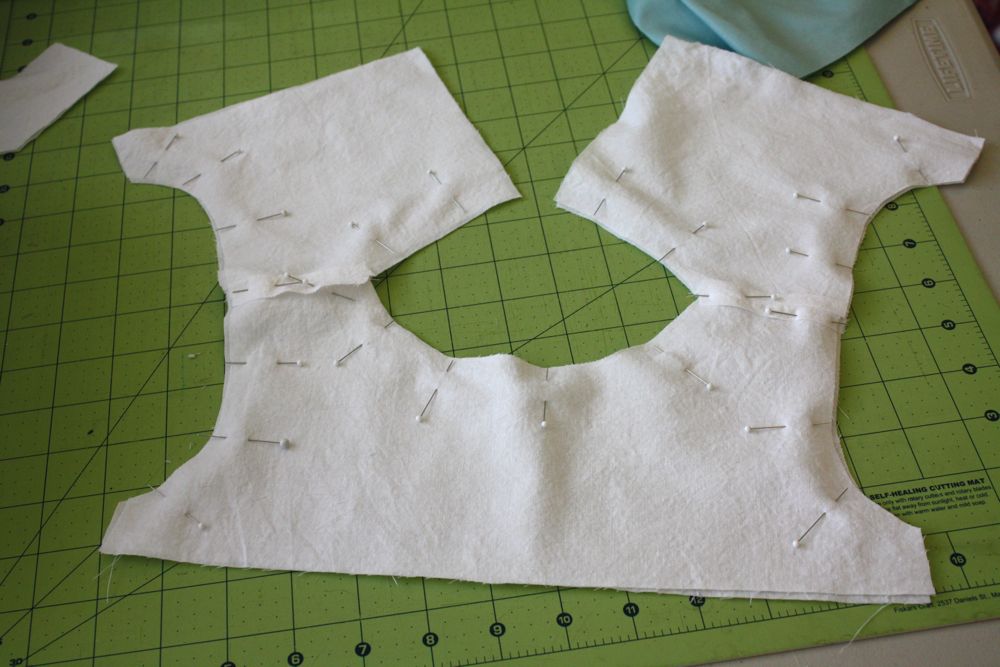
Press your shoulder seams open, then lay the bodice pieces right sides together (RST), lining up the shoulder seams again. Pin around the neck and armholes. Sew along where you pinned. Then clip curves if needed and turn right side out.
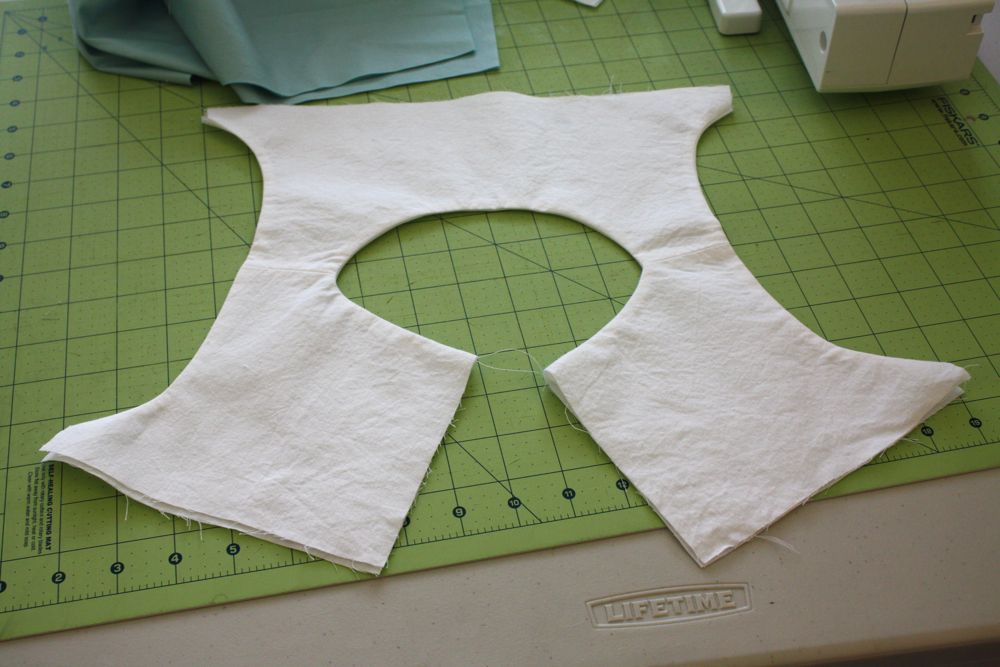
Press with your iron.
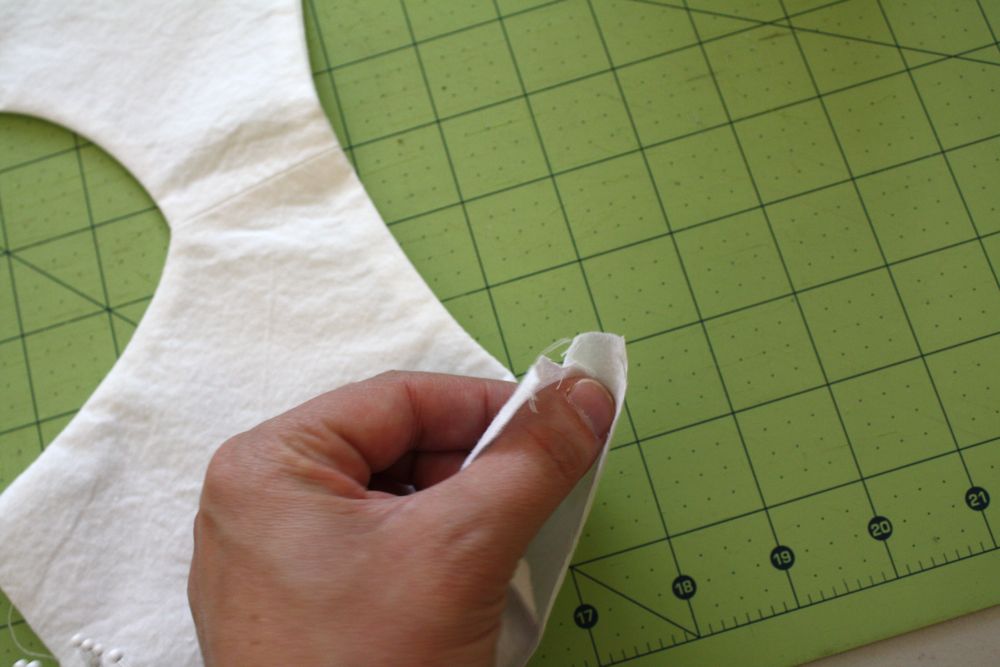
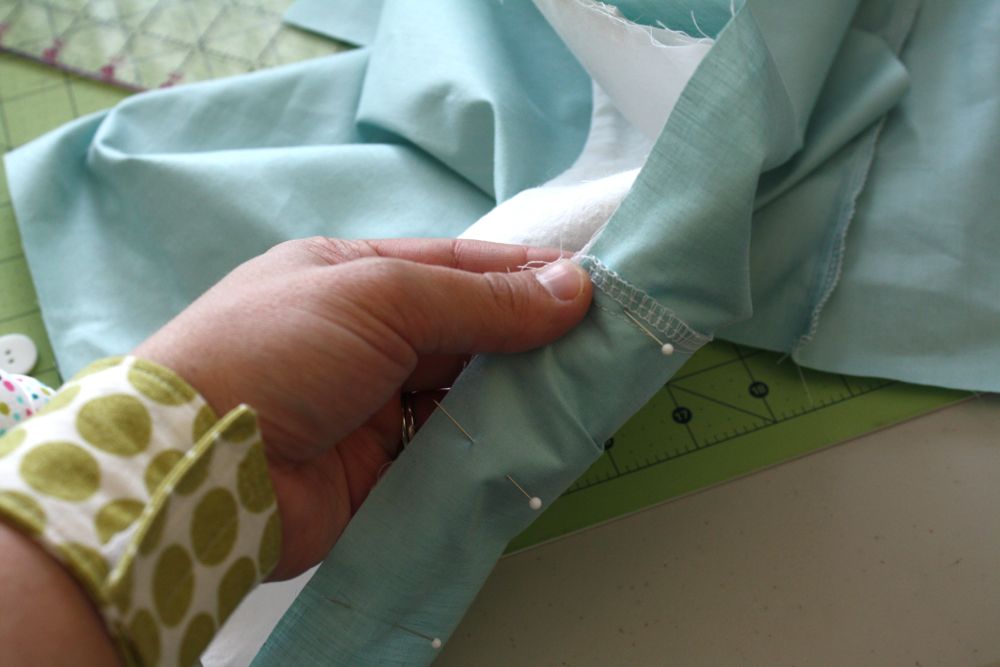
Then grab one side of your bodice piece, where the armpit ends. Open the two pieces of fabric like so.
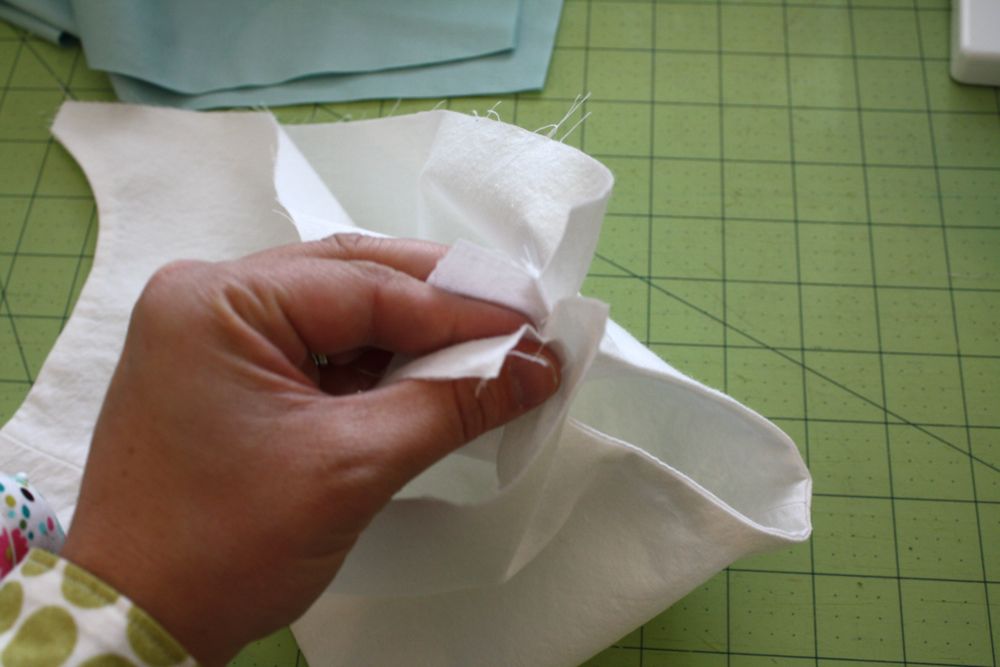
Do the same with the other side of the armpit, and pin RST.
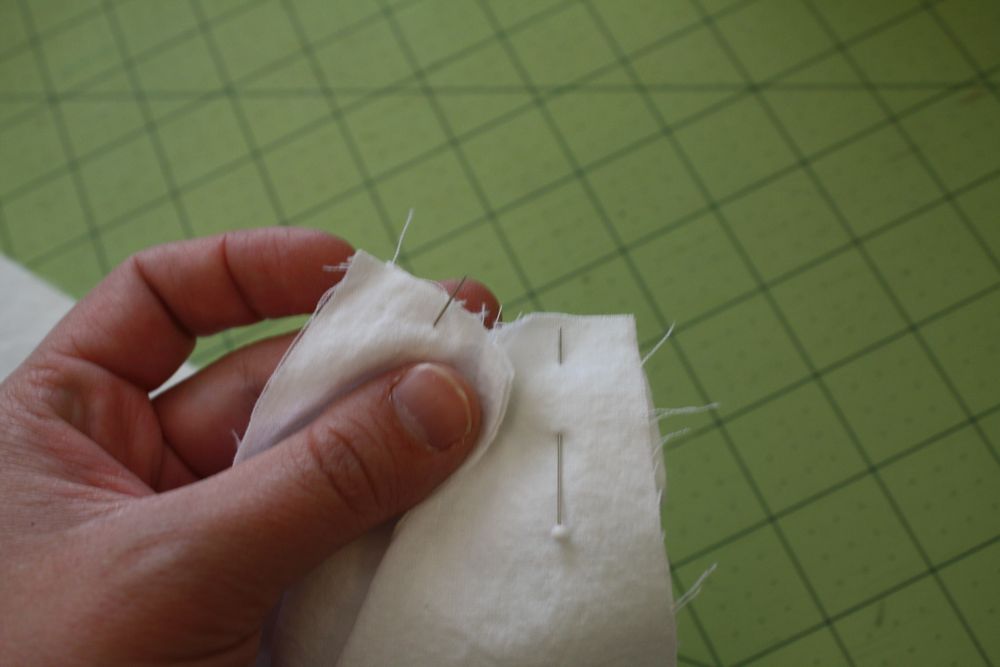
Then sew. Repeat for other side, and press with your iron.
Now for the skirt. Lay the two back pieces on top of the front piece, RST, and sew the sides together.
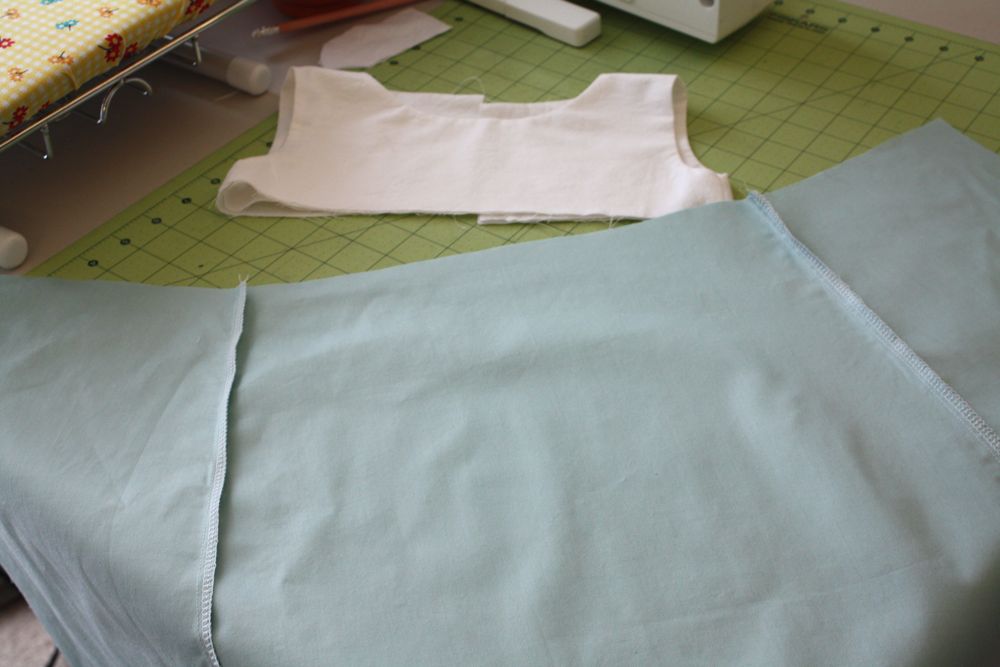
Serge of zig zag stitch to finish edges.
Then take those two small pieces of fabric for your button tab, and sew along the long sides and the point.
Trim corners, turn right side out, press, and top stitch along the edge.
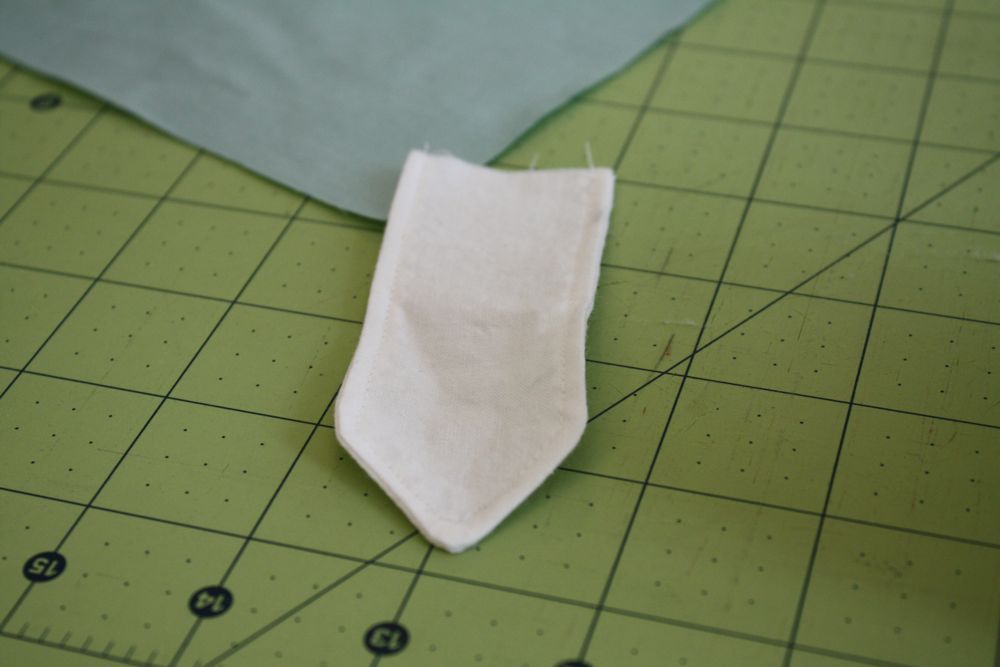
Then figure out where you want the placement to be, try it out with your buttons so you can be sure to have enough room!
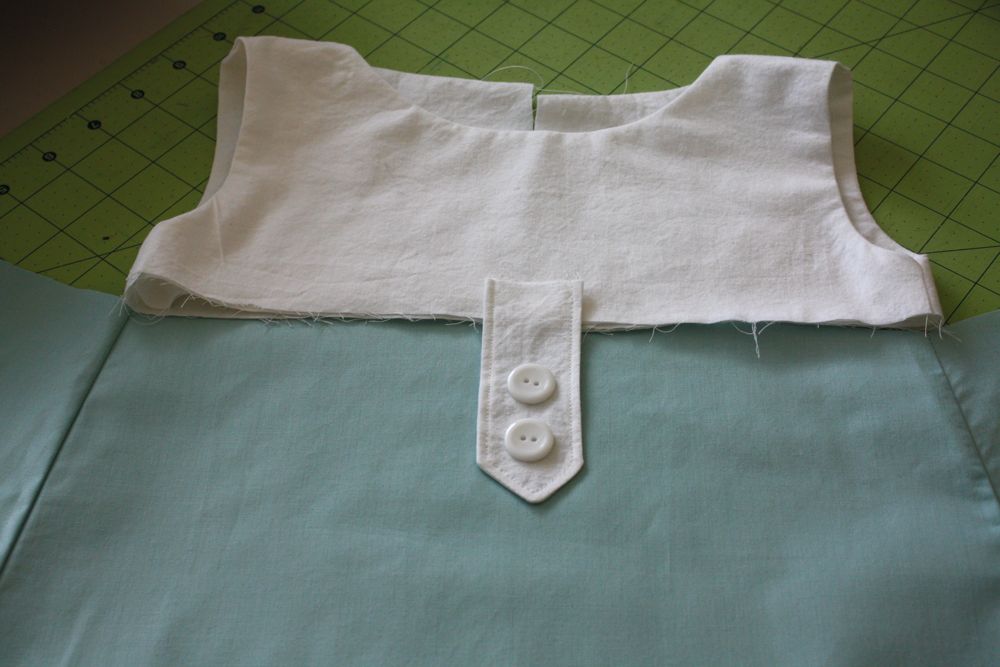
Then pin and baste to the bodice. Trim extra.
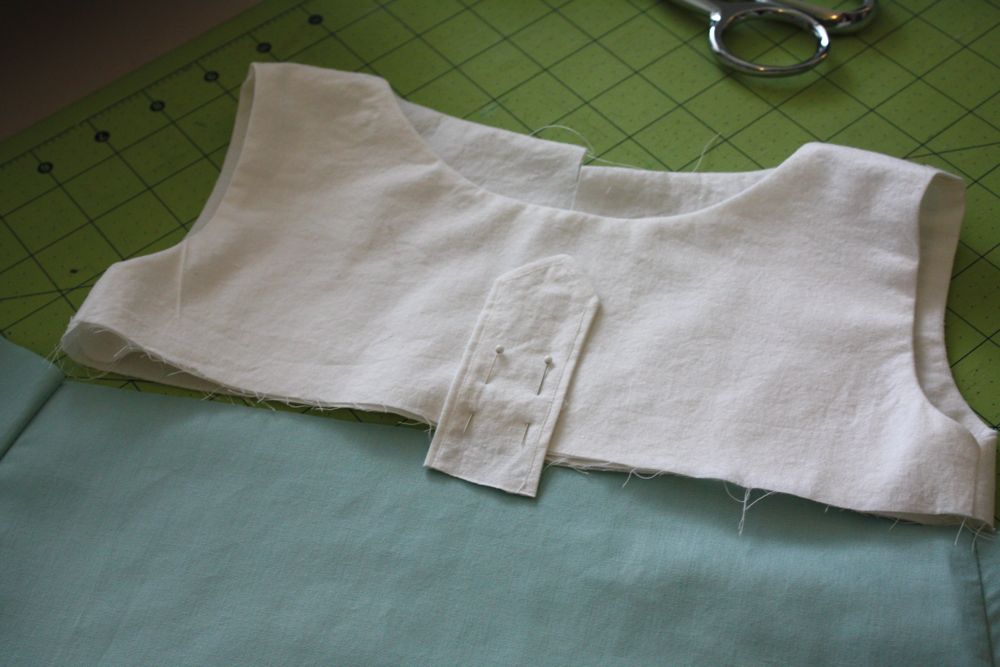
Now take your skirt, and pin it to the outer side of your bodice, RST. Leave the lining alone.
Make sure to match up the side seams as best you can.
Then sew the skirt and outer bodice together.
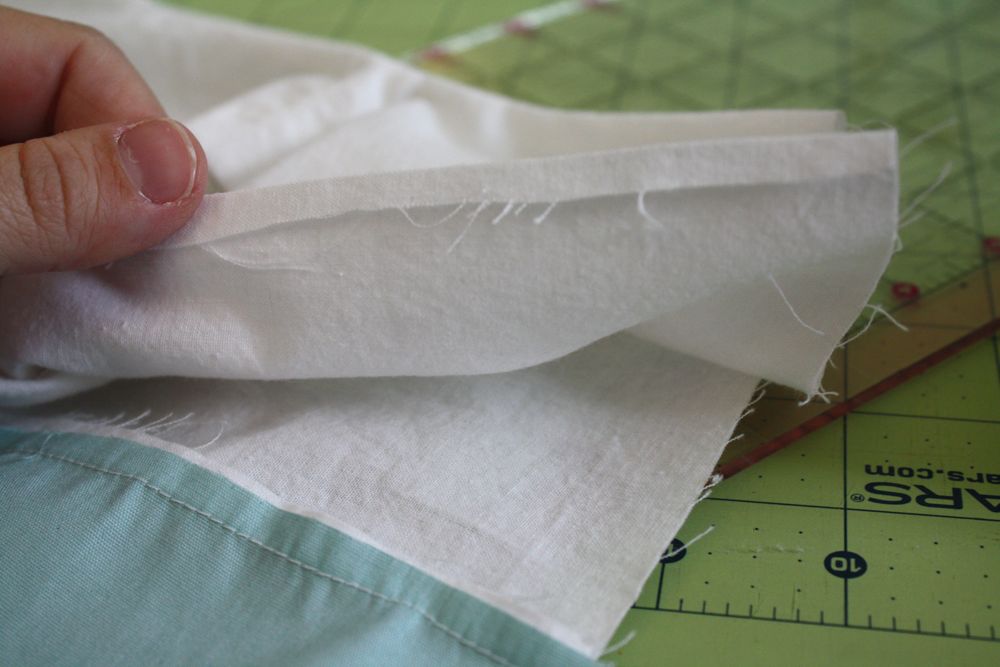
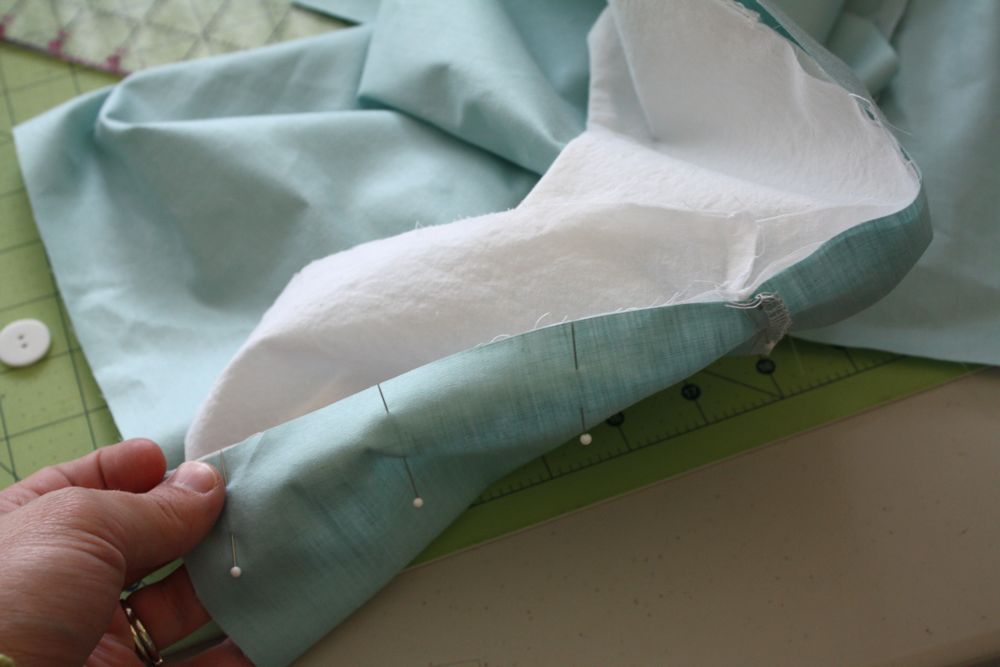
Take your lining piece and fold up and press your seam allowance. (1/4″ for me this time)
Then pin it if you like…I like to so it doesn’t shift while I’m hand sewing.
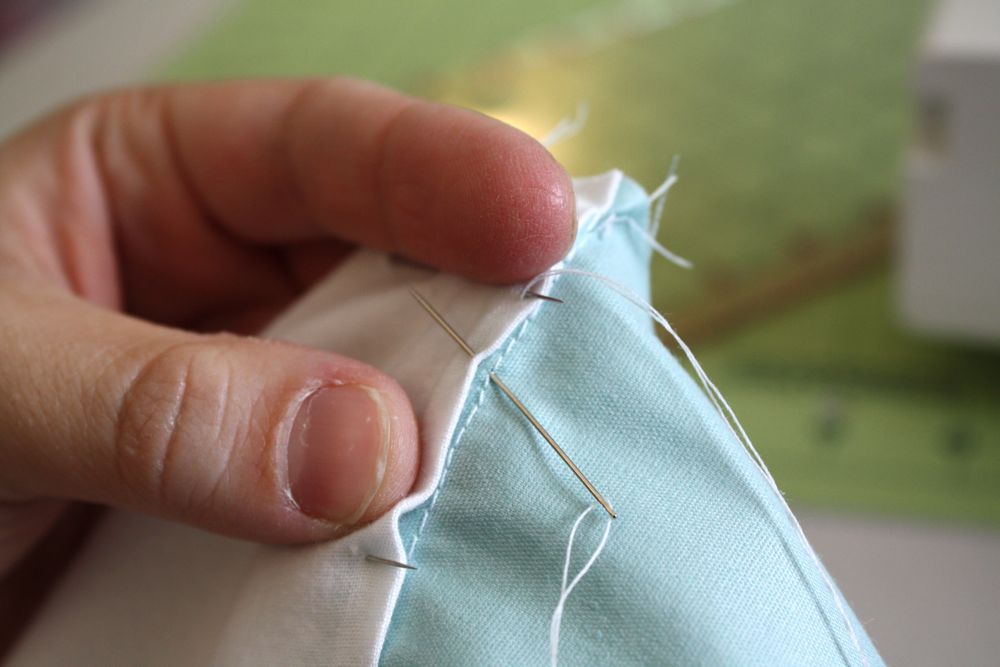
Then thread a hand needle, and start sewing the lining to the skirt. Take small stitches along the seam, making sure to not take your stitches below the seam line, that way they won’t show on the outside of the dress.
Keep going until you’re done sewing it together. I don’t do this on all dresses, mainly because it doesn’t bother my girls. It’s a nice way to finish a dress though, and is definitely worth it on nicer dresses…or if you’re willing to take the extra 10 minutes.
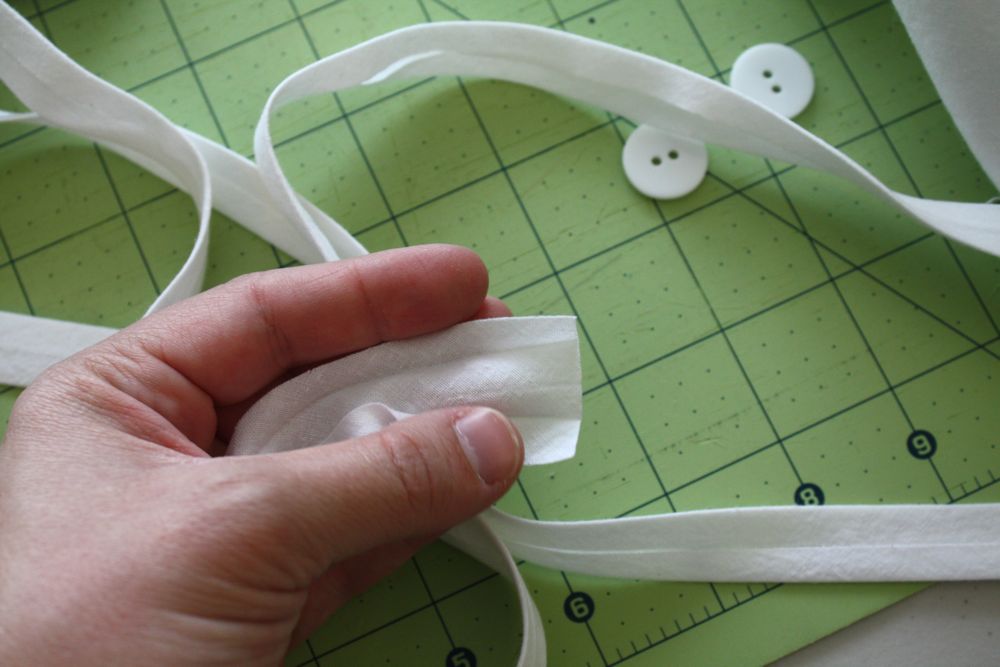
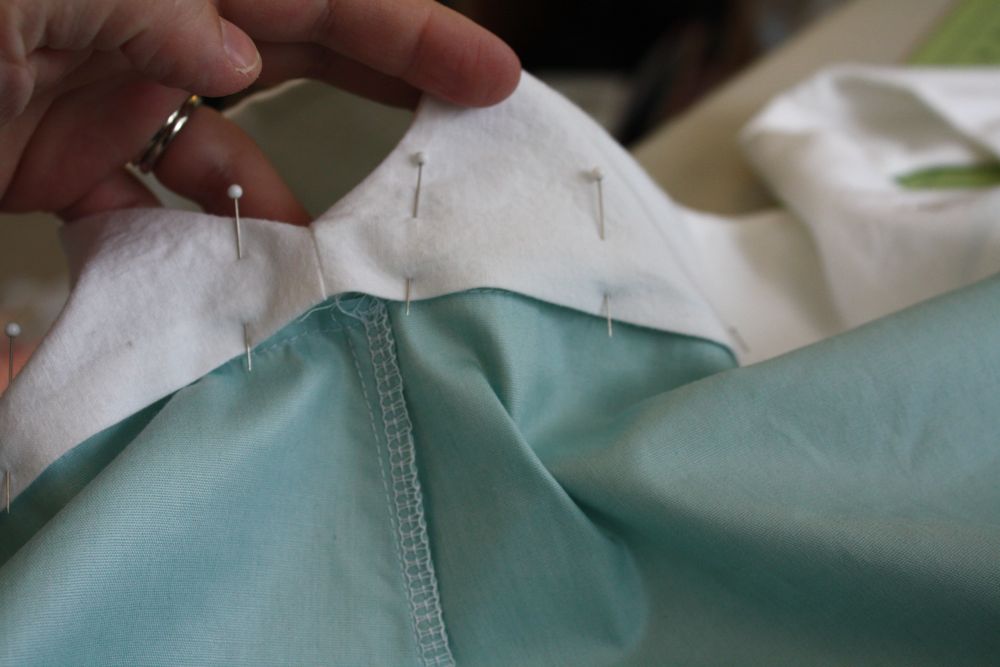
Next make some thin bias tape. I cut my tape to be 1.25″ wide, then pressed in half, and then pressed each side to the middle.
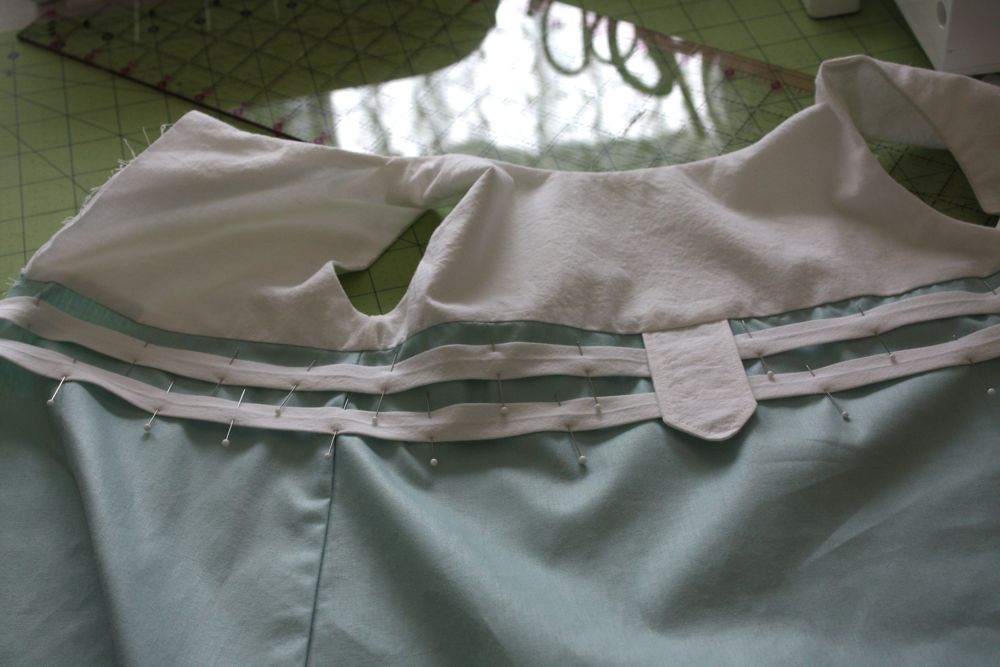
Pin two rows along the seam line, and under the button tab. Make sure to space then evenly!
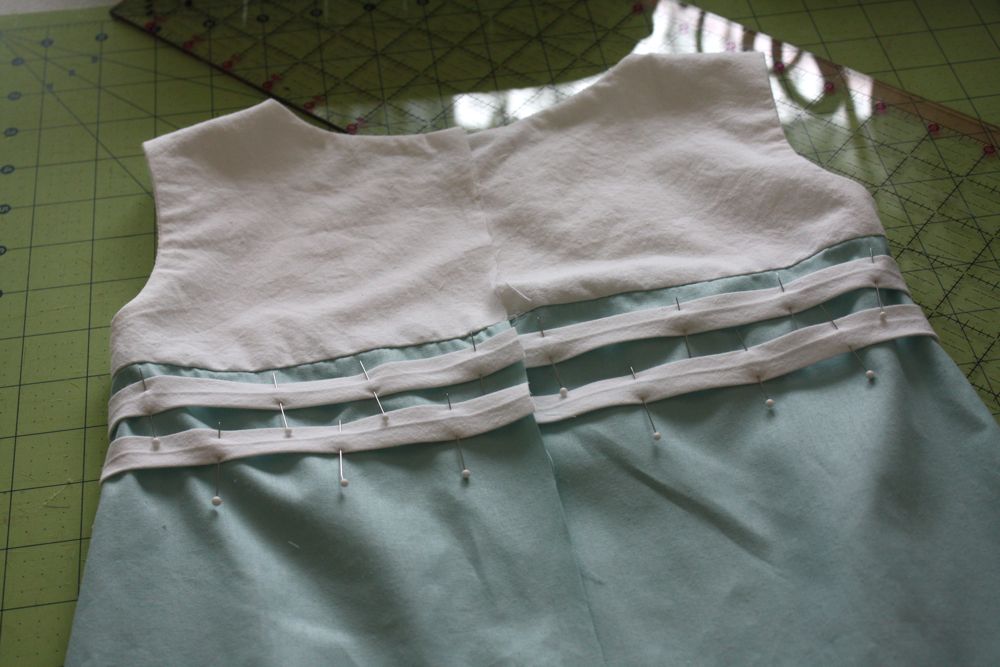
Also make sure they match up on the back!
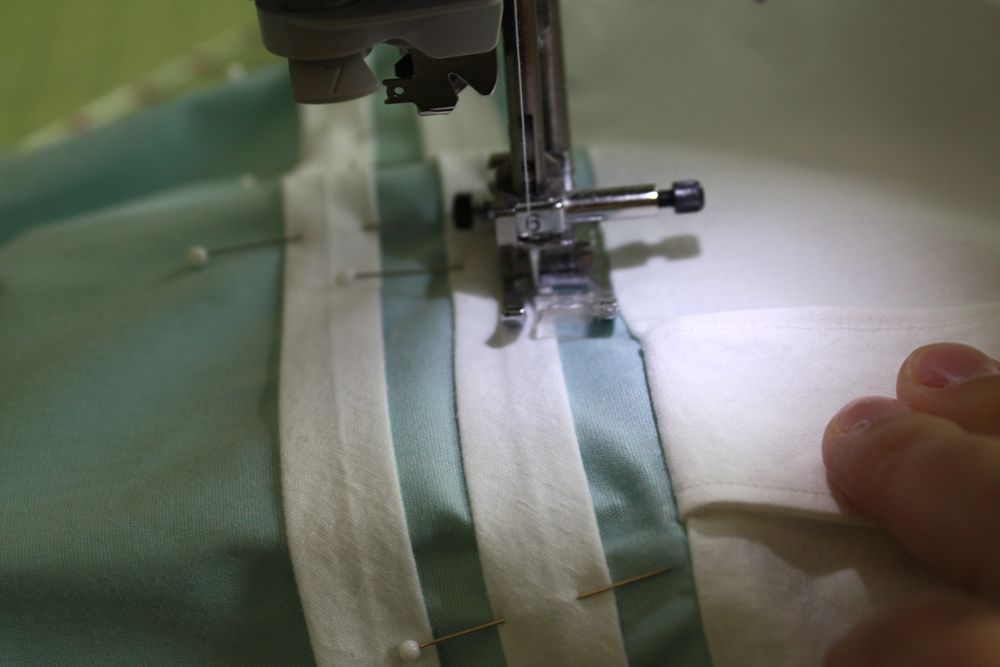
Then top stitch on each side of the tape. Insert your invisible zipper, and then hem how you like. (I fold and press up 1/4″, then another 1/2″ or so.
Then you’re through! Done with your groovy dress!
So adorable! Could you add little cap sleeves to make it a fall dress? & how would one do that?
Well, if you have a pattern (among your stash) …. you could use that. Or – if you have a dress that has sleeves that you like – they could be copied – on tissue paper (there is always an answer) – dc
I love this dress! The colors are perfect!
That’s so adorable!
<3 So lovely!
Oh I love this one!! I want one in my size too! hhmmm, I will have to make mommy and daghter dresses! Thank you for taking the time to make the tutorial (all your tutorials for that!), I will be useing it very soon!!
So cute! I’m super impressed with your zipper and how those stripes lined up so well and the hand stitching. 🙂
I love LOVE this dress! Thank you for being soawesome and sharing all of these tutorials with your readers. I really appreciate it!
Katie
Sweet Rose Studio
this dress is fabulous!!! I absolutely love it!
And another dress for my To-Do list!! :D!
http://www.madebymami.com
So adorable and simple~ love the aqua!
Wonderful dress and so well done tutorial!
Your daughter is gorgeous (but I’m sure you read it every day:).
Gorgeous dress, so elegant.
Love it! That will be added to Miss Ms wardrobe – just in time for an New Zealand spring!
So cute, seriously. I love the details of the stripes and button placket thingy. And it’s all grown up enough that I might just make one for B… she’s getting so long legged, and is outgrowing all her dresses. *sigh*
I love those classic vintage looks on little girls and this dress is DARLING! And beautiful work too!
I love those classic vintage looks on little girls and this dress is DARLING! And beautiful work too!
I love those classic vintage looks on little girls and this dress is DARLING! And beautiful work too!
I love those classic vintage looks on little girls and this dress is DARLING! And beautiful work too!
I love those classic vintage looks on little girls and this dress is DARLING! And beautiful work too!
I love those classic vintage looks on little girls and this dress is DARLING! And beautiful work too!
I love those classic vintage looks on little girls and this dress is DARLING! And beautiful work too!
As always great job!! I think I’m going to have to make one.
What a cute dress!! You did a great job!
Heh, I was watching that film the other day and eying up the outfits too :oD Love how you’ve done this
This comment has been removed by the author.
I love this dress and hope you don’t mind that I pinned it to my board on pinterest with hopes of making it sometime in the future. Thanks for sharing!
our family really enjoyed that movie, fun to see where you got your inspiration from ~ the dress turned out super sweet 🙂
So adorable! My sewing to-do list is getting a little out of control, but I’m adding this one anyway. 🙂
This is the cutest little dress! I’m a sucker for horse racing movies, too, and I was crazy excited about the race in “Secretariat,” too, even though I already knew how it ended! I’m definitely adding this lovely dress to my ever-growing, never-ending to-do list! Thanks for sharing!
I really like this one, too! I have never done a zipper, but I was just pondering what the best way to add bias tape stripes would be (I figured either topstitch with machine or use a ladder stitch, but that would be a LOT more hand-work!)
I want one in my size!!
Another fabulous dress. you are amazing!
I agree with earlier comments- I want one in my size!
I agree with everyone else! this is too cute. And love seeing how you were inspired and followed through with something so adorable!
Just when I think you have created my absolute favourite dress, you make another one, and that is my new favourite one, until the next one…You are so creative…the dress is FABULOUS! I would love to make some of your creations, but unfortunately the summer is almost finished here in Germany so I’ll have to wait for your autumn /winter designs.
This comment has been removed by the author.
I LOVE this dress, makes me want a girl! Your dresses are amazing, I might try this as a jon jon for my baby boy!
This dress is adorable! I’m marking it for the spring.
this is the cutest dress ever!!! I love how modern and at the same time it’s so retro, so pretty. 🙂 you amaze me as usual!!
Wow. This is fantastic. I love that you saw it in a movie and made it. Just like that. I can’t believe it. It’s flippin’ adorable.
Beautiful. It design and the watery colour combination make it look so sophisticated. I am going to have to have a go at one for my little girl. Thank you!
I love everything about this dress! I love your inspiration and the colors and the small details that you put on it that really make it special! And you get an A+ for getting the stripes to line up 🙂
That’s always a miracle when it happens to me!
So classic! I love this dress!
I love it. ‘re a great seamstress and have a beautiful daughter. Congratulations. a greeting from Spain
Love this!!! Thanks so much for showing how to do everything so well! It’ll help me with one that I’m making for my daughter for a pageant! Thanks again!!!
I believe that I will have to do this for a Christmas outfit for my girls. Add a cute cardigan, and we have a winterized outfit! Thank you so much for sharing this tutorial!
I love this dress! I pinned it a while back. I was watching Secretariat today and saw her dress. I hadn’t realized it was Penny inspired until I saw it and came back to look at your post as I remembered this adorable dress. I too want all her outfits (plus sleeves) for me. I can imagine this dress in different shades with the new color blocking. Thanks for sharing! Love it!
So cute, Can’t wait to give it a try!
Hai Jess. Just finished making this cute dress. I happened to steal my mom’s fabric stash and she has the ikat satin fabric with the same hue as this dress. Bcoz Indonesia is very hot, I didn’t line the bodice. A little bit see-through 🙂 but it’s OK. My daughter looks great in it.
Hi,I loved this pattern and the colour. I did one for my GD with white cotton hacoba(hope that’s the correct name,its like lace)for the yoke and for bottom orange satin finished cotton which has a sheen like yours.Your tutorial is very easy to follow .Thank you.Planning to follow you and use your patterns.Thanks again.
I was thinking about using one of my decorative stitches in place of your beautiful hand stitching (I HATE hand stitching) has anyone else done that, does it look good?
I have done the stitching on other dresses. When using a white fabric on the bodice I use the same thread as the skirt for my decorative stitching. This allows for the tie in for the theme. Another alternative to making your bias is to purchase hem tape at the fabric store for simplicity. The hem tape comes in many colors or you can purchase rick-rack tape in a zig-zag pattern to make it a little different as well.
so cute!
Thank you for the great tutorial. I just finished this in st patty’s day themed fabric and couldn’t be happier! Makes kitschy fabric look elegant lol. I am a beginning sewer having started with pillow case dresses and your let’s go fly a kite dress and was able to finish this fairly easy with your instructions and some help from you tube for my first invisible zipper. I think I am going to start putting zippers in everything! Also added pockets in the seams because my 2yo loves pockets! Thanks again!! Your blog is my go to for tutorials and is helping me become the mommy I always wanted to be (ie the one that can make fun costumes! Haha)
I’m not much of a seamstress but I would be willing to pay for this dress. Would you be interested in making and selling me one for my daughter for Easter?
Lisa, I am glad you like it! I don’t have the time for custom orders, unfortunately. 🙂
First time to this website and this dress is perfect for my grade nine exam needlework coursework project .
This is so precious! Thanks for sharing your pattern, it will be adorable on my first granddaughter!
Adorable dress. Just loved the way you explained the pattern throughout.
A Very pretty dress on A very pretty doll?