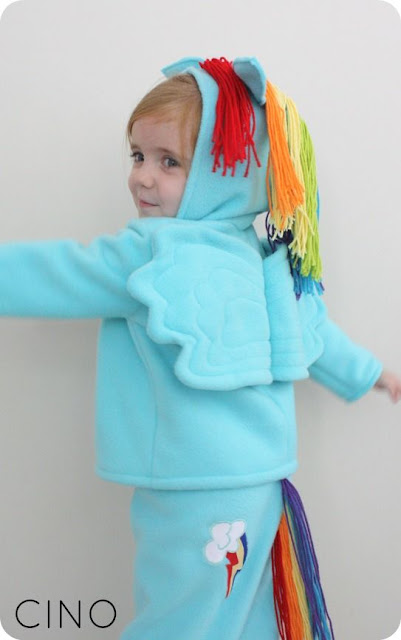
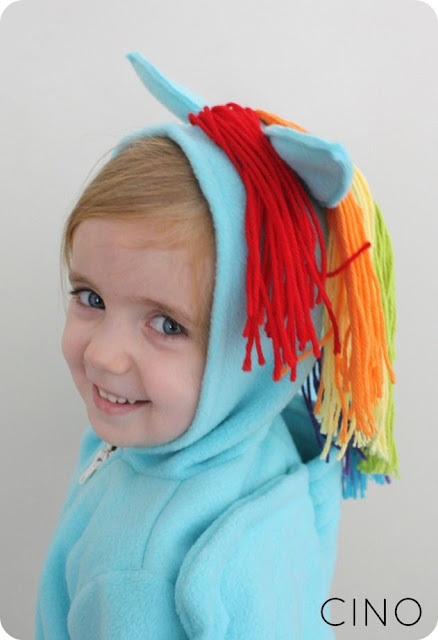
Today I’ll show ya (or try reeally hard to show ya) how to make the Rainbow Dash hoodie! Most of this came together well, except the hood was a little small for the neck part. I fixed that with a little pleat in front and it looks fine to me. Well, fine for a costume, ya know? 😉
We’ll take ears, mane…
…and wings of course!
See below for the tutorial!
You’ll need:
fleece
hoodie to trace for a pattern
matching thread
rainbow colors of yarn
separating zipper
So first I folded a hoodie of sadie’s in half like so and traced around it-adding plenty of room on the sides for seam allowance.
On the inside seam (where the hoodie was folded, left side of the above pic) I added about 3/4″ for seam allowance. You’ll need this for both the front and back pieces, since the wings will be inserted in the back, and the zipper in front.
Then I traced the hood to make a pattern as well, adding seam allowance. This is where I probably should have made it a bit deeper-just adding some to the front would have made it fit into the neck better. It still fits her head fine, though.
Same with the arm-trace, add seam allowances.
Then cut two of the front and back (just the necklines are different), two of the hood, and two sleeve pieces, on the fold as shown.
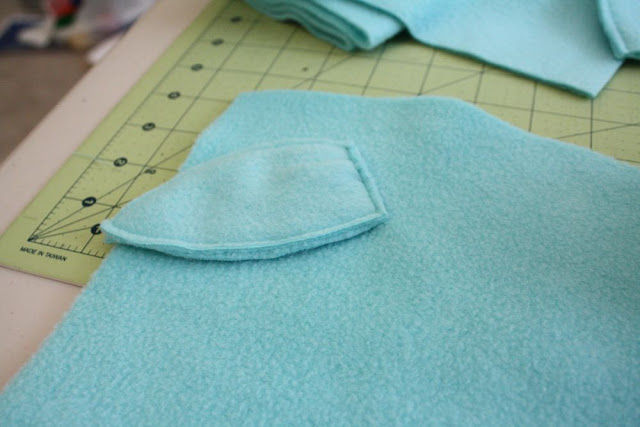
I also freehanded some ear shapes-you’ll need two for each ear.
Then I sewed them together around the outside. I was going to turn them right sides out, but it was kind of bulky, and they looked fine to me so I left them like so.
Then I decided where I wanted them on the hood (leave space in the front for hemming under), added a little pleat like so, then pinned it to the hood. Do this with the other ear on the other hood piece, making sure to match them up evenly)
Sew along the edge like so….
…Then flip over and sew on the other side along the bottom. This will help it stand up a little. Repeat with other ear.
Next cut lots of yarn to the length you want it! I wanted her mane more full than the tail so I cut probably twice as much.
Sew the yarn pieces together just like the tail…
Then sew to the top of one of the hood pieces.
Next sew the hood pieces together along the curved edge.
Next hem the front under like so.
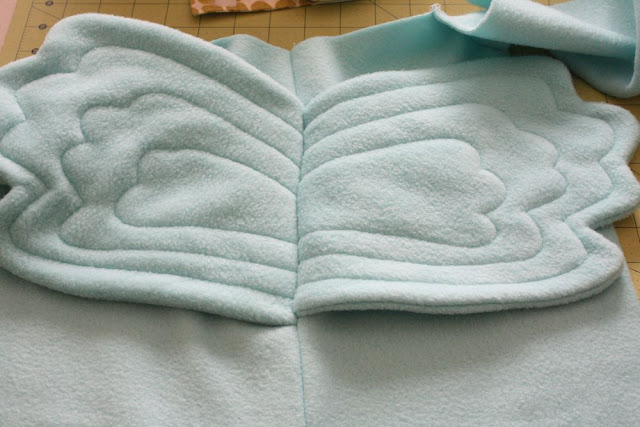
For the wings, next make a quick pattern with wingy bumps like so, using your back piece as a size guide. I wish I’d made the base of the wings a bit narrower, but oh well! Cut four pieces of this pattern.
Next pin and sew around the wingy bumpy edges, leaving the flat edge open.
Next I stitched around the bumps like to to form some wingy parts. Just follow the shape as best you can, and mark where you start to match them up together.
Next line them up on the back hoodie pieces, matching them up like so. Pin, and baste the wings to the back pieces.
Then, going slow cause this is a lot of fleece to sew through!….sew the back pieces right sides together. Hopefully your wings will line up a bit better than mine.
Again…it’s a costume. Oh well!
Next sew the shoulder seams of the front and back hoodie pieces together.
Lining up the back of the hood with the back seam, pin and sew in the hood to the neckline. You’ll see I had extra room on either side. I fixed this by adding a little pleat after it was all done.
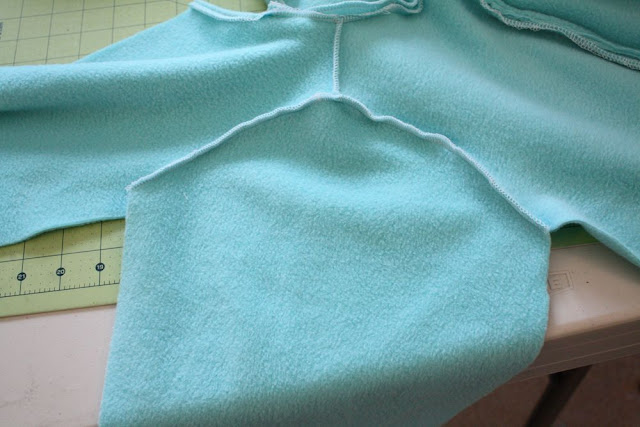
Sew the curved edge of the sleeve into the armhole like so, repeat for other sleeve, then sew the bottom of the sleeves and sides together.
Next I hemmed the bottom to fit Sadie and the zipper (mine was 12″ I believe) though you can always trim the top of zippers down to fit your project. You can see the space I had on the top of the front piece…I hemmed that under and then added the pleat later .(pic below)
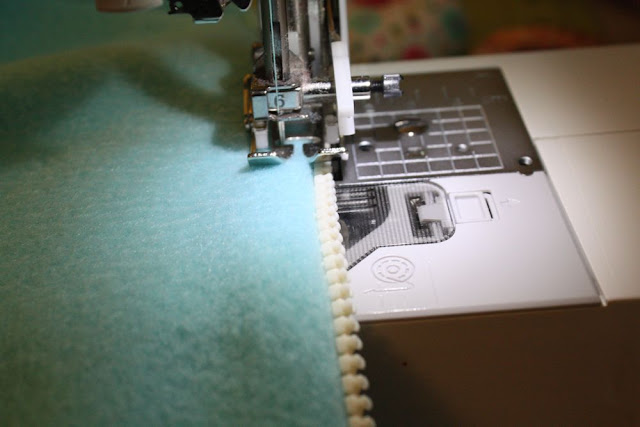
I unzipped the zipper, then sewed each side to the edge of the front piece, make sure to line up the bottom!
I tucked the end of the top of the zipper under and stitched it down.










Looove this! Thanks for the tutorial…Em might need a Rarity hoodie soon! 🙂
Jess this is so stinking cute! this was just the inspiration I needed today. My niece decided to be an elephant and I had a WAY more complicated idea in my head but I think if I tweak what you did it will be even cuter and easier than I was planning. thanks!
I have a little girl set on being Twilight Sparkle, so thanks for the tips. I was trying to find a pre-made hoodie to add some felt to, but I may just make the hoodie instead.
-Thanks!!
I bought a hoodie & pants at OldNavy.com. I’m just going to open the seams, add the yarn for the mane & tail and then see them closed again. I’m still deciding how to add the ears & wings.
How much fleece did u use for the hoodie/wings/ears?
Love love love this!!! My 3 year old saw me looking at this and is now determined to be Rainbow Dash! I was also wondering how much fleece you used for the hoodie/ wings/ ears? Thanks!!!
This is exactly what I needed – my daughter wants to be Twilight Sparkle. Wondering if 1.5 yards covered the whole costume? My Clara is only 2.5… And short… And I don’t need wings…
Thanks so much! Your work is awesome!
@Kelly Milller, wchase, Stacie Evilsizer: The 1.5 yards covered the whole costume! The fleece I bought was 54″ wide I believe.
I love this so much. I hope Natalie likes My Little Ponies when she gets older!
I love this! Thanks so much for the tutorial. After reading about the MLP obsession at your house, I remembered how much I loved them growing up and started hunting for some vintage ponies on ebay. I won a lot of 32(!!!) ponies this week and decided to give a few ponies and a pony costume to my nieces and my little girl for Christmas this year. I’m so excited to see how they like them!
We are officially even 😉
Okay, Azy just saw YOUR Rainbow Dash suit and now SHE wants one, lmao. Kids are hilarious! She is talking my ear off right now about how she wants it to look!
Super cute!!!!!
I just LOVE this costume, thanks for the tute! I already have gotten started on this years, so I might use this for next year!
Also wanted to let you know that I have given you an award on my blog (if you don’t do that sort of thing, that’s fine, just wanted to let you know! I love your blog!) check it out here: http://kerraftycreations.blogspot.ca/2012/09/sunshine-award.html
I absolutely LOVE this and so will my 2 year old, thanks!
Thank you so much for this. I am not much of a sewer and i dont own a machine but this gave me great ideas and motovation for my daughter who wanted to be rainbow dash this year. I actually modified a hoodie and sweat pants existing set instead of making my own as i said i dont own a machine. i used a hot glue gun for most of the work but i did end up stiching on a few parts. i used ribbon for the hair instead of yarn because it was lighter weight then the yarn. i had a lot of fun with it ! Thanks again for the inspiration
I am going to use your tutorial to make my daughter a Twilight Sparkle costume for Halloween this year! She would totally love a Rainbow Dash costume, but I’m going to make a Spike costume for her little brother, so Twilight it is! I might die from cute. Thanks for the inspiration!
Thank you so much for sharing your tutorial! My 5 year old has been MLP obsessed for the past 3 years. She hasn’t decided which pony she’s going to be yet but this is a huge help! I think we’re going to make her baby sister Apple Bloom just because I love her big bow.
Thank you!!!! My 4 year old is so happy to have this costume and your directions were awesome! This is my first time making pants or a top! The only problem I had came when I realized I bought the wrong kind of zipper. :)- Thanks, again!!!
I’m almost done with pinkie pie and now I find your awesome tutorial, smh. Looks like there will be a lot of adorable ponies out there this year! Great tutorial!
Thank you, Thank you, Thank you! You are absolutely wonderful! My HUsband got our daughter into My Little Pony when she was only a couple months old. I think he is now obssessed he thinks she loves it! We decided after much consideration and what color of fleece the fabric store had that we would make her be Rarity. This was the easiest tutorial I have followed yet and the first clothes I have ever made! THank you for making this so easy for a beginner who only sews blankies and burp rags, this was super easy! Now I have a little baby Rarity to take out trick or treating with her older brother, it will be a hit and she will be cozy warm. This only took me two days to make but we had a few hiccups as my sewing machines timing went out and had to borrow my mother-in-laws and I too got the wrong zipper even though you clarified “seperated”. Again thanks so much my 5 month old will look absolutely adorable in a one of a kind costume on her First Halloweeen!
I just finished this costume as the Rarity version last night, and wanted to add some slight variation I did, in case anyone wanted to try it.
Instead of yarn, I bought a few fake hair extension headbands from the local dollar store. They were basically an extension glued to the back of a braid and the whole thing glued on the headband. I separated it all out and used just the extension part, layered twice if needed. On the tail, I covered the inside seam with some ribbon as my daughter said it was poking her in the behind!
I found a quick tutorial online for making a unicorn horn to slip onto a headband that worked perfectly.
In retrospect, there are two things I’d add to this if I did it again. The first is that I’d add a drawstring to the hood as the hair made the hood heavy. This might not have been an issue if I had used yarn, but I liked the way the extensions turned out, even if they were heavier. The second is that I’d consider adding a buttonhole near the hood seam to slip the unicorn horn into.
This was a great tutorial and gave me a lot of confidence to try some of the other patterns (this was the first one I’ve tried as I’m not much of a sewer… yet!)! I also used part of your Charlotte dress pattern and the circle skirt pattern you recommend to make a Minnie costume (including a dreaded invisible zipper!).
Hi, I fell in love with this costume the minute I saw it. Fortunately two of my daughters love My Little Pony, and – lucky for me – were willing to walk around dressed as My Little Ponies during the upcoming Carnaval. Today, they are celebrating Carnaval at school, dressed as Star Song and Cherry Lee; two happy Little Ponies. Thank you so much for your tutorial. I posted some pictures on my blog (but am still waiting for a moment for the girls to pose properly) and added a link to your tutorial. Marieke (www.threeforaparty.blogspot.com
Hi! I love love love this!! An excellent tutorial and both my girls will be over the moon (pinkie pie and twilight sparkle of course). My only question is how did you manage the cutie mark? I was thinking that instead of doing pants, I’ll extend the hoodie length a bit and put the cutie mark there (think sorta like a trench coat).
Thank you so much for posting this!
Rainbow is evil
P.S I’m a brony
So glad I came across this tutorial! My girls want to be Rainbow Dash and Pinkie Pie this year but all I could find in stores were silly looking short dresses that in my opinion should not be made for such young girls. They are also way to cold and flimsy for our climate.
i loved this tutorial even though my little one is only 9 months she loves her my little pony teddies I so making this!!