


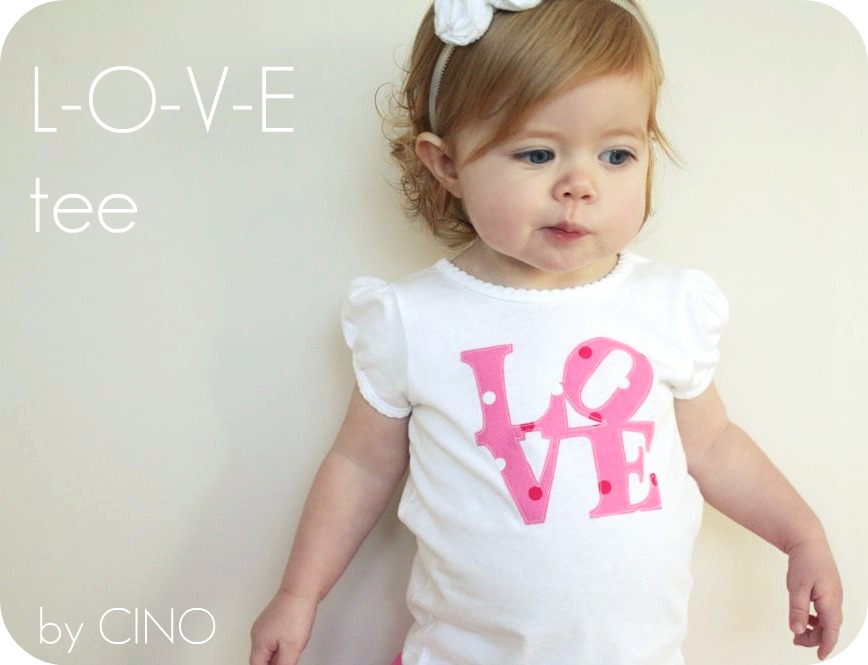
There’s nothing sweeter than some adorably squishy girls dressed in pink, is there?

I just LOVE (yes I went there) how these love tees came out, too. They are based on the sculpture, and I just traced a picture of it and used that to make my appliques.

Can’t wait for our Valentine’s Day party to whip these cuties out! (oh, and the outfits too)

I also put together a (rather overly detailed) tutorial for the tiered skirt-hopefully my wordiness doesn’t scare you off. If I haven’t scared you off by now though….you are made of tough stuff.

Ok so first off you’re going to have to do some math. I know, I know. Math is the pits. It’s just a wee little bit though, so hopefully I won’t be responsible for anyone’s brains melting. (gross)
Get the full tutorial below!
You’ll need your child’s waist measurement, and also measure how long you’d like the skirt to be.
If you’re doing 3 tiers, divide the skirt length you decided on by 3. (For Charlotte’s her waist was 18″ and length was 9″)
So if each panel is going to be 3″ wide, you’ll need to add some extra fabric on the top and bottom of each strip, for seam allowances, hem, and elastic casing.
For example, my pieces were cut out as follows: (just talking width right now)
Top pieces: I added 2 1/2″, so they were 5 1/2″ wide. (for seam allowance and elastic casing. I used 3/4″ elastic, so adjust if you’re using wider or thinner elastic)
Middle pieces: Added 1/2″ (for seam allowance) so they were 3 1/2″ wide.
Bottom pieces: Added one inch (for seam allowance and hem) making them 4″ wide.
Now to figure out the length. I used my waist measurement to figure out the top tier length. I divided that number in half (18/2=9) then added 9 to the waist measurement. (27″) So basically one and a half waist lengths. Does that make sense? Hope so.
For the middle….I didn’t add much more length, about 6 more inches, since I only wanted it to be slightly gathered. (33 “)
For the bottom tier, I multiplied the top tier length by 3. (52″)
Then I divided each length by 2, and cut two pieces for each tier.
So, the two top tier pieces were 5 1/2″ x 27″. Middle tiers were 3 1/2″ x 33″, and bottom tiers were 4″ x 54″.
I hope this makes sense and the formula works ok for you!

Moving on. For each tier, sew the two pieces right sides together along the short ends. Finish with a serger or zig zag stitch. Then serge or zig zag the long edges as well.

Also hem under the bottom edge about 1/2″.

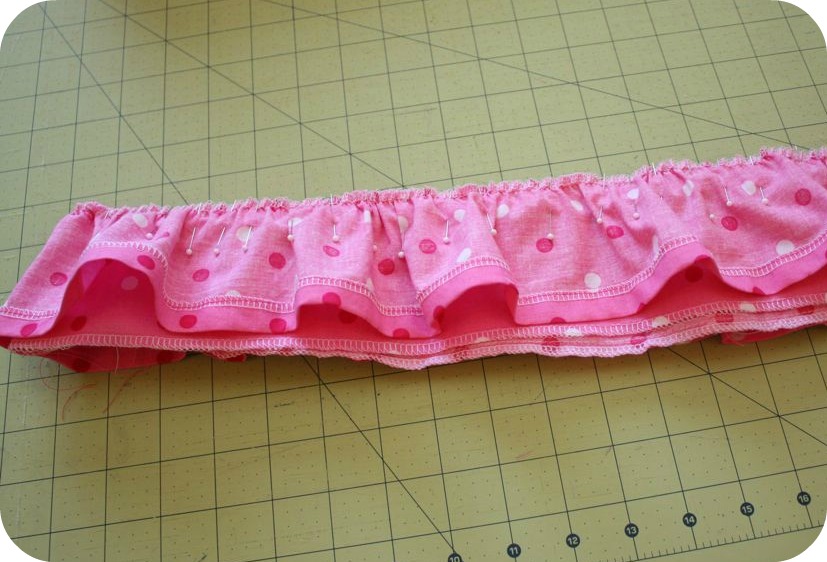
Then sew a gathering (longest) stitch along the top of the bottom and middle tiers. Gather the bottom tier to fit the middle tier, like so:

Then pin and sew together.
Handy tip: I like to tie my thread tails together from my gathering stitch (all four of them) so that I don’t lose any gathers while pinning and/or adjusting.
Then do the same with the middle tier, and pin and sew to the bottom of the top tier.

Then iron the top of the top tier over for the casing. I use my elastic to gauge where to fold it over.

Then sew around the casing, leaving an inch or two open.

Next cut your elastic to your child’s waist measurement plus about 1″, thread it through with a safety pin, then sew the two ends together, and the opening shut. You’re done!
For Sadie’s skirt, I lengthened the top tier and omitted the middle tier.

VERY cute – and it should be quite easily adaptable to adult size too, even for a novice like me. Thank you!
I thought I had the cutest grandchildren in the world, but yours might have them beat! I can hardly believe how cute they are! Good job on the instructions and kiss those cheeks for me! Darling!
Adorable girls and adorable skirts! Thanks so much for sharing this tutorial!
Is lovely! Is perfect! I like it.
Charo
http://www.cosiendoyaprendiendo.blogspot.com
Oh my, your girls are looking so grown up. Beautiful skirts.
I’ll have to give this a go!
So so so cute!!! Love the sculpture inspired shirts!!! Also, did you know there is a measurement calculator out there to figure out what you will need for a skirt like this? No math required 🙂
http://www.chicaandjo.com/2009/05/28/sew-a-tiered-ruffled-skirt/
Your girls are SO ADORABLE. I am making a stop at Joanne’s today to get some fabric to make one of these great skirts! Thanks for the tutorial!
Oh sheesh, I wasn’t going to make anything for V-day, but you may have just talked me into it. I was going to make a LOVE pillow, but as I have no visitors, am thinking letting my little one wear it is the way to go 🙂
Love love the skirt!
Your girls are so stinkin cute I can hardly stand it!
great tutorial! i love these super-cute skirts!
Is Charlotte’s skirt knit fabric? Do you think this can be done in knit?
Oh my goodness your girls are adoreable! So cute.
Oh my goodness your girls are adoreable! So cute.
Oh my goodness your girls are adoreable! So cute.
Oh my goodness your girls are adoreable! So cute.
Oh my goodness your girls are adoreable! So cute.
Your girls are so adorable! and you are an amazing sewer of clothes. I am really trying to branch out and it’s getting somewhat easier. Sort of. 🙂
Love the skirts and the girls!
Hi I’m new to the sew world and love this tutorial! I need every detail to be able to make this so I really appreciate how descriptive you were 🙂
I just had one question, what kind of fabric is this?
Ok, I’m sorry, but what a great blog! I just found you via pinterest. PLEASE post every day! I have a 1 year-old little girl who I love to sew for. I have a boy too, but… you know. I love that you have stuff to make for women too. I’ll be back, oh yes. 🙂 ~Chelsea
Ahhhh SUPER SUPER cute! Love their adorable little outfits. They look so great in them.
just adorable! i so love the facial expressions on little miss c!
I know you don’t want to hear this, but Sadie is looking quite grown up in these pictures. The outfits are adorable 🙂 My oldest has a three-tierd skirt from Lands End that she loves. I’d love to try this for my youngest. Great tutorial.
I just keep ending up on your site and I love every idea!! Thanks for the inspiration!!
Darling, as usual!!
Oh how adorable!!! I have the same fabric print as Sadie’s and was going to make a dress for my daughter out of it, but now I think this just might be cuter!!!!!!
Soooooo CUTE!!! I went to a LOVE sculpture in Israel, but the letters were in HEBREW! Cool.
I LOVe those cuties! Great tute! I’m really hoping this new baby is a girl, then I can FINALLY use all your glorious tutes!!!
These outfits are so adorable. Love them!
Ok, so trying to work out the maths for making this adorable skirt….but….
You say for the third tier that you times the top tier by 3, but your top tier is 27 inches, and 3x 27 = 81, not 52 as you say in the tute (which is only about 2x).
I’m assuming that it would need to be 3x to be able to gather it, but as I am a novice sewer, can you just confirm if the bottom tier is 2x or 3x the top tier.
Thanks!
Actually, I just worked it out (I think!)
You have 3x the ORIGINAL waist measurement, not the new top tier measurement @ 1.5x the waist.
Although you have 52 inches, then you change it to 54 inches (which is the correct one, I think) when you describe it a few sentences down.
Is that correct?
They look so cute in thier outfits! Love the love tee.
These are heart-poundingly cute! Really, my heart is pounding as I anticipate going to the fabric store to pick out fabric for this project!! Thanks so much for the tutorial, I think even a novice like me can do it!
These are adorable!
OMG these are so cute and the little cute models are adorable as well! Thanx for sharing, great tutorial, easy to follow!
Natalie
http://www.projectdowhatyoulove.wordpress.com
Very cute Jess!
I love this tutorial and for me, it wasn’t anywhere near being too long. Thank you!!!
I just adore your littlest one in these pictures. Seriously. Could they both BE any cuter? I even had my husband come see how adorable they are. Did I see your trick to getting the youngest to stand there and make those adorable faces in her hand? LOL Are you actually bribing her with candy? HA (if I am correct, thank you..I’m stealing that trick when my Grandkids are older and visiting and I want pictures)Our 3rd Grandchild is due in 2 weeks…oops less than 2 weeks actually. This one lives close to us and is our 2nd Granddaughter so I’m even more excited. I had 3 boys myself and then hubby brought a 4th boy into the mix so I am THRILLED for a little girl to spoil. I think, in fact, I’ve told you before I want to steal your littlest one and give her hugs and spoil her. LOL
I’m so happy I came across your blog, I’m absolutely loving it!
I just received the age of my first great niece and want to make her a skirt. But when I asked the mother she just told me her daughters age which is 2 years old. Any help on what size to make. Would love to make one of these little skirts from your tute. Perfect directions. Makes it seem oh sew easy. I make purses and quilt and would love to try my hand at this. The mother is having a tough time making ends meet so thought I could help by making clothes. I don’t have money but have lots of fabric and a sewing machine. Any ideas or help? Great tute. Thanks for taking the time to do it!
Holy stinkin’ cute. Those are adoreable valentine outfits!
Jess- oh my gosh!! Your girls are so adorable. I still haven’t gotten good at sewing, but I like reading your blog bc it makes me feel crafty 😉 I want one of these outfits for my daughter asap! Must learn to sew!
I’m a little late in commenting, but your girls are so beautiful! I can say that with security because my daughter is beautiful but brunette! 😉 I love this tutorial for the skirt. I have lots of fabric I could use. I like math a lot better than buying a stupid pattern! Thank you!
I love this , and as a mum of 2 girls too, I’m definitely doing this one. So cute!! … and everyone needs some pink gingham in their lives!
Made one today! Sew easy and my daughter loves her new skirt!
Found time to make this gorgeous skirt tonight, after a day full of munchkins with tummy bugs … thanks for some sanity for this mum tonight! Oh, and I made a matching ruffle heart t-shirt to go with it.
Hi Jessica!!! I love this pattern…am just about to finish the first of many skirts for my grandgirls…but I have a question…why do you serge the edges of the fabric to begin with??? I used my serger for construction, but didn’t serge the edges first….should I be doing this??? Thanx alot!!!!
Very helpful and easily understand. Many thanks!
I just love your tutorials, I need the details 🙂 Just made this for my three year old who happened to have the same measurements. I LOVE it! I’m going to try my hand at the shirt too… wish me luck. I do have a random question for you. Unrelated to this tutorial, how do you get your bias around the collar of your dresses to lay flat against your girls neck?