


So I cleaned out Sadie’s shirt drawer the other day and found out that she had outgrown half of them! That, coupled with cooler weather (hopefully) on the way, spurred me to make this tunic with longish sleeves. (Sadie’s official opinion: “Mom da sleeves are big. But I wike the birds.”)
While this top was coming together, I was worried that it would be too busy…and it might be…but it’s growing on me. It’s kind of groovy, actually.

It’s fairly simple, but has some interest in added trims, and a pleat in the front.

Of course you can never go wrong with the easy peasy button closure. I use these way too much, but for good reasons.
A. It’s way easy.
B. It’s way peasy.
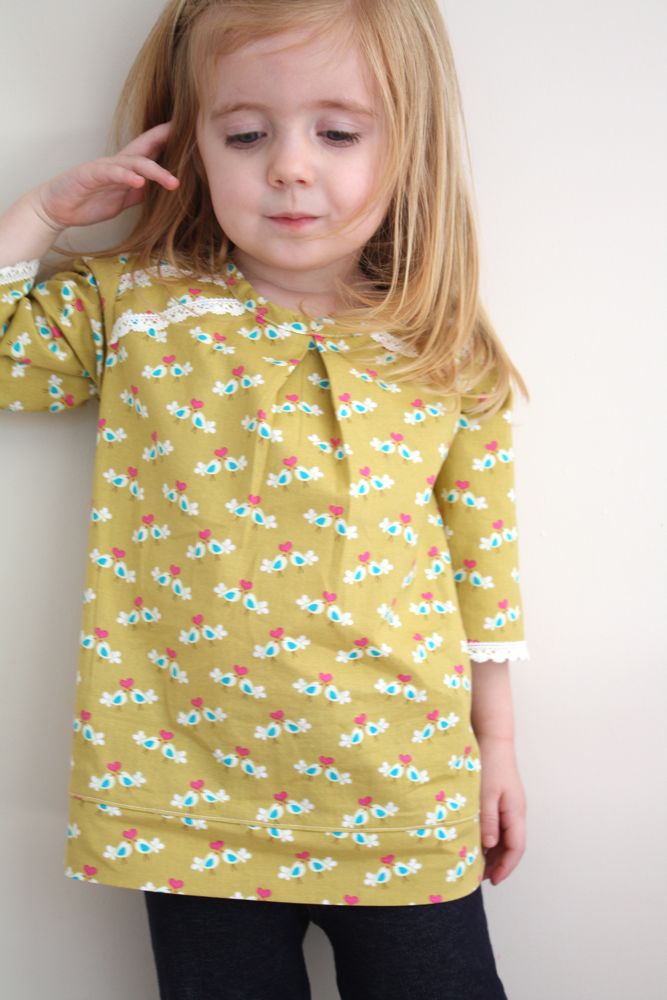
I also added a band around the bottom for fun, and because the pattern I made was a bit short. Happy mistake!

I guess it makes Sadie feel like she can fly!
Well….there are cute birds on the fabric! (which is Michael Miller-Lovebirds…from my sponsor Crafty Girls Workshop! It looks like it’s out of stock right now though)
Here’s some quick notes about how I made it. (nothing special or hard about this one)
Click below for the tutorial!
You’ll need:
fabric (I used a yard for 3T size)
thread
1/8″ elastic
button
1-2 yards trim if desired
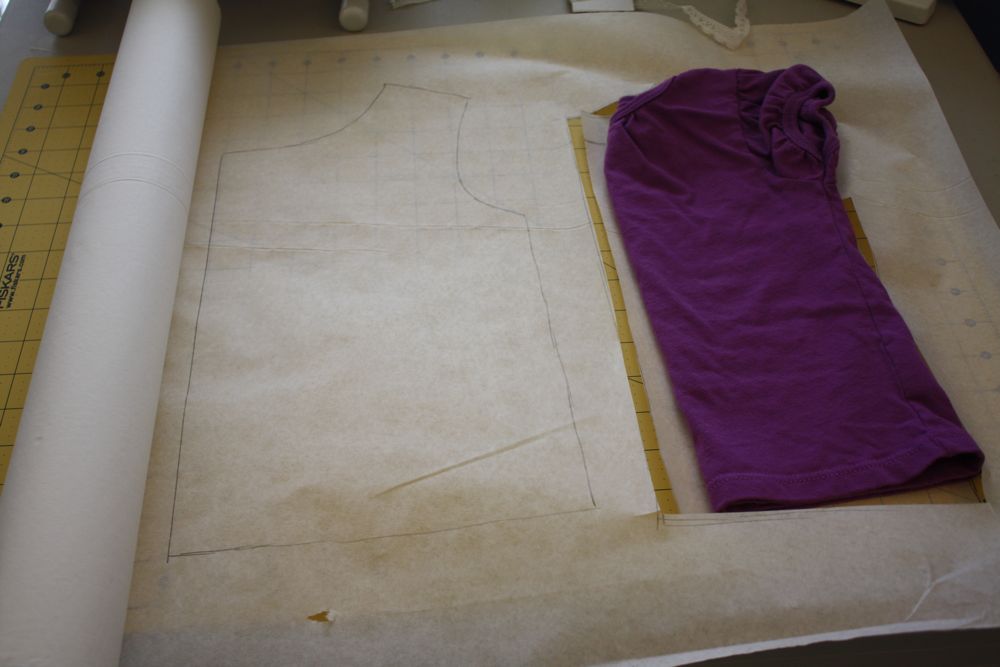
First I made a quick pattern by folding a tee in half and tracing around it, adding seam allowance. Trace the back piece normally, but add 1-2 inches on the fold for the front piece. (depending on how deep you want your pleat)

Here are the pattern pieces laid out, hopefully that will help too. Then use your armhole on the pattern to sketch out a sleeve pattern. The sleeve pattern is on the far right. Here’s a better pic of the sleeve shape (from another tute, sorry!)

You can use a shirt your kiddo has to get the length where you want it, or measure them!
Cut out one front piece, one back piece, and two sleeves, all on the fold.
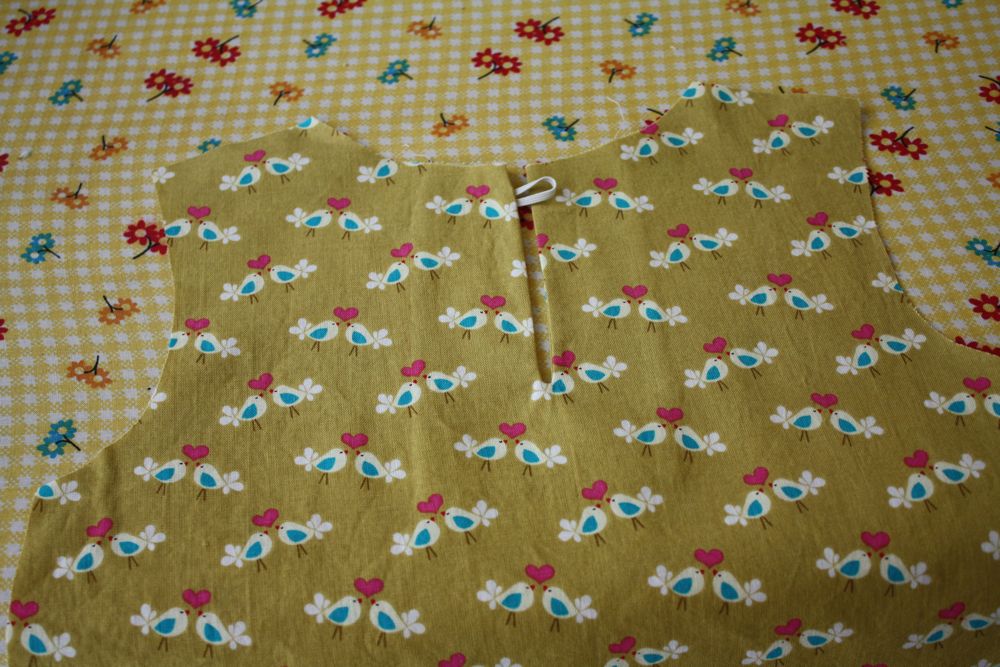
Then make the button closure with my easy peasy tutorial. (are you sick of that phrase yet? I’m pretty sure I over use it. I’m pretty sure I overuse “pretty sure” as well.)

On the front piece I laid out my trim pieces, then sewed them down.
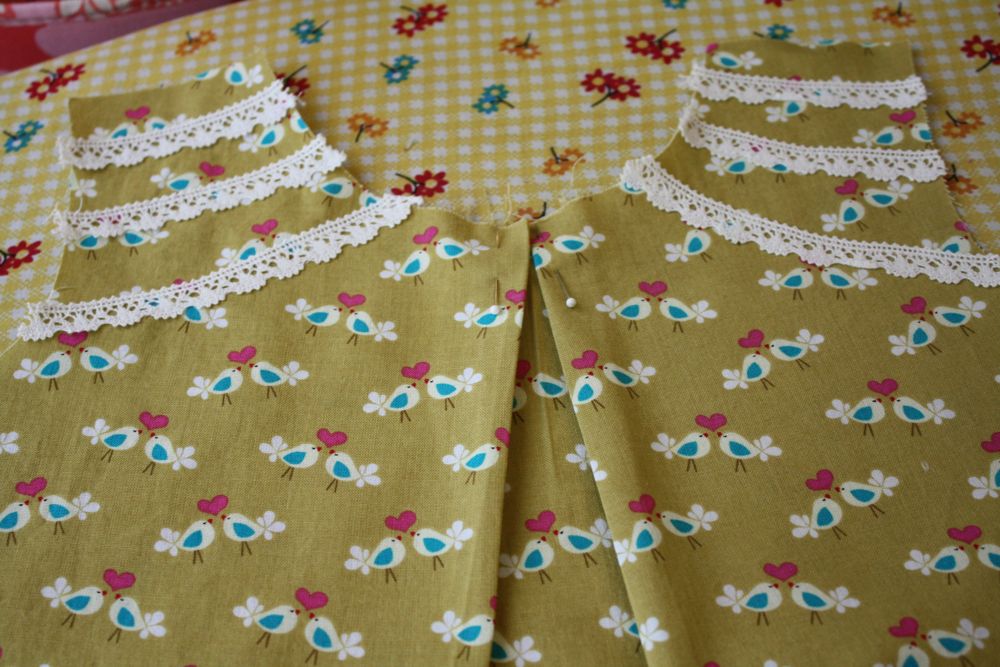
I formed an inverted pleat in the middle, pressed it, then basted it together along the top.

Then sew the front and back pieces together at the shoulder seams. Always finish (zig zag stitch or serger) and press seams as you go!
Use this tutorial to finish the neckline.

Then on the bottom of the sleeves, I serged them, then ironed over the edge 1/4″.

Then I topstitched the trim right on to the right side of the fabric, hemming it and sewing on the trim in one step.

Then for the sleeves, fold one in half and place at the shoulder seam. Pin right sides together.
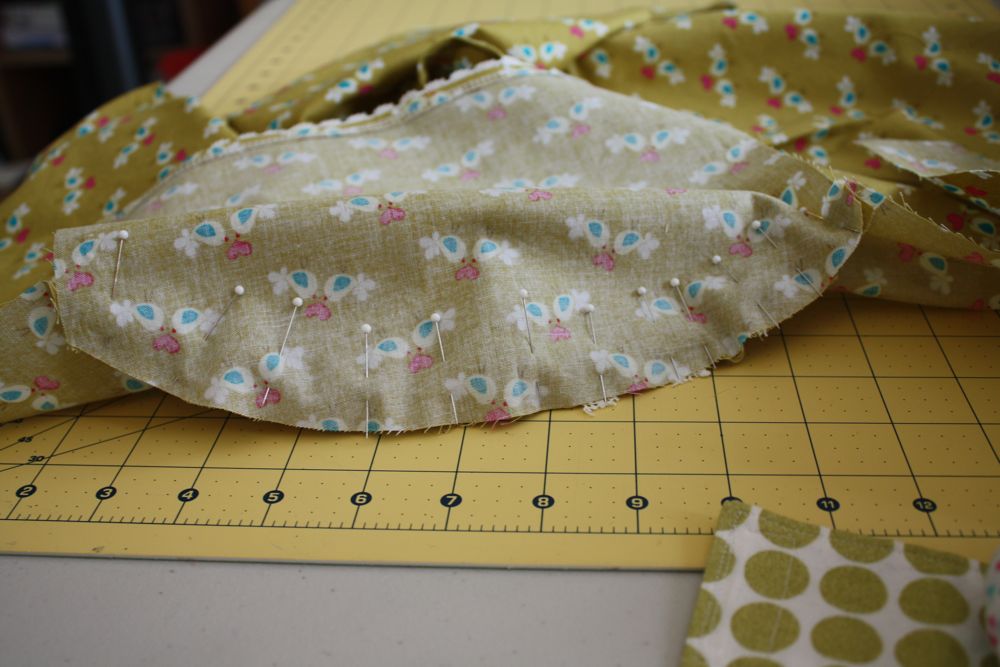
It should ease into place pretty well, just play around with it til it fits in. Then sew both sleeves in, then finish and press.

Then, sew and finish one side of the shirt-right sides together, of course.
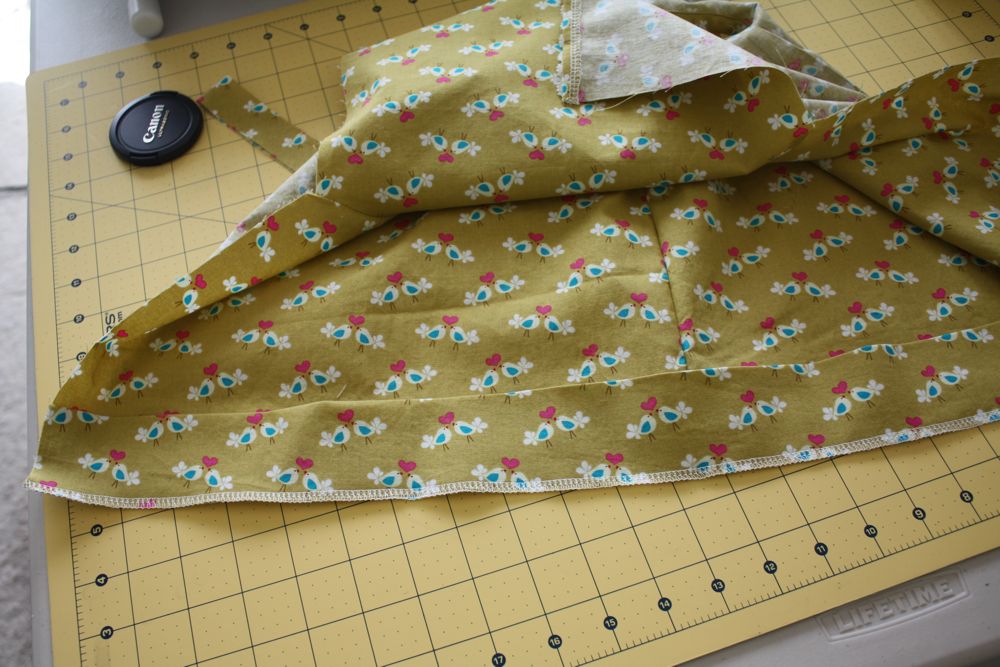
Helloo lens cap!
Next I pressed a long strip of fabric in half, wrong sides together (mine was about 5″ wide), then serged it to the bottom of the shirt.

Press the seam towards the top of the shirt, then top stitch around the seam like so. Sew up the other side of the shirt, finish the seams, press, and sew on a button-and you’re done! It really is an easy top. Have fun!

Lovely tunic jess….thanx for the tutorial…u r my inspiration to sew:-) am so fascinated by ur blog n creations that my browser homepage is ur blog….
I love this tunic! I would wear it myself 🙂 but maybe I’ll first make one for my daughter. Thanks for the tutorial! I’m new to your blog but I like it very much!
Steffi
Wow, this is great! Thanx for the tute (how CUTE is that tunic) and I guess this could also work for big girls of 29 yo 😉
Esther.
Oh, I love it! Have always loved this print and keep onto my scraps. It looks fab as a tunic. 🙂
wow!!!such a lovely tunic..u inspired me a lot!!
This would be just perfect for my DGD!…thanx for this great tutorial:)
Well, it is just so nice to see how you sew! I can do it! The trouble is, having twins, I always balk at the last minute… two every time… but you are right… I can do it! What a gorgeous tunic… Thanks. you are fantastic. grace
This is gorgeous, I love the material and your mini model is so cute!
Katie
This is adorable! You create the prettiest things! And your model is the best part!
Okay, questions; tracing paper? Where fore art thou? Also how handy are those cutting mats? Do I really need one? I’m rocking dull scissors and crawling around on the bedroom floor with needles poking me and such. The only issue I see is that my pattern pieces are way big since I am now making size 7 and 8’s so would I need a mat the size of Texas?
I love this tunic! I don’t think it’s too busy at all, it’s adorable! Thank you so much for sharing your awesome talent again!
I am absolutely going to make this this week! Thanks!
Super cute and I love the fabric. SO perfect for little girls.
liZ
(simplesimonandco)
I have the same question as Greta – what kind of tracing paper do you use and where do you find it? I’ve been using regular printer paper and taping it together but the bigger my 15 mth old gets the harder that is going to be!!
Tracing paper!!! I have used newspaper, Inexpensive wrapping paper from the dollar store will also work.
This is so great! I tried to sew sleeves for the first time the other day, and botched my project. It got me pretty down about my lack of skill. I will figure it out, and then make this awesome shirt for my little one!
–Ashley (KnittyBittyMommy)
Thanks for sharing you have greatly inspired my creativity when it comes to going away from commerical patterns! I’m totally makin this one though its a good pudgy belly cover up lol 🙂
So cute! LOVE the fabric… and adding the trim gives it that special touch.
***Jennifer
I think it’s lovely, not to busy at all. Man, I really miss sewing for my girls.
I like the band on the bottom and the way you used the lace trim. 🙂 I actually just got a bunch of lace trim from one of my old roommate’s moms and can’t wait to do something cool with it.
I don’t think the prints to busy at all! I LOVE it! What a cute tutorial! ;D
I.love.this. And I think it would work great on my rotund little toddler!
One quick hint for larger sizes–I made a top similar to this for myself (like, 10 years ago) and pieced together 2 pieces for the back (because who cares if there’s a seam up the back?) to make more efficient use of the fabric.
Beautiful job! You make it look so easy (peasy).
🙂
i LOVE this. you.are.amazing.
Okay, so now I have another of your tutorials to add to my CINO to do list.
I really like this one too. I love the lace trimming that you added. It gives it that little extra feminine touch.
Tell Sadie I like the birdies too!
I made this! My model was asleep and this us the first real clothing I’ve ever ever made and I’m absolutely going to do it again. Now I know some cool tricks and am excited to improve my skills! Thank you!
This is really darling! I think the band on the bottom makes it unique and gives it that extra punch. I love it.
Linda Estampa!!!
I love the band around the bottom. It really adds something to the shirt. Super cute fabric!
I agree with Sadie – I wike da birds too!
I like this! I like the birds even more! This one is definitely on my to do list! Thank you for the lovely lesson.
Becki
I have to tell you that I ADORE your tutorials. They make up about 89% of The Benevolent Dictator’s fall wardrobe and she is having a great time playing model. Thank you thank you!! For this one, because I have a fantastic piece of fabric picked out so it’s now at the top of my to-do list, between sewing the front and back pieces together at the shoulder and putting the sleeves on, how did you finish the neck?
Simply adorable! I think I want this tunic….Does it come in size grown-up? 🙂
love this…jess you are so talented! Sadie is adorable and looks great in this colour – my two little girls have exactly the same colouring so i can def see my biggest girly in this top! for all those asking about tracing paper…i use paper from IKEA – they sell it in the kids section on a long roll, its cheap, thick and really good for patterns! 😀
Lovely tunic in a lovely fabric. x
I don’t think it’s too busy at all. I absolutely love this shirt and plan to make it for my girls in the very near future! Thanks for the tute!
Love this, definitely pinning it to try this fall!
Hey girl! I love this top & I’m actually working on it right now. I was wondering how/when you finished the neckline?
I have a tiny boy (Finn, age 2), so I won’t be sewing this for him — but I’m going to take your tutorial and sew this for myself!! If it works out, I will blog about it with a link back to YOU! If it doesn’t then you’ll never hear about it again…
🙂
Thank you for sharing this sweet tunic!
This is really cute!
I just loved this tunic. I made my own version of it today with a vintage pillow case. Put multiple links to your webpage in my tutorial. You really are a one stop shop for sewing knowledge. Thank you!
Thanks so much for this awesome tutorial. I love these tops and they make great gifts.
http://www.twolittletornadoes.blogspot.co.nz/2012/04/lovebird-tunic.html
thanks again
i do have a question.there is a bias tape around the neckline,right?
Thanks! This tunic is very cute, and while mine didn’t turn out quite as well as yours, My girl still looks pretty adorable!
http://sphotos-b.xx.fbcdn.net/hphotos-prn1/539258_507975289229507_1657406260_n.jpg
This is too cute!! I’m thinking of modifying this pattern form myself. Since I don’t have kids (yet)
I just made this and it is soooo cute! Though the one thing I didn’t account for while pattern drafting was that my little girl has a ginormous head, whoops! Better luck next time I guess!! Thanks for such a great tutorial!
Very cute but was wondering how you finished the neckline??
Love this! Cut it out tonite, can’t wait to sew it tomorrow. Question though; I was going to make a facing for the neckline but it seems tricky because of the loop closure on the back. Did you use bias tape??
Thank you for this tutorial. I made a Thanksgiving shirt for my daughter and it looks fantastic. I was so worried about it being short that it turned out a bit too long so I have a wide hem. The trim really makes a difference!
For the recent commenters: I finished my neckline with doublefold bias tape.
I made one for my princess…great tutorial thank
zal ik zeker eens uittesten
Thanks for the tutorial, it is great I have made one of the tunics and have written it up here http://whatyousew.blogspot.co.uk/ I’m sure I’ll use more of your tutorials in the near future!!
Becky
What sizing would work for size 2?
Thanks
What would be the measurements for size 2?
New to sewing…
Thank you for sharing your talents! This tunic is absolutely adorable and the three little girls that I love sewing for will look super cute in it. Your instructions are terrific. Thank you so much.
Betty, a new fan
Thank you so much for posting this! I sat and frowned at the t-shirt for a good long while before I got up the nerve to start cutting and it’s adorable! I can’t wait for my little monkey to wake up so I can try it on her 🙂
Thanks again!
I’d love to make this outfit but the link to the tutorial isn’t there.
I know this is an old post, so I’m very behind the times (!) but I’ve just used this tutorial to make a gorgeous top for my almost-3-yr-old. Thanks so much for sharing your expertise. I’ve just blogged some photos and linked back to your site and the tutorial http://makey-cakey.blogspot.co.uk/2013/07/clothing-and-curtains.html
LOVE this tunic!
I’m a novice to sewing and have been stuck on the sleeve portion for 2 hours now. I cannot for the life of me figure out how to attach them. Can you help me?
Thank you for the tutorial! Love the tunic, had I discover you before and I would have made a better job at mine! Learning with you and loving it!
It is sooooooooooo cute. first time I drop by ur blog and I am really loving what I see xox
love it! I might have to have another child to sew for! (not sure that can happen at nearly 60 yrs old! lol)
I made a variation of this tunic today, and I love it! So does my daughter! I’ll link to your blog when I post about it. Thank you so much!
Hi,
Can you tell me how you did the neckline please?
the tutorial found here is how I finished it 🙂
https://www.craftinessisnotoptional.com/2010/10/sew-along-part-5-hem-collar-buttons.html
Thanks, you make it look so easy. Thanks, love your stuff x
hello!
It’s funny because today i made a skirt in the same fabric but in blue!
This tunic is adorable!
Question, in that first picture you say fold shirt and make a pattern, adding extra for seam allowance. However, when sewing the back piece, you say to sew normally. Does that mean open and flat or eithout a seam allowance. Want to try, but am confused. Also, what are the measurements for those sleeves? Thanks for the help!
I just meant trace the back piece as is, and to the front piece, add the width for the pleat that I describe. Does that help?
Not really…sorry. I have a tee that fits my daughter folded in half and traced that, making it a smidge bigger for seams. Then, after tracing, do I unfold the shirt and trace for the back piece or trace it without allowing for seam (i.e.: trace folded without any extra space for seams)?
the front piece has extra width in the center fold for the pleat. The back is traced without the extra width and with a high neckline.
Can you elaborate on how to make the sleeve pattern? I’m pretty new a sewing and when i look at your sleeve pattern I am a bit confused. Should it be the same shape as the arm holes from the back and front pieces?
Used this to make a top for my son’s Gingerbread Man costume! First time I followed anything close to a pattern and I never thought sleeves could be so easy (albeit far from perfect, but it was my first time). Believe it or not, I didn’t even measure a thing – was in a rush and it didn’t need to be spot-on, so I just drew around a folded jumper for the sections Ended up slightly longer at the back, but somehow I liked that a little anyway! (fashionable maybe?!) So, thanks ever so much Jess for being so kind as to share your creations and write very simple instructions. I have no idea what serging is (my machine manual does not include it and I’m wondering if it might be an American term?) but zig-zag stitch seemed to do the trick regardless. Thanks a million!
Lovely tunic..i like this very much! Thanks a lot =)
YOUR AMAZING! I am new in the sewing world and boy do I love your posts!
thank yoU!!