


Got some tee shirts?
Got a sewing machine?

Then you’re on your way to some seriously cute and easy headbands!
Click below for more!
 First, cut a piece of your tee shirt/knit fabric 3 inches by “how big your kids’ head is”.
Mine was about 15 inches long for Charlotte.
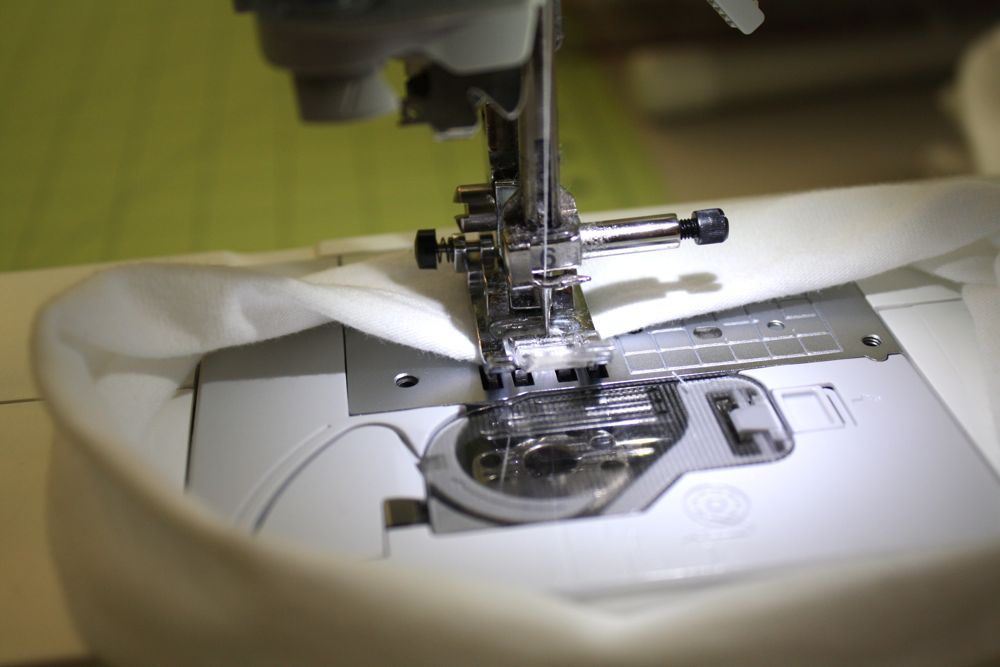
 Fold lengthwise and sew down the long side with about a 1/4 inch seam. I used my serger after this first one, which worked fine, as did the sewing machine. Pick your poison!
 Turn right side out and press with your iron if you like. As you can probably tell…I didn’t.
 Measure around your stinkin’ cute baby’s head to adjust for the best fit…make sure to add about 1/2 on each end for overlapping. I also finished the ends on my serger, but that’s probably not necessary, since they’ll be enclosed.
 Overlap, and sew ends together with a zig zag stitch.
 tada!
tada!
You’re done.
Just kidding.
 Next, fold the spot where you sewed your strip together, towards the back, like so…and sew it together.
 Then, take a piece of ribbon, or twill tape, like I used, and sew one end down on the back where you just folded the edges over.
 Wrap your ribbon/twill tape around the front, and back around, and trim.
 Then tuck that end under.

and hand sew it down…forming a handy little loop for clips!
Repeat as needed…er…wanted.

Hope you liked the tutorial, the model didn’t hurt, right? 😉
Let me know if you have any questions!
Featured on UCreate!
and One Pretty Thing
***If you have used any of my tutorials, I’d love if you’d add a quick pic to my flicker group! Thanks!***
Thanks for the easy handband idea. I can’t wait to get started!
Kelli
xoxo
SO Cute. Thanks for a great gift idea.
The model is ADORABLE!!! Thanks for the tute. I’ll def be using it!
http://spontaneousday.blogspot.com
O….M…G! She is to freaking cute! And she looks soo tiny with that big binky (pacifier) in her mouth. AWWWWWWWWWWWWWWWWWWWWWWWWWWWWWWWWWWWWWWWWWWWWWWWWWWWWWWWWWWWWWWWWWWWWWWWWWWWWWWWWWWWWWWW! OK, I’m done now, that is one seriously cute little girl tho. She may be too cute…… 🙂
great idea, thank you! I’m going to whip up a few and make some clips to go along with it.
cute! Thanks!
Great tutorial, love the idea of being able to use a single headband for multiple flowers!
That is so cute and so is you model! Mega awws. Thanks so much for this, I’ll be linking.
Visiting via UCreate. Simply adorable, such a precious little model.
super cute Jess…. Just a helpful note. You can also use baby tights and they work super good. And they are sheer so it adds some variety.
Cute headband and super cute baby!
You are awesome! These are so cute!
Aw such a cute little tutorial thanks and an adorable little model too!
I saw this on one pretty thing and it is so adorable! I will be making a few of these for my itsy bitsy – I think our baby girls are only a month apart. Really love your blog – you and your girls are way cute!
LOVE these…doesn’t hurt that that baby is about the cutest thing EVER.
I would love for you to link up this idea at my Christmas in July linky party. I am gathering up a list of great homemade gift ideas. I fell in love with these.
Seriously your stuff is great, I would love to see any of this stuff linked.
I hope to see you there soon.
Just Another Day in Paradise
Love this headband–so crafty!
Would love for you to link up to my Headband Link party over at Little Miss Momma! Here’s the link:
http://littlemissmomma.blogspot.com/2010/09/headband-week-link-party-and-surprise.html
Love this idea… especially for babies because the t-shirt material will be very soft. Did you make the flower clip that is attached to the headband in the first pic? I love that as well!!!
Awesome tutorial. Beautiful baby!
~Nike@Thrive
[email protected]
OMG!!! Your blog (like, every thing I’ve seen so far) makes me want to go buy a sewing machine and make myself learn how to do all these awesome projects! Especially because you make really cute girly things and I’m pretty sure I’m having a girl (I’m 17 weeks preggers!)… Who knows, You might see some of my attempts in your flickr group someday!
Thanks for the really great tutorials!
Mandy Saunders
I love this headband! I featured it in my DIY Headband Article on our blog! Check it out here– http://www.favecraftsblog.com/link-love-diy-headbands/
do you have a tutorial on how to make the flower on the headband?
@sara bench-the tutorial is here: http://naturesheirloom.blogspot.com/2010/05/hair-clip-addict.html
I am a follower of your blog but I found this tutorial on Pinterest and let me just say that it is awesome! So quick and easy but adorable. And the perfect use for T-shirt scraps. I made one but plan to make many more because it came out so nicely and is so versatile. Thank you for taking the time to share this with us. And seriously…your blog is one I HAVE to check for new posts. Love love love ya girl 🙂
ï»?Agreed upon baseball jerseys in popular people are usually introduced to make sure you diehard devotees upon exclusive periods to establish a good serious creating among MLB and additionally the proponents This is because there are a number of dealers that will offer you cheap jerseys but the quality will be very poor as well
ï»?Since the beginning of tourism[url=http://www.nikebaltimoreravensstore.com/womens-torrey-smith-purple-jersey-c-8_12.html]Womens Pink Torrey Smith Jersey[/url]
PISA has been known for just one thing – the Leaning Tower[url=http://www.nikebaltimoreravensstore.com/womens-haloti-ngata-purple-jersey-c-8_9.html]Haloti Ngata Purple Jersey[/url]
which serves around the world as a shorthand image for Italy Chicane Cheap Jerseys refers to an area of monitor which is designed to gradual vehicles down making use of a sequence of corners that alternate instructions
twitter-inner-ditto233987489872896000 div Another reason this game is so good is that you are permanently on offense Otherwise[url=http://www.CalvinJohnsonJersey.net]www.CalvinJohnsonJersey.net[/url]
the side effects can be uncontrollable Third borns can have a weakness for mood altering substancesWhat is the processormicrocontroller suitable for this application
Her ensuing tweet stated[url=http://www.BobbyWagnerJersey.com]www.BobbyWagnerJersey.com[/url]
“They said I can’t talk about it or I’ll be locked up The use of these combination drugs[url=http://www.CalvinJohnsonJersey.net]Calvin Johnson Authentic Jersey[/url]
therefore[url=http://www.CamNewtonJerseynike.com]Cam Newton Jersey[/url]
should generally be avoided You’re wasting its operational life by leaving your system on There are many beaches in the state which are loaded with many attractions The fact that Denver panicked and grabbed Tebow in the first round when he would have dropped to them in the second round shows possible immaturity on McDaniels part It contains Windows Shell API functions which are used when opening web pages and files
ï»?The items in the minispec would be implemented after the originally scoped product is delivered possibly taking it to version By not adding features in drips and drabs[url=http://www.BruceIrvinJersey.com]Bruce Irvin Womens Jersey[/url]
you are optimizing integration-Parachutes now respond to turn and throttle inputs more quickly They were[url=http://www.BrianUrlacherJersey.net]www.BrianUrlacherJersey.net[/url]
on both occassions[url=http://www.JasonPierrePaulJersey.net]Jason Pierre Paul Authentic Jersey[/url]
time teststwimgProject Portfolio Management: Pure Simplicity Project Portfolio Management PPM is “a process that ensures your company spends its scarce resources on projects that will deliver the most value to your organisationErin AndrewsDaddy issues?5
Chances are a hiring manager has already seen the same ones over and over again Robbins needed 100 games to defeat Dick DellRoyal HolidayA relaxing escapade out of the town[url=http://www.BruceIrvinJersey.com]www.BruceIrvinJersey.com[/url]
far from the maddening crowd Maybe he spent most of his career on the sidelines eating Salisbury steaks The ratio of protein[url=http://www.BruceIrvinJersey.com]Bruce Irvin Womens Jersey[/url]
carbohydrate and fat should be optimum in the meals
They are small and easy to pack[url=http://www.BrettKeiselJersey.net]Brett Keisel Womens Jersey[/url]
so why not? For conditions that are cold[url=http://www.HowieLongJersey.com]Howie Long Jersey[/url]
obviously you want to be warm He sports the colors and tailgates at Lambeau just like the rest of us[url=http://www.CalvinJohnsonJersey.net]www.CalvinJohnsonJersey.net[/url]
so we think he deserves a spot[url=http://www.BrianUrlacherJersey.net]Brian Urlacher Jersey[/url]
even if it isn’t technically on the listSalisburyThis city is situated in Rowan County[url=http://www.KevinWalterJersey.com]Kevin Walter Authentic Jersey[/url]
North Carolina and has a population of about 33[url=http://www.BrianUrlacherJersey.net]Brian Urlacher Jersey[/url]
663; as of 2010 But if you have a goal that you really like to achieve[url=http://www.JoeMontanaJersey.com]www.JoeMontanaJersey.com[/url]
you have to be willing to personally restrain yourself should temptations appear He has also won an Olympic Gold Medal with the United States national basketball team Nowadays[url=http://www.JaredAllenJersey.net]Jared Allen Authentic Jersey[/url]
Sabrina is also a record producer: she owns a recording studio which was used by Sade[url=http://www.JasonPierrePaulJersey.net]Jason Pierre Paul Authentic Jersey[/url]
Simply Red[url=http://www.BruceIrvinJersey.com]Bruce Irvin Womens Jersey[/url]
Vasco Rossi[url=http://www.ArianFosterJerseys.net]Arian Foster Jersey[/url]
and many others They love trumpetshaped ones and the nectarrich flowers
ï»?A screen name can also be referred to as ‘user name’Most people refer to this as the golden rule So crushed Two of the factors of lesser importance would be torque and kick points
ï»?This method will also keep cost down[url=http://www.BarrySandersJersey.com]Barry Sanders Authentic Jersey[/url]
because accessing the Internet with a personal digital assistant (PDA) will cost them an initial purchase price of at least that cost over $500 to get the same Web and file access Stone is a few months older[url=http://www.CharlesTillmanJersey.net]Charles Tillman Jersey[/url]
but still extremely young when compared to all of the other golfers trying to find success on the amateur circuitWhen Randy Pausch[url=http://www.JoeMontanaJersey.com]Joe Montana 49ers Jersey[/url]
a computer science professor at Carnegie Mellon[url=http://www.CharlesTillmanJersey.net]Charles Tillman Womens Jersey[/url]
gave his now famous last lecture[url=http://www.JaredAllenJersey.net]www.JaredAllenJersey.net[/url]
having been diagnosed with terminal cancer[url=http://www.CalvinJohnsonJersey.net]Calvin Johnson Womens Jersey[/url]
he spoke about timestamp font-family: Arial[url=http://www.CamNewtonJerseynike.com]Cam Newton Jersey[/url]
Helvetica[url=http://www.KevinWalterJersey.com]www.KevinWalterJersey.com[/url]
sans-serif;font-size: 12px;display: block;color: #999;margin: 10px 0 0 0;line-height: 25px;spanDick SchaapSchaap[url=http://www.CamNewtonJerseynike.com]www.CamNewtonJerseynike.com[/url]
second from right[url=http://www.JasonPierrePaulJersey.net]Jason Pierre Paul Womens Jersey[/url]
brought some class to sports broadcasting4
twitter-inner-ditto222840173996679169 a:hover text-decoration: underline; div ” But the comments follow not only failed to dispel people’s concerns[url=http://www.CalvinJohnsonJersey.net]Calvin Johnson Authentic Jersey[/url]
but it has deepened speculation Specifically[url=http://www.BarrySandersJersey.com]Barry Sanders Jersey[/url]
it is recommended for use by individuals who have a body mass index or BMI of 30 or more They currently hold the title of oldest cue manufacturer in the United StatesI wasn’t quite sure how I wanted to put this together For starters[url=http://www.JasonPierrePaulJersey.net]Jason Pierre Paul Authentic Jersey[/url]
they lowered their target to Weighing in more than this might be discouraging since weight can fluctuate a few pounds from day to day[url=http://www.BobbyWagnerJersey.com]www.BobbyWagnerJersey.com[/url]
even if you are sticking to your diet
Miss Jess,
These are Adorable! I would like to know if I would be able to sell these at a craft show. Thanks!
~Mackenzie
Sure just make sure to get a license to sell-on my site on the right side bar 🙂
Great idee! I’m gonna use it for my granddaughter 🙂
greetings,
rita