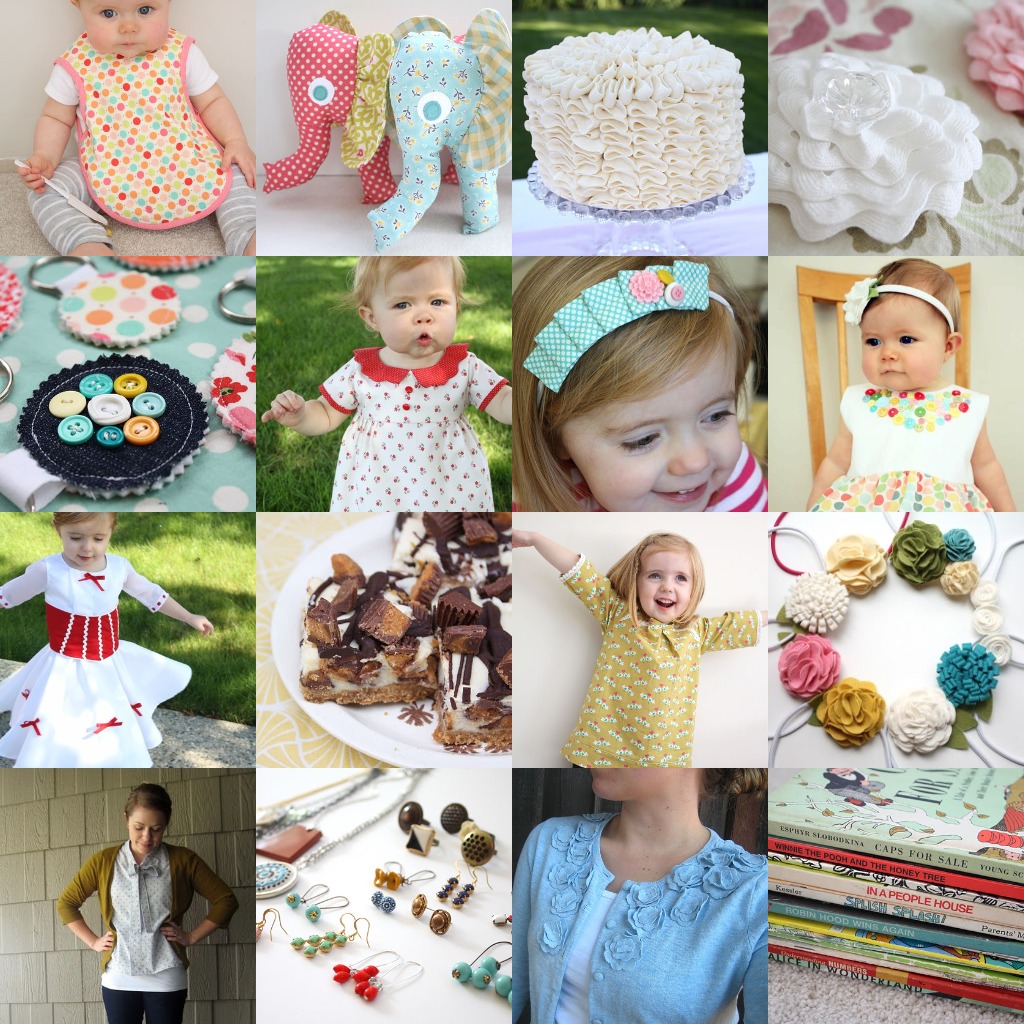
Friday, July 29, 2011

Simplicity 3835


I want to shout it from the rooftops! (if I could climb on my roof....) I love, love, love this top and pattern! It's Simplicity 3835, view C, size 12. I made it with some swiss dot fabric I got at Joann's on sale a little while ago (for like $3 a yard, sweet). 


I added a little tie to "belt" it a little, which I love! I didn't add any elastic in the sleeves, it fit fine as is. It's seriously so comfortable and fits like a dream. I am definitely making one of these in some voile, I can't imagine how comfy that would be. I'd probably have to avoid wearing it so I wouldn't fall asleep in the middle of the day.


You know I couldn't leave you without a dumb face Jess pic, right? 

Thursday, July 28, 2011

Simplicity 2593


(wow I do a good bucktooth impression)

I got a slew of Simplicity patterns at the latest Joann sale ($2 each!), so I've been working my way through them. So expect some more tops and pattern reviews. This is Simplicity 2593, view D. The fabric is Anna Maria Horner Little Folks Voile Four Square Sea. Her voile is a dream to work with, albeit a teensy bit slippery. It's soooo (oooo) comfortable, too.


I shortened the sleeves a little bit, and they were still too long for my taste so I sewed up two tabs (two rectangles sewn RST, one end open. Turn right sides out and press, then I pinned it where I wanted it, sewed it down, then sewed a button on top to hide the stitches), to shorten the sleeves a little bit. I really like the added detail. I'm all about simple clothing with little details.

I'm not sure if I'm pledging allegiance, or covering my bra strap. Hmmm...

Anyways, the pattern and fit were great! It doesn't have any darts either, which simplifies it even more. I do think I'll bring in the neckline a little bit next time I make this pattern-it gapes a little too much for my comfort level. (I'll just have to wear a wide strapped tank I guess) I sewed it in a size 12. (I'm usually an 8 or 10 in regular clothing, but patterns seem to run large)

Shazam. Beat that awesome face. Just don't hurt yourself tryin'.

Wednesday, July 27, 2011

pink peasanty top


Ooh lala...I whipped out the awesome faces for you guys this time. All joking aside, don't be jealous of my posing skillz. 
I made this peasanty top the other week-I even drafted my own pattern for it! And it fit! Miracle of miracles. I got the cotton lawn on Fabric.com a loong while back.


Grimace. 

Just keepin' it real. I am no model guys, so feel free to chuckle at this face. I did. Whenever the camera comes out, I can't be held responsible for what my face does.

I do like the two rows of elastic stitched to the inside, spaced about an inch apart. It kind of added a grecian look to the top. (as grecian as pink polka dots can be) I sewed some bias tape to the sleeves, too, they're not elasticized. So anywho...it's a fun addition to the wardrobe...and way comfy too.

Tuesday, July 26, 2011

dress and shorts


I went to a craft night the other week and decided to make another Playdate dress from this adorable knit I picked up on Etsy awhile ago. I wanted to add a pocket too, but threw away all my green scraps accidentally. Whoopsie! Looks like pregnancy brain still affects you a year after the baby is born. At least, that's what I'm going with.


It's a little bit short, but she wore it the other day when it was 100+ degrees and it perfect for those hot summer days. I kind of wish I could get away with that too! Sadly, I don't think people would giggle quite the same way if I did a somersault in my dress and flashed my undies at them. Though, they undoubtedly would giggle some.


I also whipped up some PJ shorts for Sadie the other night-I used this tutorial minus the cuffs-just hem them up normally. The fabrics I used from top to bottom are: Riley Blake, Amy Butler, vintage sheet, and Hullabaloo by Moda.

I picked up some tanks at Walmart and now she's set for PJ's-although I might make her a few more pairs-they're so easy and cute!

What have you been working on lately? I've got a slew of tops I've sewn for me waiting in the queue to be posted. More on them soon! 

Monday, July 25, 2011

the flora and fauna shirt-tutorial


I'm so excited to be participating in Anna (from Noodlehead) and Shannon (from Luvinthemommyhood)'s Sewing with Knits series!


noodlehead


Both Anna and Shannon are fabulous and talented gals, not to mention so sweet. :) It took me forever to settle on a knit project to do-I had just come off of an obsession of my own with knits, so I was kind of out of knit ideas for the time being, lol. Pinterest to the rescue!

I quickly found (thanks to my best pal), and was enamored with the simple style of this top from Garnet Hill:


So I set out to figure out how to make it myself. I used my raglan tee pattern and tutorial for most of the construction, so I'll refer you to that tute for some of the top, the rest I'll show you how to do right here, right now.
 

It has a cute keyhole neckline, with elastic casing around the neck and button closure (though not that necessary because of the elastic, mostly there for the cuteness factor), and 3/4 sleeves with a bias tape trim. I used a jersey knit sheet set (clearance-$6), so I used the finished edge for my hem. 


I think Sadie looks like a little woodland nymph or something. Grass nymph? What's a nymph, anyways? I'm pretty sure it's like a fairy. I hope. Am I thinking of a sprite? Anyways...that's neither here nor there. Get on with the program, Jess!
 One more pic, cause the sleeves are too cute! 

Click below for the full tutorial!


Friday, July 22, 2011

some slight alterations


Do you remember this dress I thrifted earlier this month? It was too big for me, but I recently altered it a little to fit me better. (and a belt works wonders....also thrifted) I really liked the polka dot fabric and neckline ruffly bit, so I brought it home with me. (and for $3, even if it was a FAIL it's still cheap fabric that could become a skirt or something...) It's so easy to alter clothes slightly to fit better.

Example A:

**Eh...what's that on the ground?** 

So here's what it looked like, pre-messing around with it.

And....on me. Lovely, right? (ignore the discarded towel on the bed)

So I took in the sleeves and side a little bit...and hemmed up the sleeves a bunch. I also tacked down a pleat in the shoulder so it wasn't as wide. I sewed up a little pleat in each sleeve too, so it fit better.

Just a simple fix, but I've often overlooked cute dresses and tops while thrifting that are too big, never realizing, that DUH I sew...and can alter it. 

Example B:


Ok, so I don't have a before of this, but just picture it a lot baggier and boxier. (are those the same things?) I loved the wide stripes in navy and white, plus it was only a couple bucks. So I cut it up, made it slimmer and sewed in new sleeves. The stripes don't match up on the sleeves, but I kinda like it that way. (that's my cute sis modeling for me!)


So anyways, hope this inspires you to grab that cute top or dress you spotted at the thrift store or on clearance, and hack it up to make something even cuter!

Thursday, July 21, 2011

About Me...

I've finally got most of the questions answered! I'm posting them in this post, and also on my About Me page.

Ok, so you'll probably be hollering "UNCLE" from knowing too much about me after you read this page, but it's my blog...so....let's get going. ;) I asked you guys for questions, and you delivered! I don't know if I can answer all of them, but I'm going to try!


Click below for the whole scoop!


Wednesday, July 20, 2011

Junebug sew along Part 3-sleeves and skirt

Now for the sleeves and skirt!


Click below for the full tutorial!


Tuesday, July 19, 2011

Junebug dress sew along part 2-bodice and buttonholes

Let's work on the bodice and buttonholes today...


Click below for the full tutorial!

Monday, July 18, 2011

Junebug dress sew-along Part 1: pattern and pieces


And now for the Junebug dress tutorial/sew along. (without much fanfare apparently)


You'll need:

1-2 yards of fabric, depending on child's size. I barely scraped by with one yard for my 2T size
6 buttons-for the pattern I provide no larger than 5/8"
thread, sewing and pattern making stuff (ie sewing machine and paper)

You can download the free 2T/3T pattern here. I say @2T/slash/3T because Sadie's kind of in the middle of the two sizes....the finished dimensions of this pattern are 21" around the waist, 8" around for the sleeves (though you can definitely use more elastic to get a wider opening), and 18" from collarbone to hem.

Ok, if  you're not using the pattern, let's get going and make your own! First you'll need to trace a tee that fits your child-see more about that here.

This will be the back piece of your bodice-so trace the back neckline. Add seam allowances-I allow for 1/4" in my pattern. Measure down how far you'd like the bodice to go on your child. and draw a line across.


Next, cut out your back piece, and trace it again. Then draw a half-square neckline-dropping off before it hits the fold line. (left side of pattern in pic)


Then cut out that pattern, trace the back piece again, and draw your bodice flap pattern. It should flare out a little bit on the bottom (ie not go straight down), and curve up a little bit where it meets the bodice front piece. Add seam allowances on the top and side of this piece. (again, about 1/4")


Then I drew a sleeve shape like this one for my gathered sleeve. These are really easy to draw and forgiving too. Make sure to square it off, ie, make sure lines are straight.


There. Now label your patterns as shown, and cut out your fabric from the pattern pieces.

Tomorrow: bodice and buttonholes!

Friday, July 15, 2011

Gingercake patterns giveaway (closed)

 ***this giveaway is now closed, scroll down to see the winners!***

I have got a fabulous giveaway for you today! Gingercake has some of the cutest PDF patterns I've seen. Seriously adorable, I mean, you saw those duffel bags I made the girls, right? 


So fun! Some of the other patterns of hers I adore: 

Hobo Style Lunch Sak -I love how it ties at the top!


Crayon Art Folio-perfect for car trips and on the go.

 Lucky the Elephant pillow. those ears....Agh, so cute! this would be absolutely adorable in a nursery or playroom!


and the Notebook Slipcover. It says it right there: chic, simple, functional. Totally true!  


Gingercake is generously giving away a pattern package to 2 winners! 

They will get their choice of 4 patterns each. Score! ;D

How to enter: 

Head over to their site, browse around their patterns, then come back here and leave a comment mentioning at least one of the patterns you might pick if you win!

(PUH-lease leave your email address with your entry, mkay?)

I'll pick a winner Sunday, July 17th, using Random.org. 

Good luck!

and now!

 The winners are: 

Lara Petch

and sewok!

Congrats, girls, I'll be emailing you soon. :)

Thursday, July 14, 2011

that's a lot of information.

Hey there.

I am so, so excited to unveil a new look for my blog! It's been a long time coming. I loved my old design, but was ready for a change and something fresh and new. So I turned to Smitten Blog Designs, and my designer Missy did an amazing job translating my garbled wants into a crisp new design. I absolutely love it! (make sure and hop over if you're using a reader to check it out!) They are so professional and I loved working with them. I would highly recommend them! Also, they have a lot of really cute free backgrounds, you can check out on their site.


Speaking of readers and such, are you guys getting the posts ok on the Google reader feed since I've switched over to the .com? I'm not sure if you need to update it or not. hmm...anyone know?


 ALso! The Junebug dress sew along will start next week, July  18th-20th! Here's a supply list:

You'll need:

1-2 yards of fabric, depending on child's size.
6 buttons-for the pattern I provide, no larger than 5/8"
thread, sewing and pattern making stuff (ie sewing machine and paper)
I'll show you how to make a pattern, and provide a 2T/3T sized pattern for the bodice, and sleeves.


Thanks for all the awesome questions from the other day! I am having a blast answering them, and I will probably have the longest About Me page in the history of blogging, but you won't have to wonder, "gosh I wonder if Jess likes black or green olives better?" Yep, cause I answered that question. (you're gonna have to wait though, for the answer....oh the suspense!) I'm going to close the comments now to choose a winner, but of course if you have any other questions for me, feel free to email me anytime! :) 

I'll have the questions answered and posted soon!


Sooo...the winner, of a yard of this cute fabric (from Just Wing it by Momo, c/o my sponsor, Lark Cottons) is...

(p.s. you have the coolest name ever.)

Please email me at craftinessisnotoptional(at)gmail(dot)com, Callie so I can get your info!

Hope everyone is having a great morning! We are....so far Charlotte is refusing to nap though. :( Booger.

Here's another hint for Sadie's birthday party theme (part of the favors):
;)

OH, and is anyone else waiting on pins and needles for the last Harry Potter movie? I don't do midnight showings, but tomorrow night me and my sis are SOOO there. I need to whip up a tee shirt before then, I think. ;) I'm soo bringing tissues. ;)

Wednesday, July 13, 2011

Summertime refashion guest post

Today I'm guest posting over at On the Laundry Line, for Laura's Summertime, and the Living is Thrifty blog series, with this adorable refashioned top. (which cost a total of $2.75 thankyaverymuch)

Hi! I'm Jess from Craftiness is not Optional, and I'm a cheapskate.  I also love to sew. (that's also kind of an understatement)

I also absolutely love refashioning. Especially taking a somewhat funky thrift store find, taking it apart, and making it look brand new! I stumbled across this shirt a little while ago while thrifting and the pattern jumped out at me-it was perfect for a summertime top for my daughter Sadie.


I added a cute little tuxedo shirt detail, bib detail, scoop thing...whatever you want to call it, and some ric rac and buttons to jazz it up.


Little miss likes it, and it was really easy and cheap to make! The shirt was $2, ric rac about 25 cents, and buttons were 50 cents. So a grand total of $2.75! Can't shake a stick at that! (I might not actually know what that saying means)

So, want your little one to be thrifty and cute?

You'll need:
a women's knit t-shirt (the larger the better)
scraps of white knit
ric rac
buttons
ballpoint needle (for sewing with knits)
thread and sewing stuff

pattern (I go into more detail about making a t-shirt pattern here.)


 Ok So first off cut two bodice pieces on the fold, one should have a lower neckline. Use the bottom of the shirt if you can so you don't have to hem it!


Next, sketch a bib/scoop on some paper, using the front neckline.


It doesn't have to be perfect, just fold it in half and cut out.


make sure it fits your neckline.


 ...and room for  buttons!


Then cut out two pieces on the fold of your white knit. (two layers so the pattern won't show through)


Pin to your bodice.


Then sew around, about 1/8" from the edge.


Then take your ric rac and sew it along the edge as well, covering your stitches from the previous step. Sew down the middle of the ric rac.


Next cut out your sleeves-I used the armhole to gauge the size needed, and cut out a shape like this. Knits are forgiving, so it doesn't need to be exact. I also cut this out using the existing hem, and on the fold, of course.


Then I unpicked the collar to re use.


Sew right sides together, one shoulder.


Then pin your tape on, sandwiching the raw edge.


Sew that on, and then sew the other shoulder, right sides together.


Sorry about the pic from another tutorial, but pin the sleeves into the armholes, right sides together, then sew those as well.


Next pin and sew the sides of the shirt together.


Match up the existing hems as best you can. (again, knit is forgiving, so it's not too hard!)


Sew on your buttons, and tada! You have a cute, refashioned top for mere dollars.  Also, one of a kind!


Thanks for having me Laura! I hope you all have a Thrifty Summer!
 
Blogging tips