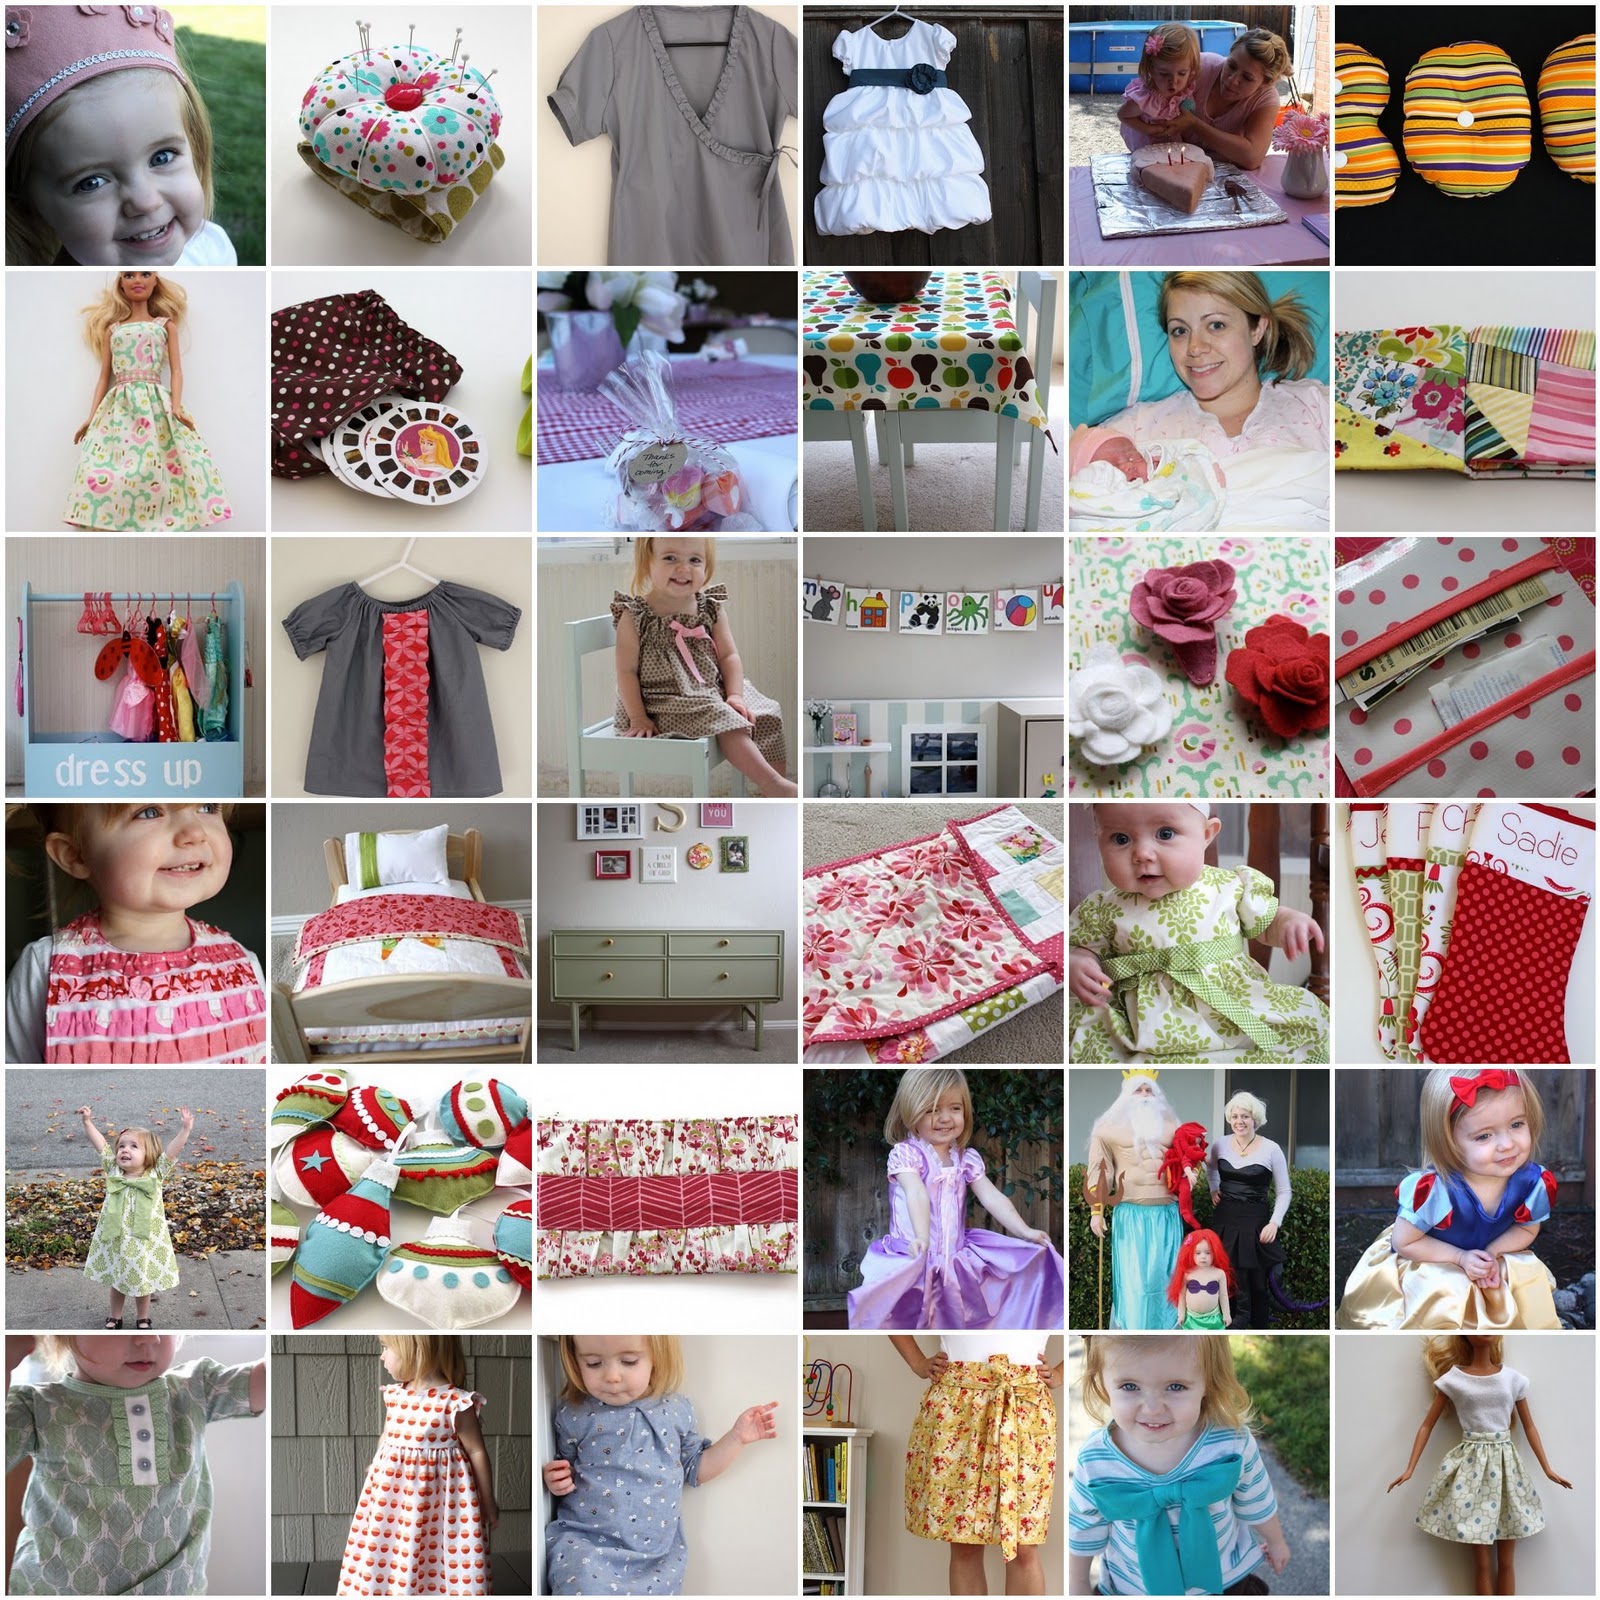
Saturday, January 30, 2010

back in the quilting saddle

started sadie's quilt for her new room last night! it's going to be an hourglass quilt, inspired by this quilt. amazing blog, by the way. i've got 77 squares to make, 22 down, 55 to go. it's a lot easier than my pinwheel quilt though.


after a trip to joann's this afternoon, i have the fabric for the baby's crib skirt and bumper, so i'll be starting that soon...i'm excited to have some real projects going! it's nice to turn on some friends (the tv show), and lose myself in the quilting process. i haven't done that in a loong time. (some of you may think i'm losing my marbles...but i love it!)

Friday, January 29, 2010

currently...

...sore from priming three pieces of furniture for sadie's room. why did i decide to paint them all? lol.

...enjoying the sun! we went to the park earlier with aimee, gage, cassy, rayne, and baby dylan, and had a blast! sadie's still conked out from all the fun.

...finally found some fabric i like for the girls' rooms. well, for sure sadie's room.

here's the fabric for that...love the orange and pink combo!

for the baby's room, i tentatively like these fabrics,

but not totally sure that they go with the wall color. we're not painting, so it's still this color:

it's got a bit of blue in the flowered fabric...what do you think? i don't want to be totally matchy matchy, and i also want to steer clear of light colors, i had enough of that with sadie's nursery.

...is done with her tangent about fabric.

...is making pulled pork sandwiches for dinner tonight, yum! it's made with root beer...i'll let you know how it was!

...is done typing.

...but still let me know what you think about the fabric!

Thursday, January 28, 2010

crafts. messes. how fun.

sadie and i did a little valentine's day crafting today. and by we, i mean me.

she did help me clean up the little foam hearts...kinda. well, she handed a few to me.


we made this cute little garland for her play kitchen. i got a container of foam hearts in the dollar spot at target last year, and remembered to break them out this year before valentine's day had come and gone.

(a huge accomplishment in and of itself!)


and just to keep it real, this is what the sadester was doing off camera...knocking off all her alphabet magnets into the pile of play food she had pulled out earlier.

har har.


in the spirit of keeping it real...this is what the other side of the playroom looks like most of the time.


although, look at the pretty storage! nagging works! just kidding, rory. we finally got some storage out there last weekend, and after putting everything away i just sat and looked at it. ahh.
(it looked better than this picture.)

i am a nerd, i know.


Oh, and check out my giveaway on my favorite everything!

it's a valentine's day special!


Tuesday, January 26, 2010

play time

this is sadie's favorite new game...line up the play horses on top of the stable. it's so cute.

my dad made me the stable, along with some fences, and stalls, when I was a little girl. i was QUITE horse crazy. we recently pulled it out, and sadie loves it.

i made some place mats for sadie's play table the other night, quick and easy! some muslin, flannel batting, and patchwork is all it took.

please ignore the stray thread...

Monday, January 25, 2010

ruffly heart shirt tutorial

want to make a sweet valentine's day shirt for your little one? even if she doesn't smile in pictures? then, read on!


Click below for more details!


for this shirt, you'll need:
one t-shirt
fat quarter of material, or large scrap

sewing machine
disappearing ink pen


first, cut two strips of fabric 22x2 inches
fold them in half lengthwise, and sew 1/4 inch seam down the side, making a tube.
turn inside out ( i use tweezers...it takes forever...anyone have a trick?), and press with iron, pressing the seam to the back.

edit:
as you all know, i am blond (though not naturally), and pregnant (naturally), so I had forgotten the safety pin trick! In the comments, Nikki kindly reminded me of that trick. (though i really needed a smack on the noggin) thanks Nikki!

so, the trick: when you turn the tube inside out, you pin a safety pin on one end, and pull it through, inching it down the tube, and then pulling the fabric through.

then, cut out a heart shape out of paper in the size you'd like for your shirt.
trace around it with your disappearing ink pen.
next, starting at the top arch, sew onto your shirt, following the line, and pleating and rufflying (is that a word?), til you reach the end of one side of your heart, making sure to tuck both ends under and sew down, backing up a few stitches on both ends.

then, using your other tube, start from the bottom of the heart going to the top. when you're done, clip your threads and admire your super cute, easy peasy valentines day shirt!


it may not be perfect, but it sure is cute!

featured on craft gossip!

***If you have used any of my tutorials, I'd love if you'd add a quick pic to my flicker group! Thanks!***

Sunday, January 24, 2010

couldn't help myself...

plan on seeing many more pairs of shoes. ;)

Saturday, January 23, 2010

crafting, for hope.

you've probably heard about craft hope's etsy store by now...what an amazing way to help the haiti people. they've raised over $20,000 already for Doctors Without Borders. they're accepting donations again in a few weeks, and i'll be planning on donating some onesies, but for now, i did my part by purchasing a super cute, fun, and EASY mary jane shoe pattern. sold here. also check the craft hope store for other fun things!

cute, no? and so easy, i whipped out these two pair in a nap time. strangely enough, sadie fits into the 3-6 month size (purple ones), but she's always had small feet. i'm gonna have to make more of these for the new baby! after all, she's gotta have a few new things of her own, right?
and as a good bye...sadie's cute face. ahh love this munchkin.

Friday, January 22, 2010

movin' around

there's been some shifting in the christian household over the past few weeks. what with the baby coming in about 5 months, we needed somewhere to put said baby.

so. we booted rory into the kitchen/family room, and got him this super nice desk off of craigslist to make him feel better about losing his man cave. although it wasn't so much a man cave as it was a room with a folding table, computer, rock band instruments, and a star wars poster on the wall. (someday honey, you can have another one.)


we're very happy with the desk, it was a great deal! we (meaning rory) did have to do a little work on it, the person who put it together didn't quite know how to handle a hammer apparently.

anyways...this leaves rory's old room available for...the sadester! her very own big girl room! i've gotta say, this gets me really excited, and it seems like sadie likes to hang out in there, too. we'll see how she feels once a crying baby "steals" her old room.

a pretty blank slate to work with! i've got big plans...and hopefully enough time to finish them all.

rory finished the closet doors and shelves last weekend, and sadie has already broken them in, as you can see. now, for a toddler bed, bedding, curtains, painting the dresser and nightstand, artwork, a book shelf, doll corner, and storage. can't wait!

Thursday, January 21, 2010

more felt food!


pizza with the works!

bag o' chips! (used a piece of clear vinyl for the front, i love how you can see the chips!

Wednesday, January 20, 2010

currently...

...drying out from errands this morning. it's been raining almost non stop for 3 days.

...starting to feel the ittle bitty baby kicks..love that!

...tired.

...cracking up at sadie. she likes to play in her closet with the doors closed. then, when i come to check on her, she gives me this LOOK, and shuts the door. (mom! go away) haha.


...slowly adjusting to sadie only getting one nap a day. it's more of an adjustment for me, than for her. she's like a ball of energy, while i'm like...PLEASE SIT STILL....i'm begging you!

...is having fun thinking of girl names.

...and trying to pick fabric for the new baby's bedding. it's so hard!

...rory is hinting at getting a stand mixer. bestill my heart!


...trying to decide between a Bosch and a Kitchen Aid. Anybody want to weigh in?

Monday, January 18, 2010

corsage shirt

i've got this white maternity shirt that had a little stain near the collar. darn! not really. it was the perfect candidate for a makeover!

so i went digging through all my bookmarked projects and found this cute tutorial for a corsage tee. found an old tank top in the refashion pile, cut it up, and 15 minutes later...had this! cute no? (ignore the wrinkles please) it was so easy and i saved a shirt destined for the trash. btw, i love the motherhood maternity tees. they fit perfectly (once you have a belly, that is), come in all kinds of colors, and are soft and comfy. just a plug. they're not paying me or anything. (wish they would...)

Friday, January 15, 2010

it's a.......party!

if you're dying to know what we're having (boy or girl), skip to the end if you must.

if you can stand waiting til the end of the post, continue reading about our "baby gender reveal" party!

this party almost didn't happen! i had been planning it for a few weeks, and had my ultrasound scheduled for this afternoon. (friday) well, i get a call thursday afternoon telling me it's been cancelled. what?! i call the lady back, have some words, and am very mad. (this is putting it mildly...i am pregnant...hormones and everything...) LUCKILY!...i was able to get another appointment for this morning at another location. PHEW! (and i got to find out three hours sooner!) so it worked out.

before you think i'm so clever or something....(though feel free if you like)...i got the idea here,
and thought it would be so fun to do! really, i just wanted an excuse to throw a party. har har.

the old stand by-tissue puffs! my favorite party decoration ever!

cupcakes...we'll get back to these special treats later.

everyone digging into the grub, black and white bean dip, chips, ranch crackers, veggies and dip, and mini cheesecakes. oh, and goldfish and pretzels for the kiddos. (or anyone...)

everyone was asked to dress in either blue or pink, depending on of course, what their guess was for the sex of the baby! to be fair, rory and i dressed in blue and pink, respectively, as to not blow the surprise.

as you can see, we were pretty evenly matched! 12 for blue...(although i don't know if baby dylan should count...hehe)

and 10 for pink!

back to the cupcakes...like the inspiration party, i used cupcakes to reveal the gender...only i filled them with colored icing. then, when they bit into the cupcakes...whala! tada! it's a....

...can you tell? (i need to work on my cupcake filling skillz)

PINK! it's a girl!

we're super excited! both rory and i guessed a girl..and he's excited because we don't have to buy clothes or redo the nursery. lol. i may change the nursery up a tad, but definitely not as much as if it would have been a boy! now we're throwing around names and having fun imagining two cute sisters playing together and sharing their toys and clothes lovingly. (ha!) we taught sadie to say sister today too, although it sounds a lot like thank you. huh.

can't wait!

Wednesday, January 13, 2010

currently...

...hungry. but what's new?

...frustrated that sadie gets up an hour and a half earlier in the morning this days.

...getting a lot of play time out of a $1 magna doodle.

...trying to decide what color to paint sadie's dresser.

...super happy with our craigslist dresser. (minus the mirror) only $50!

...getting ready to find out what baby #2 will be! (ultrasound friday...friday evening we're having a gender reveal party. have no idea what that is? you'll find out!)

...super excited about decorating sadie's "big girl" room!


...needs to go to the post office.


...and costco.

...and get diapers.

...back in the elliptical routine. while watching biggest loser. is there any better motivator?

...loving sadie's new hat. she put it on herself, i swear.

...needs a nap.

Tuesday, January 12, 2010

tunic shirt

i've had this shirt in my (getting quite ridiculously large) to-be-finished project pile for awhile, just waiting for me to sew on the stringy strap thing. finally did it, mostly because i was afraid of sadie growing out of it before she got to wear the darn thing. inspired by an oliver and s pattern.

recognize the material? i used it for my camera strap cover and a skirt i made myself. can you tell i love it? it was a thrifting find. sorry to not get a good shot of the whole shirt, but sadie just WOULD NOT stand still while i was taking pictures. oh well.

i embroidered the little patch on the front, freehanding it...and basically made the rest of it the same way as my mandarin collared shirt, except for cutting a slit a third of the way down the front for her head, and covering said slit with a few pieces of fabric folded over, and of course adding the tie, sewed around the neck, and then down the ties. i love how it turned out, she looks so cute in it. (i say that about everything though, and yes, i understand i am biased.)

Monday, January 11, 2010

crib book/toy holder tutorial

here is a quick tutorial for a little hangy thingy for your child's crib...fill it with books, toys, or binkies to keep them happy after naps. (or before...)

Click below for more details!


You'll need: sturdy fabric
interfacing
snaps
ribbon (to decorate)
thread, sewing machine, yada yada...the basics.

first, measure your crib to make sure these measurements work...if they're different, you'll have to adjust obviously...but i think most crib slats are standard sizes these days... don't quote me on that.

I cut my main pieces of fabric 19"x 16", allowing 1/2" seam allowance, so your finished holder should be 18" x15" (ish) You'll need two of this size.

Apply your interfacing with the instructions included.
cut 6 pieces of fabric 2 1/4" x 10" (again, make sure, if your top crib bar is wide, to lengthen these pieces so they'll be able to wrap around the bar.

Apply your interfacing to these pieces, then cut each piece in half.
taking your strips of material, sew two pieces, right sides facing together, along three sides, making sure one of the narrow ends is open for turning. Trim corners and edges, and turn right side out. press with your iron.
this is what your straps should now look like. half way there!
back to measurements...when i measured where i wanted my straps, i made sure they fell between each bar. I placed them at, measuring from the left, 3/4", 7 1/2", AND 13 3/4". didn't get a picture of this, but then, placing the straps at the correct measurements, sew right sides of your large pieces of fabric together, with the raw edges of the straps poking out of your seam. (hope that made sense.) turn right side out, and make sure it lines up on your crib. adjust if necessary!
now if you'd like to embellish your pocket a little, now's your shot. i folded up the bottom edge so that the pocket measured about 5-6 inches deep. then i lined up some ribbon, sewed it into place along the bottom of one of the pieces.

now, placing right sides together, sew around the whole large piece of fabric, and leave a space to turn, about 3-4". turn right side out, press all edges, fold up the pocket, (sew along the top of the pocket first, before sewing around the outside edges)

and sew along the outside edges. (use a heavy duty needle...cause it's thick stuff!)
set your snaps on your straps, and you're good to go!
let me know if you have any questions! thanks!

this tutorial was featured on craft gossip!

***If you have used any of my tutorials, I'd love if you'd add a quick pic to my flicker group! Thanks!***


Blogging tips